- COURSES
- SPECIALS
- BLOG
- MEMBERS
- SHOP
- ABOUT
- ENROLL HERE
eBGP neighborship is the neighborship between two BGP routers in different Autonomous Systems. In other words, when BGP Neighborship is formed between two different Autonomous Systems, it is known as EBGP (External BGP) peering/neighborship. In this lesson, we will learn How to do Cisco eBGP Configuration on GNS3. We will focus on eBGP configuration on Cisco routers.
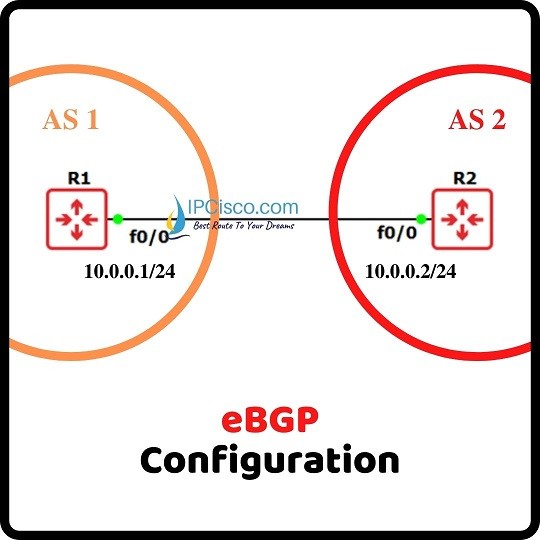
For our Cisco eBGP Configuration example, we will use the below GNS3 topology. It is a basic topology consist of two routers. Each of them represents a router in a different Autonomous System.
You can also check Packet Tracer BGP Configuration Example
Table of Contents
In this configuration example, firstly, we will configure interfaces with given ip addresses and then we will focus on the important part, Cisco eBGP configuration on GNS3. Here, we will use the given ip address for our ip addressing. R1 interface will be configured with 10.0.0.1/24 ip address and R2 will be configure 10.0.0.2/24 ip address. For eBGP peering, two routers should be directly connected to each other and must belong to the same subnet.
R1 # configure terminal
R1(config)# interface FastEthernet0/0
R1(config-if)# ip address 10.0.0.1 255.255.255.0
R1(config-if)# no shutdown
R2 # configure terminal
R2(config)# interface FastEthernet0/0
R2(config-if)# ip address 10.0.0.2 255.255.255.0
R2(config-if)# no shutdown
After ip addressing, we came to the key part of this configuration. Here, we will configure the neighbourship between BGP routers. After this configuration, they will be peers.
For eBGP neighborship, firstly, we will set BGP with AS number. And under this BGP process, we will use “neighbor” command with the neighbour ip address and its autonomous number.
You can download all GNS3 Labs
Firstly, let’s start with R1. Here, R1 is in the Autonomous System 1 and will be eBGP neighbour of another router under AS 2. So, we will use its own AS number to create BGP process and under it we will define eBGP neighborship.
R1(config)# router bgp 1
R1(config-router)# neighbor 10.0.0.2 remote-as 2
For R2, we will configure the similar parts. Here, we will use AS Number 2 to create BGP process and then we will add eBGP peer under it. For this second line, we will use remote as number with the ip address of the neighbour again.
R2(config)# router bgp 2
R2(config-router)# neighbor 10.0.0.1 remote-as 1
Here, the criteria for eBGP neighborship is being in different BGP Autonomous Systems.
We can also tweak some BGP parameter, for example here we will change the keepalive and hold down timer. So, what are these parameters, let’s firstly remember them.
Keep alive: Router will send keepalive packets after every defined x interval of time (e.g. 30 seconds)
Hold timer: Router will wait for specified y interval of time to receive reply from neighbour router for Keep alive message before tearing down the neighborship/peering (e.g. 90 seconds)
NOTE: Do not keep the BGP timers too aggressive.
Now, let’s configure these times under BGP process on both routers.
R1(config)# router bgp 1
R1(config-router)# timers bgp 30 90


Leave a Reply