- COURSES
- SPECIALS
- BLOG
- MEMBERS
- SHOP
- ABOUT
- ENROLL HERE
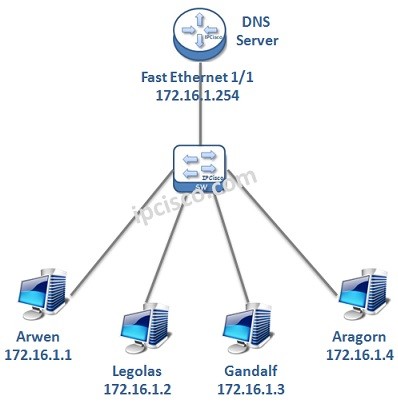
Table of Contents
To use DNS, firstly, we must configure a DNS Server. In a network, we can confgiure a router as a Domain Name System Server. In this lesson, we will talk about Cisco DNS Server Configuration, we will see how to configure a Cisco Router as a DNS Server in a network.
For our DNS Server Configuration Example, we will use the below topology:
To configure a Cisco Router as a DNS Server, we need to follow some basic configuration steps. These Cisco DNS Server configuration steps are below:
1. Enable DNS Server
2. Enable Domian Lookup
3. Public Name Server Configuration
4. Host / IP Address Mappings
5. Router Interface IP Configuration
6. Hosts IP Configuration
7. Configuration Verification
Now, let’s configure our Cisco Router as a DNS Server with the above steps
You can also Download Packet Tracer Labs
To enable DNS Server on the router, we will use “ip dns server” command. With this command, our router is becoming a DNS Server.
RouterA # configure terminal
RouterA (config)# ip dns server
We will define hostname-ip matchings manually. But what if there is a query different than them? At this time, router will query to an upper DNS Server that we will configure in the next step. To enable this query, we will use “ip domain lookup” command. With this command, router can query to the configured public DNS Servers if the record does not exist in it.
RouterA (config)# ip domain lookup
In this step, we will configure Public Name Servers. If the requested record is not in the host table, then router will query to these Public DNS Servers. Here, we can use one or more, any Public DNS Server addresses. To use these DNS Servers for queries, this feature must be enabled with “ip domain lookup” command.
RouterA (config)# ip name-server 1.1.1.1
RouterA (config)# ip name-server 2.2.2.2
In this step, we will give the Hostnames and their IP addresses to the DNS Server manually. With these records, DNS Server can answer to the requests.
RouterA (config)# ip host Arwen 172.16.1.1
RouterA (config)# ip host Legolas 172.16.1.2
RouterA (config)# ip host Gandalf 172.16.1.3
RouterA (config)# ip host Aragorn 172.16.1.4
We can check hosts on the router with “show hosts” command. This command will show manually configured hosts as permanent and dynamically learned hosts via Public DNS Server as temporary. Now, we have only manual permanent configurations. If there is an ip addresses learned via public DNS, it will be listed as temporary in this list.
Router# show hosts
Default domain is not set
Name/address lookup uses domain service
Name servers are 8.8.8.8Codes: UN – unknown, EX – expired, OK – OK, ?? – revalidate
temp – temporary, perm – permanent
NA – Not Applicable None – Not definedHost Port Flags Age Type Address(es)
Arwen None (perm, OK) 0 IP 172.16.1.1
Legolas None (perm, OK) 0 IP 172.16.1.2
Gandalf None (perm, OK) 0 IP 172.16.1.3
Aragorn None (perm, OK) 0 IP 172.16.1.4
Router’s Interface towards our network will be configured with an IP address in the same network with the hosts. Here, our router’s interface ip address is 172.16.1.254. This will be used as Default Gateway Address and DNS Server Address by hosts.
RouterA (config)# interface fastethernet 1/1
RouterA (config-if)# ip address 172.16.1.254 255.255.255.0
RouterA (config-if)# end
After this configuration, do not forget to save our configuration.
RouterA # copy running-config startup-config
You can also Download GNS3 Labs


Leave a Reply