Table of Contents
Network Preparation Before L2 VPN and L3 VPN Service Configuration
In the first part of this article series we talked about service terms and some steps about service creation and the preparing the network for service creation. Here, in this article, we will talk about the practical configuration of the network before service configuration. All these steps in this article are as a preparation for the service creation.
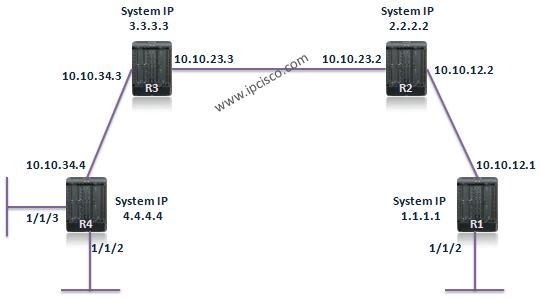
The below topology will be our reference during our configuration.

Here, we will do the configuration of R4 only. The other routers must be configured like R4.Let’s see the configuration step by step:
Step 1 – IGP must be configured.
To check the ospf neighborship use the “show router ospf neighbor” command.
Step 2 – Network must be converged.
With “show router route-table” command, you can check the routes if all the ospf routes are existing.
Step 3 – MPLS must be enabled.
You can check MPLS configuration with “info” command as other configuration checks.
You can also check mpls interfaces with the “show router mpls interface” command.
-RSVP must be enabled.-
RSVP is automatically enabled when the MPLS is enabled. You can check this, with the “info” command.
You can also use “show router rsvp interface” command to check RSVP enabled interfaces.
-LDP must be enabled for TLDP.-
After this configuration, you check the LDP with the “show router ldp status”, “show router ldp session” and “show router ldp discovery” commands.
Step 4 – MPLS Path must be created.
If RSVP-TE is used as the label switching protocol, then MPLS path must be created.
While creating the path, you can use “loose” instead of “strict”. Here, you can use strict when defining the node explicitly, meaning “go to the node,through this router”. And you can use loose when you think that “go to the node, but you define how”.
Step 5 – LSP must be created and the created path must bind to the LSP.
Step 6 – SDP must be created.
SDP must be created before the service creation. More than one service can be associated to a SDP, after this creation.
Above, you will use ldp instead of lsp, if you are using LDP instead of RSVP-TE.
Step 7 – Customer facing ports (access ports) configured.
You can also change the encapsulation type with the command “ethernet dot1q|null|qinq” .
After this last step, our network is ready to define services.
We will talk about configuring different services in the following articles. But as a summary, the service configuration steps are below:
1) Create a Customer with a Customer ID.
2) Create a service with Service ID that is associated with this Customer ID.
3) Define SAP.
4) Associate SDP to the service.
5) Enable service.
Optionaly, you can define the below additional steps:
6) Accounting
7) Filtering
8) Qos
With this two article, I tried to explain the configuration of the core before the service creation and configuration. I hope this articles will be helpful for you. In the following articles there will be more on Nokia Services. Keep on IPcisco.com ;)

Gokhan Kosem is a Network Engineer, Instructor and the Founder of IPCisco.com with 15+ years of experience in Cisco, Nokia, Huawei, Juniper, Linux, Service Provider Networks, Routing and Switching technologies.
He has worked on the backbone networks of major service providers and network vendors including Nortel, Alcatel-Lucent (Nokia) and has extensive hands-on experience with Cisco, Huawei, Juniper and Nokia networking technologies.
He has trained thousands of networking students worldwide through IPCisco.com, Udemy, books, labs, quizzes, and educational content across multiple social media platforms.
IPCisco.com | Best Route to Your Dreams
Related posts:
 MPLS Label Distribution Protocol, LDP – Part 5 (Export and Import Policy, Prefix Aggregation)
 MPLS Protection and Restoration – Part 3 (Path Diversity in Secondary Paths)
MPLS Label Distribution Protocol, LDP – Part 7 (CR-LDP)
MPLS Protection and Restoration – Part 3 (Path Diversity in Secondary Paths)
MPLS Label Distribution Protocol, LDP – Part 7 (CR-LDP)
 MPLS Protection and Restoration – Part 4 (Local Protection, Fast Reroute)


Leave a Reply