- COURSES
- SPECIALS
- BLOG
- MEMBERS
- SHOP
- ABOUT
- ENROLL HERE

Table of Contents
Juniper Networks is one of the most important network vendor in network world. Juniper routers are widely used in today’s networks. In this JNCIA-Junos Basic Juniper Router Configuration lesson we will focus on the initial configurations of Juniper Routers. With this lesson, you will learn How To Configure Juniper Routers. Here are the steps of the basic Juniper router configuraiton on Juniper CLI Junos.
Cisco vs Juniper vs Huawei vs Nokia Configuration Commands
The first thing you will see is the default user name “Amnesiac” on the screen.
Amnesiac (ttyv0)
After that the “login: “ word will appear and here, FreeBsd wants the initial user name from you. And Juniper default login, this user name is “root” at the beginning.
login: root
But FreeBsd CLI is not the exact point for us. To exit here and enter the Juniper CLI Junos, we will use “cli” command. Here the “>” sign will show that we are in the junos.
Root % cli Root >
Now you are in Junos, but in “operational mode”. In here you can monitor and trace the network, but you can not configure anything. For configuration, you must enter the “configuration mode”. To do this use, “configure” command. Here the “#” sign will show that we are in the configuration mode.
Root > configure

[edit]
Root #
In configuration mode we can configure everything we want. But here, there is an important point. There is also a statement hierarchy. In Junos for configuration take effect, we must use “commit” command. And to use this command, firstly we must give the Junos a “root password” that is not configured by default. To configure the root password, we must enter the “system configuration” part.
[edit]
Root # edit system

[edit system]
Root #
In edit system part, we can use both “plain-text” or “encrypted passwords”. Here we will use the encrypted password.
[edit system]
Root # set root-authentication encrypted-password your_password
If you want to use less secure plain-text password, you can use “set root-authentication encrypted-password” and after that you will enter the desired password and confirm it by writing secondly.
Here, we must use “commit” command to take effect the root-authentication.
[edit system]
Root # commit
After assigning a root-password, we can commit any configuration changes.
As a second configuration in system part, we can give a hostname to the Router.To do this we will use “host-name” command under the [edit system] hierarchy.
[edit system]
Root # host-name Route1Note:
Under this hierarchy you can set many things, but the scope of this article is only limited with some basic necessary information about Junos configuration.
After hostname, let’s assign a ip address to our one of the interfaces. In Junos ip assignment is a little complex than Cisco IOS. But after the configuration, while monitoring the configuration Junos i more effective I think. To assign an ip address to an interface, firstly we must exit the previous [edit system] hierarchy and after that we must enter the [edit interfaces] hierarchy.
[edit system]
Root # exit

[edit]
Root # edit interfaces

[edit interfaces]
Root #

[edit interfaces]
Root # set em0 unit 0 family inet address 10.0.0.1/24
As you see, we are travelling between the hierarchies by “exit” and “edit” commands. There are also, “up”, “down”, and “top” commands for this journey.
Under this hierarchy, to assign an ip address to an interface, we must enter some more hierarchies or we can use one command set to do this job.Here we will use this command set to show you one of the efficent part of Junos.
Here, we use “em0” interface to assign an ip address. “Unit 0” after the em0 is logical interface name and “family inet address” phrase is mentioning the address family(Ipv4).
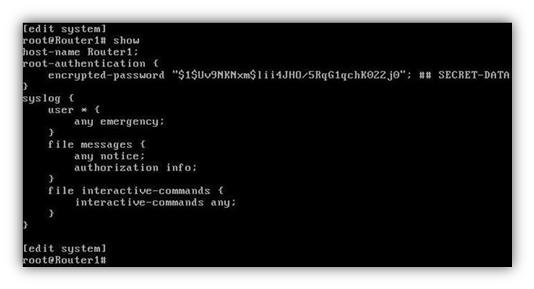
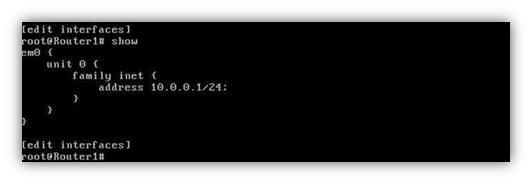
You can see both the configuration effects under [edit system] hierarchy and [edit interfaces] hierarchy below:
In this basic Juniper Router Configuration lesson, you have learned How To Configure Juniper Routers. You can do more configurations on JUNOS to gain more Juniper JUNOS hands on experience.
Cisco vs Juniper vs Huawei vs Nokia Configuration Commands


Leave a Reply