In this DHCP Cisco Packet Tracer router example, we will focus on DHCP Configuration in Cisco Packet Tracer. In other words, we will see how to configure a DHCP Server with Packet Tracer Router. Before start up I want to give some basic information about DHCP.
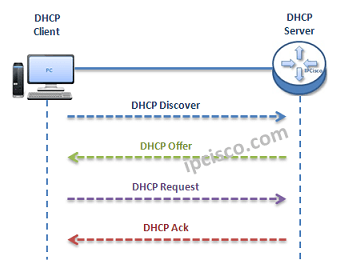
As you know DHCP uses UDP 67 and UDP 68 ports. It has a messaging system for the communication between DHCP Server and DHCP Client. These messaging system’s messages and their types are mentined below:
- DHCP Discover (broadcast)
- DHCP Offer(broadcast)
- DHCP Request (broadcast)
- DHCP Ack (broadcast)
- DHCP Nak (unicast)
- DHCP Release (unicast)
- DHCP Decline (unicast)
- DHCP Inform (unicast)
You can Reach All Cisco Packet Tracer Labs and DOWNLOAD the Packet Tracer Examples with .pkt format.
You can DOWNLOAD this lessons Packet Tracer Example with .pkt format HERE.
- Firstly, a client sends a broadcast “DHCP Discovery” message that mentions that it need an ip address.
- Then, the DHCP servers reply with configuration offers to the client by “DHCP Offer” unicast message
- After that DHCP client sends a broadcast “DHCP Request” message to the network with the “Transaction ID” of the first DHCP Server that send Offer. The other servers understand that client wants to use the server that has the related “Transaction ID”.
- Lastly, the Server sends a unicast “Acknowledgement” message to the client that mentions the ip assignment is successfully done or it send a refuse messaged named “DHCP-NACK”.
To configure a Packet Tracer Router ’s DHCP, we must follow some basic steps. For this configuration the important point is broadcast domains. If we have only one broadcast domain in our topology, our work is simpler, else we must get help from “ip-helper address” command.
What is ip helper address command? Ip helper address command is the command that helps us to convince the router and make it pass the broadcast packets.
Now, let’s go to our two different configuration topology and see how to configure a server in packet tracer for DHCP, how to configure a DHCP Server in packet tracer.
Table of Contents
DHCP Packet Tracer Config For One Broadcast Domain
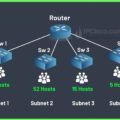
Our one broadcast domain topology is like below. There is a router that will carry our DHCP server role beside its routing functionalities. And there is a switch for PCs.

Firstly, let’s see How to Configure a DHCP Server on a Packet Tracer Router for One Broadcast Domain. For this first case of our DHCP Cisco packet tracer example, the One Broadcast Domain topology that we will use, is like below. There is a router that will carry out Server role beside its routing functionalities. And there is a switch for PCs.
On routerA, firstly we will give an ip address to the router interface that is connected to the switch.Secondly that we will create a DHCP pool named IPD. In this pool we will mention ip addresses that will be given to the DHCP clients. After that we will assign the router’s interface address as a default-router address for clients. And in the last part, we will exclude some addresses with “ip dhcp excluded address” command, that we don’t want to use during this dynamic ip assignments. With “ip dhcp excluded address” command, the mentined addresses will not used in the pool.
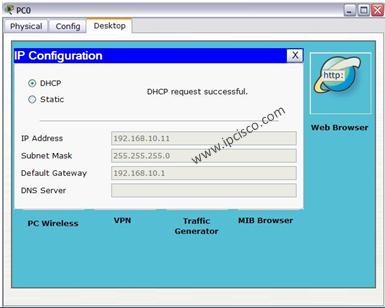
After this configuration, when we check the ip address of PC0, we will see the ip address 192.168.10.11 . Because it is the first available address in DHCP pool.
Packet Tracer DHCP Config For Multiple Broadcast Domains
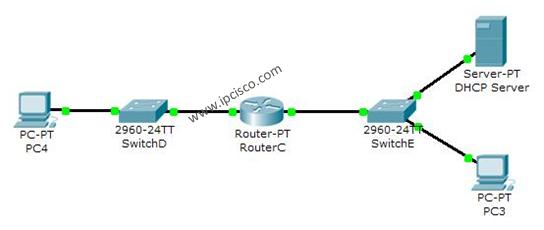
Our second case is how to enable DHCP on router for multiple broadcast domains. In our second Cisco packet tracer example, we will use ip helper, cisco command “ip helper-address“. So, what is ip helper address?
Many CCNAs learn that routers do not pass broadcasts. But progress in CCIE, network engineers learn that it is not true. Because you can pass broadcast traffic for many protocols as DHCP by “ip-helper address” command. Here we will refer only the broadcast of DHCP requests. We can use a router as a DHCP Server again, but I use a separate DHCP Server instead of router in this topology.
")
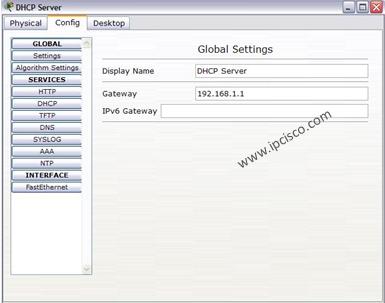
In the first place we will configure the DHCP Server for its DHCP pools and its ip configuration. The ip address is 192.168.1.10 and the default gateway will be the routers interface’s ip address that is face to DHCP server.
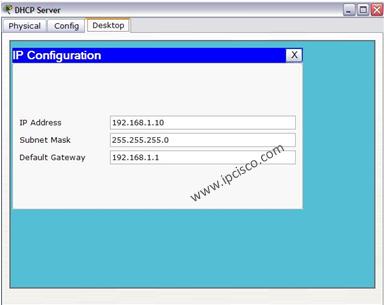
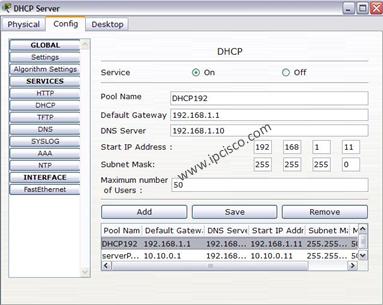
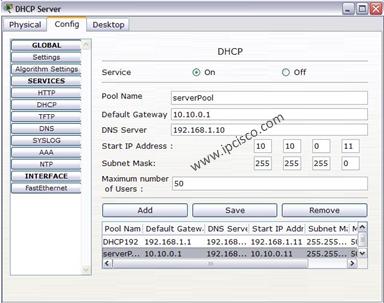
For the subnets 192.168.1.0 and 10.10.0.0 there must be two DHCP pool.The below screenshot is showing how these assignments will be done in DHCP Server.
In the Packet Tracer router the following configuration will be done for two different subnet DHCP achivement:
After this configuration, we can try dynamic ip assignment on PC by selecting the dynamic option on ip configuration screen like below.
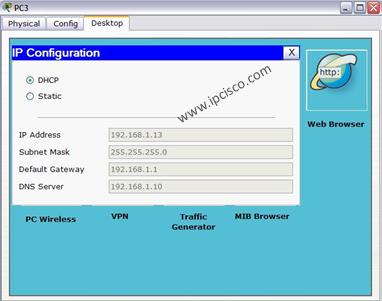
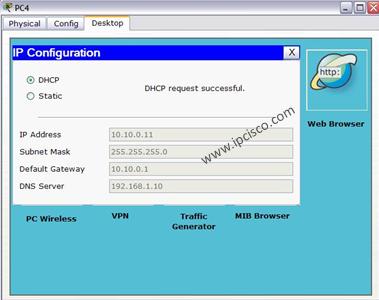
As you can seee, our PCs get their IP configuration from DHCP Server. The IP assignment is done automatically.

Packet Tracer Router Configuration Basics
Here, I would like to give you some information about how to configure a Cisco router on Packet Tracer basically. This is not a part of DHCP Configuration, but they are essentials for router configuration. So, here, we will learn how to set our laptop to connect a router, how to change a router’s name, how to set passwords on the Cisco routers, how to set console Access and basic static routing configuration step by step.
Laptop Configuration to Connect a Router
In Cisco Packet Tracer, you can directly click routers and connect them. But if you would like to do this via Console connection with a laptop with console cable as in real world, you can do it with a laptop and router. To do this, you need to set laptop terminal software setting and then a console cable to connect laptop and router.
When you click laptop on cisco packet tracer, you will see some tabs. In the desktop tab, there is a terminal configuration. When you click it, you will see the terminal settings. If you would like to connect to a router, you should set the settings as below:
Bits Per Second: 9600
Data Bits: 8
Parity : None
Stop Bits : 1
Flow Control : None
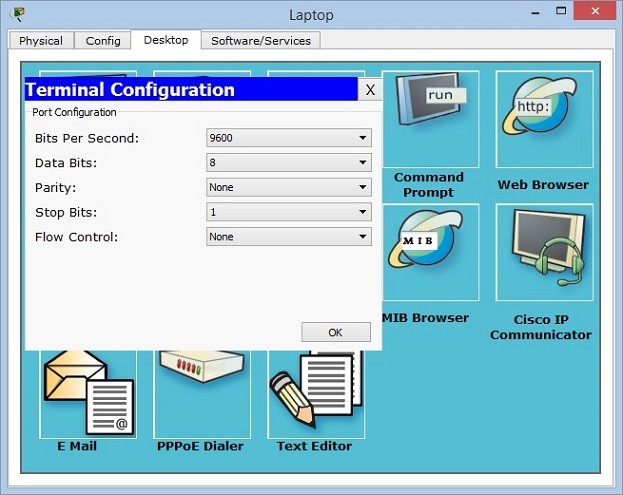
After setting these configurations, you will be ready to connect your router in packet tracer.
How to start configuration on a Cisco router?
In all routers, there are special configuration commands to start the router configuration. In Cisco routers this is also a standard. To start to configure a router on packet tracer, we should use firstly “enable” command. This will give us an administrator privilege and then we will use “configure terminal” to start our packet tracer router configuration. You can use this long version or you can use even “conf t” to do this.
How to Configure Router Name?
All routers have a default name. But generally, this name is changed to have more meaningful router names. These router names can show the location of a router, its level, importance etc. With one or more word, we can give a special name to the routers on packet tracer.
To give a router name to a Cisco router on packet tracer, we use “hostname” commands. We can use this command in configuration mode of Cisco routers. Here, we can set our router’s name as XYZ
How to Configure Enable Secret Password?
To secure our router, firstly we should give a password to this router. There are different passwords used in Cisco routers. One of the basic passwords used in routers is “enable password”. This is the password that keeps the password as clear text. But there is also another password called “enable secret password”. This password keeps passwords with MD5 and it is more secure. You can see the value of enable password clearly in configuration, but you can not see enable secret password in configuration.
Here, let’s configure our enable secret password as abc123.
By the way the command to encrypt passwords is “service password-encryption”. We will use this command to encrypt our passwords.
How to Configure Console Access on Cisco Routers?
Console connection is need to be done before your connection. It is the basic router configuration that is required to connect to the router with a laptop.
We use “line console 0” command to access console configuration. We will determine a password, let’s do it as abcdef. After that we will use “login” keyword.
Beside this basic console configuration, there are also some other configuration steps under this console access that will help you during our packet tracer router configuration a lot. These commands are:
- logging synchronous
- exec-timeout
- history size
With logging synchronous, we can set console synchronization to avoid command corruption. If we do not use this command, router can print some outputs during we are entering the commands and after a while this can be annoying.
Exec timeout is the command that is used to adjust router timeout. This can be set with minutes and seconds. If you do not want any timeout, you can use 0 with this command. Here, we will use 3 minutes 30 seconds. After this period, if there is no action, router will go to the timeout. By the way the default timeout time is 10 minutes for Cisco routers.
The last command is related with the command history. We can set the last remembered commands with history command. Here, we will set is as 20 commands.
How to Set Interface IP Addresses on Cisco Routers?
One of the most important and mostly done configuration is interface configurations on the routers. So, how to give an ip address and activate an interface of a Cisco router? We will use “ip address” command with the name of the interface on the routers. Here, let’s configure GigabitEthernet 0/0 of the router with the ip address 192.168.0.5/24.
All the interfaces of the routers are shutdown by default. So, to open these ports, we should use “no shutdown” command.
After this configuration, our port can be up or down according to the other end. If there is no problem at the other end and there is configuration, then our port will be up.
How to Configure Static Routing on Cisco Routers?
Static Routing is the simplest and most used routing type on routers. Sometimes we need to use static routing in packet tracer router configurations. So, here, we will see how to configure static routing basically.
For static routing we will use “ip route” command with the destination network, subnet mask and the gateway that we will go firstly to access this network. Think about that, we should access 10.0.0.0/24 network and our gateway to access this network is 172.16.0.1. So, our static routing configuration will be like below:
Basic Packet Tracer Router Verification Commands
After basic configurations, you can check your configurations with basic router verification commands. Some of these commands are given below:
- show startup-config
- show running-config
- show interfaces
- show ip route
show startup-config shows the beginning configuration that is stored in NVRAM.
show running-config shows current configuration. It is stored in RAM.
With show interfaces command, you can check the status and the configurations of the interfaces.
With show ip route command, you can see the routing information both static routing and dynamic routing.
There are many other show commands used in routers. You will be familiar with all of these with more practice on Cisco Packet Tracer. In the following lessons, we will see all these commands one by one.


Gokhan Kosem is a Network Engineer, Instructor and the Founder of IPCisco.com with 15+ years of experience in Cisco, Nokia, Huawei, Juniper, Linux, Service Provider Networks, Routing and Switching technologies.
He has worked on the backbone networks of major service providers and network vendors including Nortel, Alcatel-Lucent (Nokia) and has extensive hands-on experience with Cisco, Huawei, Juniper and Nokia networking technologies.
He has trained thousands of networking students worldwide through IPCisco.com, Udemy, books, labs, quizzes, and educational content across multiple social media platforms.
IPCisco.com | Best Route to Your Dreams


hi
thanks a lot
i passed ccna and enjoyed from your post and you solve my problem with dhcp config in packet tracer!
another my problem is config dhcp with different vlans and 1 dhcp server(like part2 of this project) in packet tracer .
do you have a project about that?
Hi Halleh,
Congratulations for your achievement! I am happy if my article was useful for you;)
As you know some DHCP packets are broadcast, and so they do not pass any broadcast domain.
You should cheat the router with ip helper-address:)
If you give the command “ip helper-address dhcpaddress” command to the interface of the router that is in another broadcast domain,
then you will able to set the DHCP to a different broadcast domain. Here, ip helper-address command will change the 255.255.255.255
broadcast address to a unicast address (DHCP server’s address).
I hope this will be useful for you;)
hi gokhan
can packet tracer 5.3.2 provide dhcp to multi vlans from one server?
can serverP-T in yoyr project allocate ip to pcs in different vlan?
Hi Halleh,
Yes it can allocate ip to different vlans by ip helper-address command;)
pls can get me thru on how packet tracer 5.3.2 provide dhcp to multi-vlan from one server
thank u for ur post.. and it was really helpful :)
You welcome Radio…ipcisco.com is a new website, I hope it will be more helpfull in the following days;)
hi
i want to configure dhcp on router. how to configure if have more than two switches in the network.
pl help
hi
thank u for ur post.. and it was really helpful
You are welcome, Mehrzad ;)
Hi Gokhan,
As per this article i am trying to configure DHCP in packet tracer. I am trying to configure “ip helper-address” in interface mode and “ip dhcp-server” in global config mode but none of them is working. I tried these two commands in router as well as in layer 3 switch but failed. My actual intention is to assign ip address from DHCP server to phone and pc where phone is connected to layer 2 switch and pc is connected to the phone. There are two layer 3 switches in between layer 2 switch and DHCP server. Every thing is working fine except this DHCP configuration in layer 3 switch and phones and PCs are not getting ip address. Please help me in this scenario.
DHCP server–L3 switch–L3 switch–L2 switch—IP phone(DHCP client)–PC(DHCP client)
Its very helpfull for me.
thanks
Hey. Please help me to create 3 Lan, 3 Wan . Using 3 switches and as you many as you can PC. Here our IP address 192.170.9.0/26
ASAP
Can i create a user authenticated dhcp server in cisco packet tracer?How?
Wow I learnt hw n\w are intersting from ur post
hi gokhan
i followed the tutorial you made but suddenly the pc4 wont received an ip address via dhcp but the pc3 has a dhcp ip add ,,, can u help me? thank in advance
Thank you for the post… very helpful :)
I have configured DHCP but not able to get ip for the desktop
thanks a lot..learning here first about dhcp..
@sanjev
It works for me.may be u missed to change static radio button to dhcp.
thank u very much.
hi merc
do u have bgp scenario?
if u have plz send me.
thanks
Hi Gokhan,
Thank for your useful posts, i want to request u for a dhcpv6 config tutorial with command explanation.
Thanks…
Thank you!!!!!
Thanks for the help was able to pass my ccna successfully and to finish my projects as well, unlike most sites you made things simple and straight to the point,thanks.
hello.I am Iranian
1.VLAN mode by using the Subnetting Packet tracer software by 300 client?
Very nice……helps me a lot
Made my day! Thanks alot!
Thank you a lot man! :D
Hey thanks ! this tutorial helped me a lot !
Its very helpfull for me.
thanks
Thanks, help me a lot.
best work keep up the good work
hi gokhankosem
Thank you so much it is very useful
hi,
DHCP request failed
why?
between router and switch is not connect :(
nice
Thank you for the notes. It was helpful. But I have some questions:
1-Why the RIP and static route config? Is it necessary for DHCP? Because if you just type and give them static IPs, they all the PC can ping each other without the routing config.
2- Using the configurations you provided, the 10.0.0.0 works fine. But the 192.x.x.x network does not. The hosts are given the gateway 0.0.0.0.
I am not sure what went wrong.
I hope you can help. Thank you again.
Nice share. helped me allot .
thanks it’s very help full for me.
hi
I do that but request failed. please help me in detail
best regards
Thanks for the post it really helped me in my CCn class thanks for ur efforts because of you i have got 10 out of 10 in my Assignment Thankyou be Happy as always :) :) :) :) :)
I am student of Comsats abbottabad Pakistan :) :)
Thankyou sir for the great post u did
actually today one of our teacher give us assignment in Router Dhcp and i have got the idea from your site thankyou …
it is very helpfull
thanks you for your configure dhcp
i want to know full advanced networking can u plz help me
hi gokhan , it’s very helpful though i still have one question in my mind , can the dhcp gives ip addresses through multiple routers? As i’m trying to have multiple routers and switches and i want them to be auto assigned with ip address and they can connect to each others
and what are the excluded addresses for?
In wirehark, why am is it recording packets from ip source that are not allocated?
I have written so many articles on DHCP configuration in detail.Hope you guys like it.
thanks very helpful
but i want save this i am not able to save help me
thank you dear
very helpful
Its helpful ever seen
when i change from static to DHCP it show me “DHCP failed. APIPA is being used””\
how can i fix it
Hello Sir,
I really thanks u for that training. I like to search and learn when I don’t know something.
If u see my comment. Could u reply to me mail as a hello.
Thanks
Nan Wai.
Always welcome Nan:) Good luck!
I don’t know how to thank for your tutorial and help
Thanks a lot and keep in touch.
You are always welcome Mohmed. Good luck!
Thank you. worked.
merci
Eangly you will restart your PC and check again.