Table of Contents
How to Configure DNS on Cisco Routers?
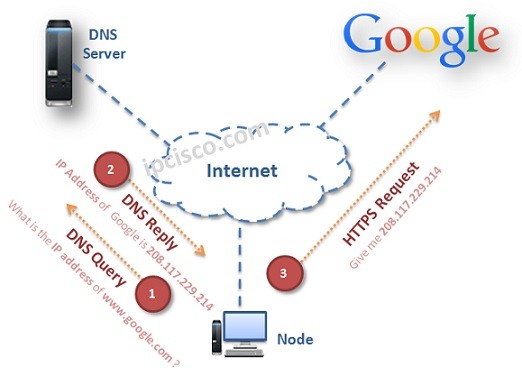
To use DNS, firstly, we must configure a DNS Server. In a network, we can confgiure a router as a Domain Name System Server. In this lesson, we will talk about Cisco DNS Server Configuration, we will see how to configure a Cisco Router as a DNS Server in a network.
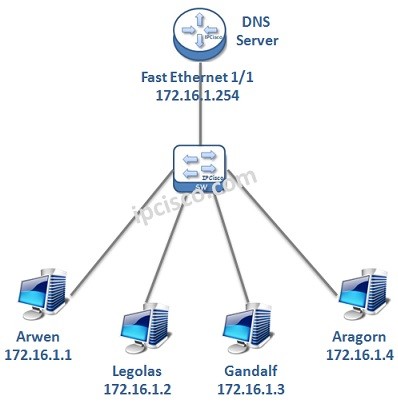
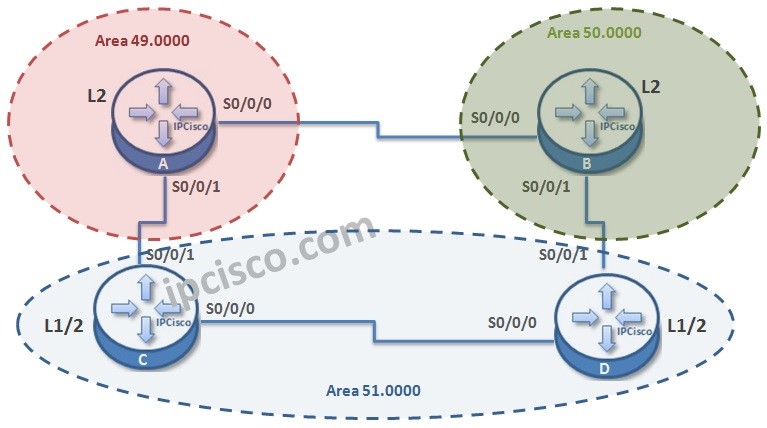
For our DNS Server Configuration Example, we will use the below topology:
To configure a Cisco Router as a DNS Server, we need to follow some basic configuration steps. These Cisco DNS Server configuration steps are below:
1. Enable DNS Server
2. Enable Domian Lookup
3. Public Name Server Configuration
4. Host / IP Address Mappings
5. Router Interface IP Configuration
6. Hosts IP Configuration
7. Configuration Verification
Now, let’s configure our Cisco Router as a DNS Server with the above steps.
Enable DNS Server
To enable DNS Server, we will use “ip dns server” command. With this command, our router is becoming a DNS Server.
RouterA # configure terminal
RouterA (config)# ip dns server
Enable Domain Lookup
To enable Domain Lookup we will use “ip domain-lookup” command.
RouterA (config)# ip domain-lookup
Public Name Servers Configuration
On the router, we will configure Public Name Servers. With this configuration, our DNS Server router will ask to the configured Public DNS Servers for every DNS Requests and replied back. Here, you can use any Public DNS Server addresses.
RouterA (config)# ip name-server 1.1.1.1
RouterA (config)# ip name-server 2.2.2.2
Host / IP Address Mappings
In this step, we will give the hostnames and their ip addresses to the DNS Server manually. With these information, DNS Server can answer to the requests coming by hostnames with IP addresses.
RouterA (config)# ip host Arwen 172.16.1.1
RouterA (config)# ip host Legolas 172.16.1.2
RouterA (config)# ip host Gandalf 172.16.1.3
RouterA (config)# ip host Aragorn 172.16.1.4
Router Interface IP Configuration
Router’s Interface towards our network will be configured with an IP address in the same network with the hosts. Here, our router’s interface ip address is 172.16.1.254. This will be used as Default Gateway Address and DNS Server Address by hosts.
RouterA (config)# interface fastethernet 1/1
RouterA (config-if)# ip address 172.16.1.254 255.255.255.0
RouterA (config-if)# end
After this configuration, do not forget to save our configuration.
RouterA # copy running-config startup-config


Gokhan Kosem is a Network Engineer, Instructor and the Founder of IPCisco.com with 15+ years of experience in Cisco, Nokia, Huawei, Juniper, Linux, Service Provider Networks, Routing and Switching technologies.
He has worked on the backbone networks of major service providers and network vendors including Nortel, Alcatel-Lucent (Nokia) and has extensive hands-on experience with Cisco, Huawei, Juniper and Nokia networking technologies.
He has trained thousands of networking students worldwide through IPCisco.com, Udemy, books, labs, quizzes, and educational content across multiple social media platforms.
IPCisco.com | Best Route to Your Dreams


Leave a Reply