- COURSES
- SPECIALS
- BLOG
- MEMBERS
- SHOP
- BOOKSHELF
- ABOUT
- ENROLL HERE
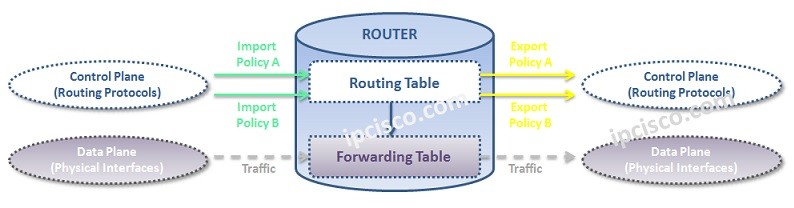
Routing Policies are the rules that allows you to control and modify the default behaviour of the dynamic routing protocols like RIP, OSPF, IS-IS etc. This type pf routing is called Policy Based Routing. With this control and modify mechanims, you can arrange the routing facilities for your network needs. In this juniper policy based routing example, we will focus on these policies and we will configure Juniper Routing Policy on Juniper routers.
A Routing Policy consist of different “terms”. This terms include “match” and “action” parts. A basic meaning of this is, the matched traffic with “match” field is behaved according to the “action” field.
To use a policy based routing and routing policy, firstly you need to create it. After this, you can use this policy by applying them to the routes.
Let’s see how to write a Juniper routing policy step by step.
Table of Contents
Before Juniper Routing Policy Configuration, let’s configure a basic Prefix List that we will use in the policy. Our Prefix List name will be OurPrefixList.
junos-user@Kosem> configure
[edit]
junos-user@Kosem# edit policy-options[edit policy-option]
junos-user@Kosem# prefix-list OurPrefixList[edit policy-option prefix-list OurPrefixList]
junos-user@Kosem# set 192.168.1.0/24[edit policy-option prefix-list OurPrefixList]
junos-user@Kosem# set 192.168.2.0/24[edit policy-option prefix-list OurPrefixList]
junos-user@Kosem# set 192.168.3.0/24[edit policy-option prefix-list OurPrefixList]
junos-user@Kosem# set 172.16.10.0/24[edit policy-option prefix-list OurPrefixList]
junos-user@Kosem# set 172.16.20.0/24[edit policy-option prefix-list OurPrefixList]
junos-user@Kosem# commit
commit complete.
Now, we can focus on our Routing Policy configuration.
A Routing Policy can be configured under “policy-options”. To create a Routing Policy, firstly, we need to go under policy-options. Prefix Lists are also configured under this hierarchy.
[edit]
junos-user@Kosem# edit policy-options[edit policy-options]
junos-user@Kosem#
Secondly, we will create our policy with its name. Here, we will use “policy-statement” command with determined policy name. As an example, our policy name is “OurPolicy”.
[edit policy-options]
junos-user@Kosem# policy-statement OurPolicy
Then, we will add the “terms” that we need. There are multiple “terms” in a Routing Policy.
[edit policy-options policy-statement OurPolicy ]
junos-user@Kosem# term ImportanRoutes
Now, it is time to write the match condition. We will say that if you see a prefix in ImportanRoutes prefix-list, then do the written action. Our action is accept.
[edit policy-options policy-statement OurPolicy term ImportanRoutes]
junos-user@Kosem# set from prefix-list ImportanRoutes[edit policy-options policy-statement OurPolicy term ImportanRoutes]
junos-user@Kosem# set then accept[edit policy-options policy-statement OurPolicy term ImportanRoutes]
junos-user@Kosem# up
After writing first term content, now we will write the second term content. Here, we will write give a name to the term and then we will give the action. This means that, for the remainning routes, do this action.
[edit policy-options policy-statement OurPolicy ]
junos-user@Kosem# term OtherRoutes[edit policy-options policy-statement OurPolicy term OtherRoutes]
junos-user@Kosem# set then reject[edit policy-options policy-statement OurPolicy term OtherRoutes]
junos-user@Kosem# commit
commit complete.
To verify our Routing Policy, let’s check our configuration.
junos-user@Kosem# show policy-options
refix-list OurPrefixList {192.168.1.0/24;
192.168.2.0/24;
192.168.3.0/24;
172.16.10.0/24;
172.16.20.0/24;
}policy-statement OurPolicy {
term ImportanRoutes {
from {
prefix-list OurPrefixList;
}
then accept;
}
term OtherRoutes {
then reject;
}
}
The last step that can affect the production network is applying routing policy to the protocol. We will do this by entering the protocol hierarchy. For example, for this time, let’s do it under bgp.
You can add the policy as internal or external or both. This is up to the network requirement.
[edit]
junos-user@Kosem# edit protocols[edit protocols]
junos-user@Kosem# edit bgp[edit protocols bgp]
junos-user@Kosem# import [OurPolicy][edit protocols bgp]
junos-user@Kosem# export [OurPolicy][edit protocols bgp]
junos-user@Kosem# commit
commit completed.
To verify our juniper policy based routing configuration, we can use “show protocols” command.
[edit protocols bgp]
junos-user@Kosem# show protocols
…
bgp {
import [OurPolicy];
export [OurPolicy];
….


Leave a Reply