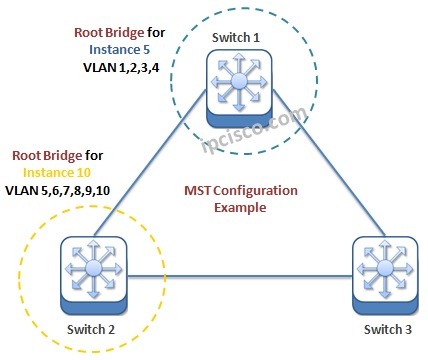
In this configuration example, we will learn How to Configure Spanning-Tree MST Mode on Cisco switches. BEfore, we have leared what is STP and MST. Now, we will learn Cisco MST Configuration. To configure MST (Multiple Spanning Tree), we will use the below topology.
Now, let’s start MST Configuration on Cisco.
Table of Contents
MST Configuration
How to Enter MST Cofiguration Mode?
To enter MST Configuration mode, we will use “spanning-tree mst configuration” command. On each switch, we will use this command.
How to check current MST Configuration?
After entering MST Configuration mode, we can check the current MST configuration with “show current” command under MST configuration mode.
As you can see above, by default, there is only instance 0 and all the VLANs (1-4094) are mapped to instance 0 on each switch.
MST Region Configuration
Now, we will configure the name of our MST region name and revision number. These region name and revision number will be used to identfy that belongs to a specific MST region. Here our MST region name will be XYZ and our revision number will be 3.
Next, we assign a region name and revision number. These are used to identify switches as belonging to a common MST region.
MST Instance Configuration
Now it is time to create new instances. To have new instances, we need to create this instances. Here, we will create Instance 5. We will add VLAN 1,2,3 and 4 to Instance 5.
Again, we will create another instance, instance 10. We will add VLAN 5, 6, 7, 8, 9 and 10 to Instance 10.
Checking New Instances and Associated VLANs
To check our new instances and the associated VLANs, we can use “show pending” command under MST configuration mode.
Manuplating Root Bridge Election for Each Instance
Now, we will set STP Priority values to manuplate root bridge selection for all these instances. As you know, the switch that has lowest bridge priority wins the elections and becomes the Root Bridge.

Gokhan Kosem is a Network Engineer, Instructor and the Founder of IPCisco.com with 15+ years of experience in Cisco, Nokia, Huawei, Juniper, Linux, Service Provider Networks, Routing and Switching technologies.
He has worked on the backbone networks of major service providers and network vendors including Nortel, Alcatel-Lucent (Nokia) and has extensive hands-on experience with Cisco, Huawei, Juniper and Nokia networking technologies.
He has trained thousands of networking students worldwide through IPCisco.com, Udemy, books, labs, quizzes, and educational content across multiple social media platforms.
IPCisco.com | Best Route to Your Dreams


Leave a Reply