
Table of Contents
How to Configure vSmart Controller?
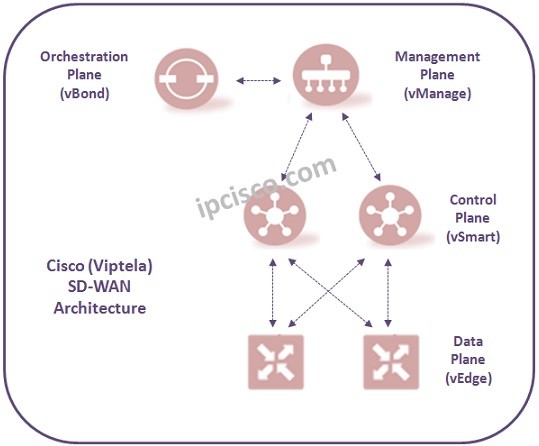
The Virtual Machines that we will use as Cisco (Viptela) vSmart Controller device come with a factory default configuration. We should do the initial configuration of some key parameters on Cisco vSmart Controller. With this initial configuration, our vSmart Controller can enroll to the Cisco SD-WAN Architecture. For Initial vSmart Controller Configuration, we will follow the below steps.
Connecting Cisco vSmart Controller
Firstly, we will connet our vSmart Controller device and then we will login with the default login credentials. The default credentials of Cisco (Viptela) devices are give below:
User : admin
Password : admin
To change this default password for admin user as “xxxxxx”, you can use “user admin password xxxxxx” command.
Configuring System Name and IP Address
To enter the configuration mode, we will use “config” command on our vSmart Controller device. We will change our system name as “Our_vSmart_C” and we will set System IP address as 2.2.2.2. System IP address is also used to communicate with vManage NMS in Cisco SD-WAN Architecture.
vBond# config
vBond(config)#system host-name Our_vSmart_C
Our_vSmart_C(config)# system-ip 2.2.2.2
Configuring Site ID
We can configure our vSmart Controller, as a vContainer Host. To do this we assign a “site-id” to our vSmart Controller. After this configuration, vSmart Controller’s public IP address is not accessible outside the vContainer Host.
Our_vSmart_C(config)# site-id 10
Configuring Domain ID
To identify the Domain from other domains in Cisco SD-WAN Architecture, we can use “domain-id”.
Our_vSmart_C(config)# domain-id 5
Configuring vBond Orchestrator IP Address
To connect vSmart Controller to a vBond Orchestrator, we will set our vBond Orchestrator’s IP address.
Our_vSmart_C(config)# vbond 100.100.100.5Here, we can also set the DNS name that connects us to our vBond Orchestrator. (For DNS XYZ)
Our_vSmart_C(config)# vbond XYZ
Configuring Interface under VPN 0
This interface will be our Tunnel interface in which the control traffic is carried in the Cisco SD-WAN Architecture. Our interface name will be “eth5”.
We will also enable tunnel interface under our interface. This is required that our vSmart Controller reside in Cisco SD-WAN Architecture.
Our_vSmart_C(config)# vpn 0
Our_vSmart_C(config-vpn-0)# interface eth5
Our_vSmart_C(config-interface)# ip address  192.168.0.1/24
Our_vSmart_C(config-interface)# no shutdown
Our_vSmart_C(config-interface)# tunnel-interface
Our_vSmart_C(config-tunnel-interface)# allow-service netconf
You can check also SD-WAN Verification Commands to verify this configuration in Cisco SD-WAN Architecture.
Saving Initial vSmart Controller Configuration
To save Cisco vSmart Controller configuration, we will use “commit” command. We can also use “commit-and-quit” command to exit from the configuration mode.
Our_vSmart_C(config-interface)# commit-and-quit
Verfication of Initial vSmart Controller Configuration
To verify our Initial vBond OrchestratorConfiguration, we can use “show running-config”.
vSmart# show running-config
system
host-name         Our_vSmart_C
gps-location latitude 92.457896
gps-location longitude 45.1274575
system-ip         2.2.2.2
site-id           200
organization-name "IPCisco"
clock timezone Istanbul
vbond 100.100.100.5
..
vpn 0
interface eth5
ip address 192.168.0.1/24
tunnel-interface
....

Gokhan Kosem is a Network Engineer, Instructor and the Founder of IPCisco.com with 15+ years of experience in Cisco, Nokia, Huawei, Juniper, Linux, Service Provider Networks, Routing and Switching technologies.
He has worked on the backbone networks of major service providers and network vendors including Nortel, Alcatel-Lucent (Nokia) and has extensive hands-on experience with Cisco, Huawei, Juniper and Nokia networking technologies.
He has trained thousands of networking students worldwide through IPCisco.com, Udemy, books, labs, quizzes, and educational content across multiple social media platforms.
IPCisco.com | Best Route to Your Dreams


Leave a Reply