- COURSES
- SPECIALS
- BLOG
- MEMBERS
- SHOP
- ABOUT
- ENROLL HERE
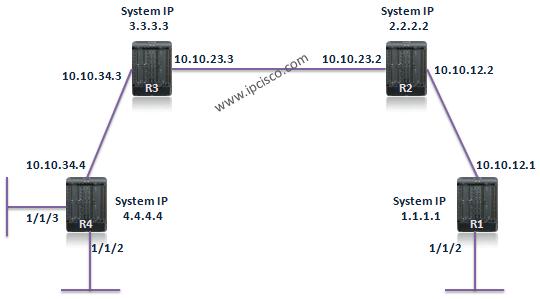
Table of Contents
In the first part of this article series, we will focus on Nokia Pre-Configurations For VPN Services Configuration. Here, in this article, we will talk about the practical configuration of the network before VPN Service Configuration. All these steps in this lesson are as a preparation for Nokia VPN Service Creation.
The below topology will be our reference during our Pre-Configurations For Nokia VPN Service Configuration.

We will follow the below configuration steps:
Here, we will do the configuration of R4 only. The other routers must be configured like R4.Let’s see the configuration step by step:
R4# configure router
R4>config>router# interface system
R4>config>router>if# address 4.4.4.4/32
R4>config>router>if# exit
R4>config>router# interface toR3
R4>config>router>if# address 10.10.34.4/24
R4>config>router# ospf
R4>config>router>ospf# traffic-engineering
R4>config>router>ospf# area 0.0.0.0
R4>config>router>ospf# interface system
R4>config>router>ospf>if# exit
R4>config>router>ospf# interface toR3
To check the ospf neighborship use the "show router ospf neighbor" command.
Network must be converge. With "show router route-table" command, you can check the routes if all the ospf routes are existing.
R4# configure router
R4>config>router# mpls
R4>config>router>mpls# interface system
R4>config>router>mpls>if# exit
R4>config>router>mpls# interface toR3
R4>config>router>mpls# exit
You can check MPLS configuration with "info" command as other configuration checks.
R4>config>router>mpls# info
            interface "system"
            exit
            interface "interface toR3"
            exit
            no shutdown
You can also check mpls interfaces with the "show router mpls interface" command.
RSVP is automatically enabled when the MPLS is enabled. You can check this, with the "info" command.
R4>config>router>rsvp# info
            interface "system"
            exit
            interface "interface toR3"
            exit
            no shutdown
You can also use "show router rsvp interface" command to check RSVP enabled interfaces.
R4# configure router
R4>config>router# ldp
R4>config>router>mpls# interface-parameters
R4>config>router>mpls>interface-parameters# interface toR3
R4>config>router>mpls>interface-parameters>if# exit
After this configuration, you check the LDP with the "show router ldp status", "show router ldp session" and "show router ldp discovery" commands.
If RSVP-TE is used as the label switching protocol, then MPLS path must be created.
R4# configure router mpls
R4>config>router>mpls# path to R1
R4>config>router>mpls>path# hop 10 3.3.3.3 strict
R4>config>router>mpls>path# hop 20 2.2.2.2 strict
R4>config>router>mpls>path# hop 30 1.1.1.1 strict
R4>config>router>mpls>path# no shutdown
R4>config>router>mpls>path# exit
While creating the path, you can use "loose" instead of "strict". Here, you can use strict when defining the node explicitly, meaning "go to the node,through this router". And you can use loose when you think that "go to the node, but you define how".
R4>config>router>mpls# lsp R4-R1
R4>config>router>mpls>lsp# to 1.1.1.1
R4>config>router>mpls>lsp# primary  toR1
R4>config>router>mpls>lsp>primary# exit
R4>config>router>mpls>lsp# no shutdown
R4>config>router>mpls>lsp# exit
SDP (Service Distribution Point) must be created before the service creation. More than one service can be associated to a SDP, after this creation.
R4# configure service
R4>config>service# sdp 50 mpls create
R4>config>service>sdp# far-end 1.1.1.1
R4>config>service>sdp# lsp R4-R1
R4>config>service>sdp# no shutdown
R4>config>service>sdp# exit
Above, you will use ldp instead of lsp, if you are using LDP instead of RSVP-TE.
R4# configure port 1/1/2
R4>config>port# shut
R4>config>port# ethernet mode access
R4>config>port# no shutdown
R4>config>port# exit
R4# configure port 1/1/3
R4>config>port# shut
R4>config>port# ethernet mode access
R4>config>port# no shutdown
R4>config>port# exit
You can also change the encapsulation type with the command "ethernet dot1q|null|qinq" .
After this last step, our network is ready to define services.
We will talk about configuring different Nokia VPN Services in the following articles. But as a summary, Nokia VPN Service Configuration steps are below:
Optionaly, you can define the below additional steps:
With this two article, I tried to explain the configuration of the core before the service creation and configuration. I hope this articles will be helpful for you. In the following articles there will be more on Nokia VPN Services. Keep on IPcisco.com ;)


Leave a Reply