- COURSES
- SPECIALS
- BLOG
- MEMBERS
- SHOP
- BOOKSHELF
- ABOUT
- ENROLL HERE
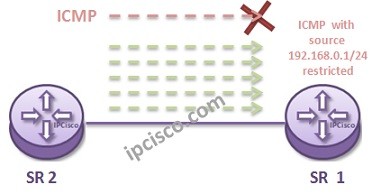
Here, we will show the IP Filter Configuration on Nokia (Formerly Alcatel-Lucent) Service Routers with an example. To do this, we will create an IP Filter on S1. And then deny the incoming ICMP traffic from a specific source prefix. For example such a configuration can be done to restrict specific users in the same subnet, to ping the Service Router.
You can also check the second Nokia IP Filter Example.
You can also check Cisco Packet Tracer Standard ACL Example and Extended ACL Example.
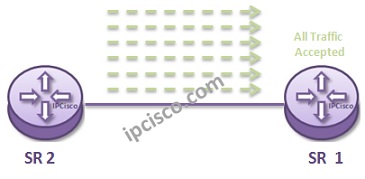
For our IP Filter Configuration Example, think about the below toplogy. As you can see, without an IP Filter, all traffic is accepted by the interface.
You can also download all Nokia Labs, on Nokia Configuration Labs Page.
To configure IP Filters in Nokia (formely Alcatel-Lucent) Service Routers, firstly we will create the IP Filter. We will do this with, “ip filter ip-filter-id” command. After this, we will write a description.
R1# configure filter
SR1>config>filter# ip filter 10 create
SR1>config> filter> ip-filter# description Prevent_Ping_List
After creating ip filter, now, we will determine the default action. This default actions means that, “do this if there is no match”. We can configure the default behavious as to “drop” the unmatched traffic or we can select to “forward”. Here, for our example, we will select “forward”.
SR1>config> filter> ip-filter#default action forward
Now, it is time to configure our entries. After creating the entry with entry-id, we will add the match criteries.
SR1>config> filter> ip-filter# entry 1 create
SR1>config> filter> ip-filter>entry# match src-ip 192.168.0.1/24
SR1>config> filter> ip-filter>entry# match protocol icmp
Here, we have created an entry that checks a source ip prefix and icmp protocol. If any traffic match one of them, IP Filter acts. What will it do? Let’s configure the action this time.
SR1>config> filter> ip-filter>entry# action drop
For this example, our action is “drop”. When a traffic match our match criterias,then it will be dropped.
Now, let’s configure the most important part. Associating the IP Filter with an interface through inbound or outbound. This is a criticcal issue in real networks especially. Because, if you apply a wrong IP Filter to a wrong interface, or if your IP Filter has actions to drop important traffic, you can face with an undesired traffic loss.
Here, we will add this IP Filter as ”ingress”.
SR1>config>router# interface “toSR2”
SR1>config>router>if# ingress
SR1>config>router>if>ingress# filter ip 10
Now, our IP Filter 10 is added under the interface “toSR2”. Here, “toSR2” is our Interface name. It is a configuration best practice to use such a meaningful names for the interfaces.
After this association, ICMP traffic will be resricted to enter SR1.
We can use IP Filters for various scenarious. To prevent the access of specific subnets, to allow only a specific destination, restrict specific ports, allow specific source etc. This is up to your security or management policy. Let’s shwo one more example and learn IP Filter better.


Leave a Reply