
- COURSES
- SPECIALS
- BLOG
- MEMBERS
- SHOP
- BOOKSHELF
- ABOUT
- ENROLL HERE

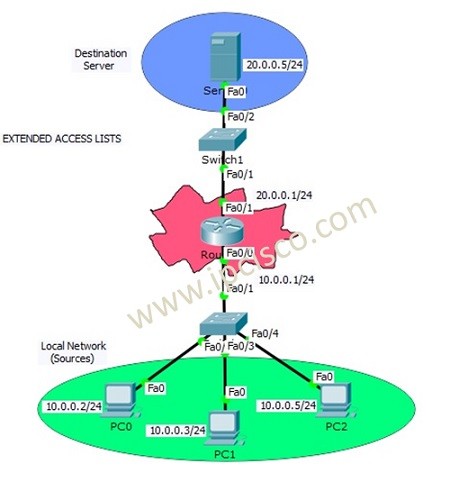
Table of Contents
We have learned Access Control Lists overview and Standard ACL Configuration at the previous lessons. In this lesson we will focus on Cisco Extended ACL Configuration with Cisco Packet Tracer. We will use the below topology for our Extended Access List Configuration Packet Tracer Example.
Let’s first remember What is Extended Access Control List? An Extended Access Control List (Extended ACL) is a type of access list used to filter network traffic based on different criterias. Extended Access Control Lists filter traffic with more detailed criteria than a standard ACL. Extended ACL allows to permit or deny traffic based on:
The range of Extended Access Lists are 100-199 are for Numbered ACLs and 2000–2699 for Expanded range.
You can DOWNLOAD the Cisco Packet Tracer example with .pkt format at the End of This Lesson.
Cisco Configurations Course With Packet Tracer
Like Standard ACL Configuration Example, we will use one router, one destination server and 3 PCs in common in this Extended ACL Setup Cisco Packet Tracer. The switches in the topology will onlyu used for port need.
Extended ACLs are a little complex if we compare with Standard ACLs. With Extended ACLs, we can restrict or allow specific things like destination, protocol or port.
In this Cisco Extended ACL Configuration example, we will allow/deny ICMP protocol through the server. As you know, ICMP is ping protocol. Here, PC0 and PC1 will be allowed and PC2 will be denied.
You can also learn DHCP Server Configuration With Packet Tracer
Let’s start to configure router for our Cisco Extended ACL Configuration Packet Tracer Example
For Extended ACLs, we can use Extended Access-List Number range 100 to 199. Here, we will use 100.
Router # configure terminal
Router (config)# ip access-list extended 100
Router (config-ext-nacl)# permit icmp 10.0.0.0 0.0.0.3 host 20.0.0.5
Router (config-ext-nacl)# deny icmp host 10.0.0.5 host 20.0.0.5 host-unreachable
Router (config-ext-nacl)# end
Router # copy run start
You can also DOWNLOAD all the Packet Tracer examples with .pkt format in Packet Tracer Labs section.
Here, we permit the PC0 and PC1 with permit line and the used wildcard mask. We will talk about wildcard mask later. And you can also use “ 20.0.0.5 0.0.0.0”, instead of “host 20.0.0.5”. It is the same meaning.
In the second permit/deny line, we denied ICMP from PC2 to server. Here, also we use host keyword to emphasize one IP host IP Address.
Now, it is time to add this Extended access-list to the interface. We will add this access-list , to the fastethernet 0/1.
Router (config)# interface fastethernet 0/1
Router (config-if)# ip access-group 100 out
Router (config-if)# end
Router # copy run start
As you can see, we add the access list 100 to the interface fastethernet 0/1.
After the Cisco Extended ACL Configuration, let’s verify the configuration. Here, we will ping from PCs to the servers and check if it is successful or not. For our configuration, PC0 and PC1 can ping the server, but PC2 can not. Because, we deny ICMP for PC2.
PC0> ping 20.0.0.5
PC1> ping 20.0.0.5
PC2> ping 20.0.0.5

In this verification ping, you can see that, PCO and PC1 can ping the server. They are allowed for ICMP. But, PC2 can not ping the server. On router , ICMP protocol is restricted from PC2 to server.

In this Extended Access-List example with Cisco Packet Tracer, we only see ICMP permit and deny. You can also do this with different protocol like telnet, ssh or different ports etc.
As we have talked about, in the Standard Access-List lesson, there is also one access-list type too. This is Named Access-List. But here, we will not give additional example for Named Access-List. Because, it is almost the same as Extended Access-List. There is only a naming difference.
At the end of this lesson, let’s briefly talk about Wildcard Masks. A Wildcard Mask is simply the inverse of a subnet mask. Let’s give an example.
Think about, we have a subnet mask 255.255.255.252. To find the wildcard mask of this subnet mask, firstly, we will convert the subnet mask into binary format. Then, to find the Wildcard Mask, simply we will change all 1s to 0s and all 0s to 1s. For 255.255.255.252 subnet mask, wildcard mask is 0.0.0.3.
Subnet Mask : 255.255.255.252
Binary : 11111111.11111111.11111111.11111100
Wildcard Mask : 00000000.00000000.00000000.00000011
Decimal : 0.0.0.3
Here are some examples:
| Subnet Mask | Wildcard Mask |
| 255.255.255.0 | 0.0.0.255 |
| 255.255.255.252 | 0.0.0.3 |
| 255.255.255.248 | 0.0.0.7 |
| 255.255.255.240 | 0.0.0.15 |
Simply remember this:
Wildcard Mask = 255.255.255.255 − Subnet Mask
Wildcard Mask as the inverse of a Subnet Mask.
We will use wildcard masks frequently in ACL, OSPF, EIGRP and many other Cisco configurations.
Extended ACL range is traditionally 100-199. There is als an expanded extended ACL list range. This range is 2000-2699.
This is one of the confused questions about access list placement. Network engineers generally think that if they place standard access list close to the destination or close to source. The answer of this question is Close to the Destination.
A Standard ACL filters traffic only based on the Source IP Address. It does not check destination IP, protocol, or port numbers. If you place a Standard ACL close to the source, you might accidentally block traffic that should be allowed to reach other destinations.
Location of exteded ACL is different than Standard ACL. Extended ACLs are placed Close to the Source.
Extended ACL filters traffic based on Source IP address, Destination IP address, Protocol (TCP, UDP, ICMP etc.), Port numbers (HTTP, SSH, FTP, etc.). If unwanted traffic is blocked near the source, it never travels through the network. This reduces unnecessary bandwidth usage, reduces router/traffic processing and improves network efficiency.

Gokhan Kosem is a Network Engineer, Instructor and the Founder of IPCisco.com with 15+ years of experience in Cisco, Nokia, Huawei, Juniper, Linux, Service Provider Networks, Routing and Switching technologies.
He has worked on the backbone networks of major service providers and network vendors including Nortel, Alcatel-Lucent (Nokia) and has extensive hands-on experience with Cisco, Huawei, Juniper and Nokia networking technologies.
He has trained thousands of networking students worldwide through IPCisco.com, Udemy, books, labs, quizzes, and educational content across multiple social media platforms.
IPCisco.com | Best Route to Your Dreams






Leave a Reply