- COURSES
- SPECIALS
- BLOG
- MEMBERS
- SHOP
- BOOKSHELF
- ABOUT
- ENROLL HERE
In this DHCP Cisco Packet Tracer router example, we will focus on DHCP Configuration in Cisco Packet Tracer. In other words, we will see how to configure a DHCP Server with Packet Tracer Router. Here, firstly we will focus on dhcp configuration inside a network. Then, we will learn dhcp configuration multiple networks with dhcp relay packet tracer example. So, how to configure DHCP on Cisco Router? Here are the basic steps:
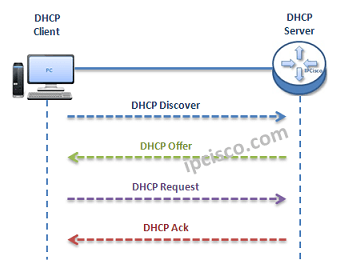
Before start up Packet Tracer DHCP setup, I want to give some basic information about DHCP. As you know DHCP uses UDP 67 and UDP 68 ports. It has a messaging system for the communication between DHCP Server and DHCP Client. These messaging system’s messages and their types are mentined below:
Access All Cisco Packet Tracer Labs and DOWNLOAD the Packet Tracer Examples with .pkt format.
You can DOWNLOAD this lessons Packet Tracer Example with .pkt format HERE.
To configure a Packet Tracer Router ’s DHCP, we must follow some basic steps. For this configuration the important point is broadcast domains. If we have only one broadcast domain in our topology, our work is simpler, else we must get help from “ip-helper address” command.
What is ip helper-address command? ip helper address command is the command that helps us to convince the router and make it pass the broadcast packets.
Now, let’s go to our two different configuration topology and see how to configure a server in packet tracer for DHCP, how to configure a DHCP Server in packet tracer.
Table of Contents
This single subnet DHCP packet tracer configuration scenario uses a single subnet where all clients receive IP addresses from one DHCP Pool. Our one broadcast domain topology is like below. There is a router that will carry our DHCP server role beside its routing functionalities. And there is a switch for PCs.

Firstly, let’s see How to Configure a DHCP Server on a Packet Tracer Router for One Broadcast Domain. In other words, we will configure router as DHCP server with packet tracer. For this first case of our DHCP Cisco packet tracer example, the One Broadcast Domain topology that we will use, is like below. There is a router that will carry out Server role beside its routing functionalities. And there is a switch for PCs.
On routerA, firstly we will give an ip address to the router interface that is connected to the switch.Secondly that we will create a DHCP pool named IPD. In this ip dhcp pool we will mention ip addresses that will be given to the DHCP clients. After that we will assign the router’s interface address as a default-router address for clients. And in the last part, we will exclude some addresses, we will do DHCP excluded‑address configuration. Here, we will use with “ip dhcp excluded address” command, that we don’t want to use during this dynamic ip assignments. With “ip dhcp excluded address” command, the mentined addresses will not used in ip dhcp pool.
RouterA# config terminal
RouterA(config)# interface fastEthernet 1/0
RouterA(config-if)# ip address 192.168.10.1 255.255.255.0
RouterA(config-if)# no shut

%LINK-5-CHANGED: Interface FastEthernet1/0, changed state to up
%LINEPROTO-5-UPDOWN: Line protocol on Interface FastEthernet1/0, changed state to up<
RouterA(config-if)# exit
RouterA(config)# ip dhcp pool IPD
RouterA(dhcp-config)# network 192.168.10.0 255.255.255.0
RouterA(dhcp-config)# default-router 192.168.10.1
RouterA(dhcp-config)# dns-server 4.4.4.4
RouterA(dhcp-config)# exit
RouterA(config)# ip dhcp excluded-address 192.168.10.1 192.168.10.10
RouterA(config)# ip dhcp excluded-address 192.168.10.12 192.168.10.14
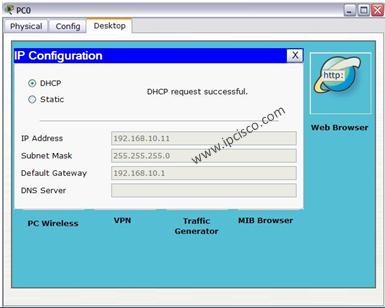
After this configuration, when we check the ip address of PC0, we will see the ip address 192.168.10.11 . Because it is the first available address in DHCP pool.
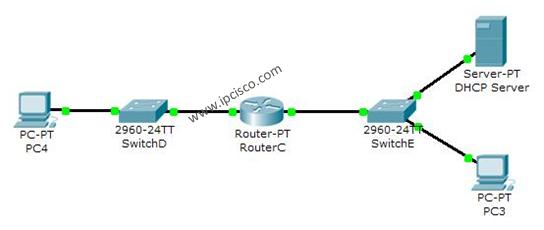
Our second case is how to enable DHCP on router for multiple broadcast domains. In our second Cisco packet tracer example, we will use ip helper, cisco command ip helper-address. So, what is ip helper-address command? In multiple broadcast domains, DHCP requests are forwarded using ip helper-address. In this packet tracer DHCP configuration for multiple broadcast domains example, we will use ip helper-address configuration.
Many CCNAs learn that routers do not pass broadcasts. But progress in CCIE, network engineers learn that it is not true. Because you can pass broadcast traffic for many protocols as DHCP by ip-helper address command. Here we will refer only the broadcast of DHCP requests. We can use a router as a DHCP Server again, but I use a separate DHCP Server instead of router in this topology.
")
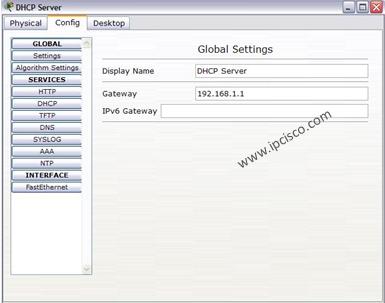
In the first place we will configure the DHCP Server for its DHCP pools and its ip configuration. The ip address is 192.168.1.10 and the default gateway will be the routers interface’s ip address that is face to DHCP server.
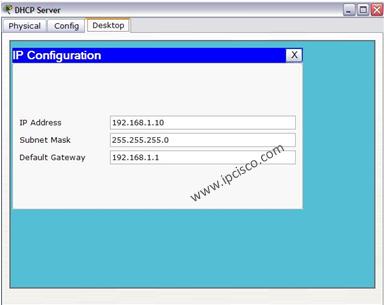
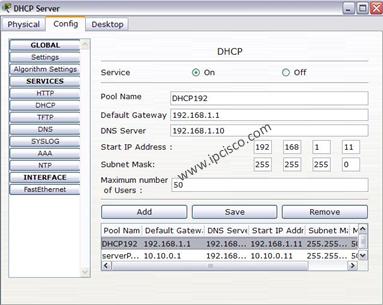
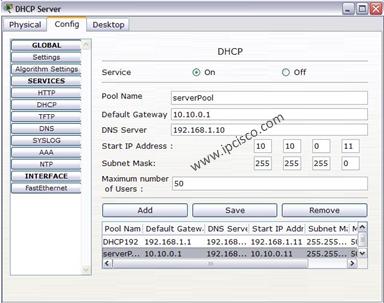
For the subnets 192.168.1.0 and 10.10.0.0 there must be two DHCP pool.The below screenshot is showing how these assignments will be done in DHCP Server.
In the Packet Tracer router the following configuration will be done for two different subnet DHCP achivement:
RouterC # config terminal
RouterC(config)# interface fa0/0
RouterC(config-if)# ip address 10.10.0.1 255.255.255.0
RouterC(config-if)# ip helper-address 192.168.1.10
RouterC(config-if)# no shutdown
RouterC(config-if)# exit
RouterC(config)# interface fa1/0
RouterC(config-if)# ip address 192.168.1.1 255.255.255.0
RouterC(config-if)# ip helper-address 192.168.1.10
RouterC(config-if)# no shutdown
RouterC(config-if)# end
RouterC# copy run start
After this configuration, we can try dynamic ip assignment on PC by selecting the dynamic option on ip configuration screen like below.
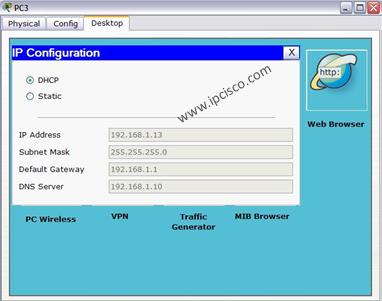
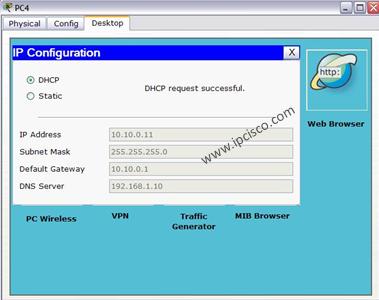
As you can seee, our PCs get their IP configuration from DHCP Server. The IP assignment is done automatically.

Single Broadcast Domain DHCP and Multiple Broadcast Domains DHCP are used in different cases. As their names implies, first one is used inside a network while the second one is used between one more networks. Here, DHCP server location is also different. Single domain DHCP Server is inn the same network with the clients. Multiple domain DHCP Server is in a centralized place or remote.
In single domain, DHCP request flow is direct broadcast while in multiple domain, it is forwarded via ip-helper address.
In single domain DHCP, one pool is enough while there must be multiple pools for multi domain dhcp.
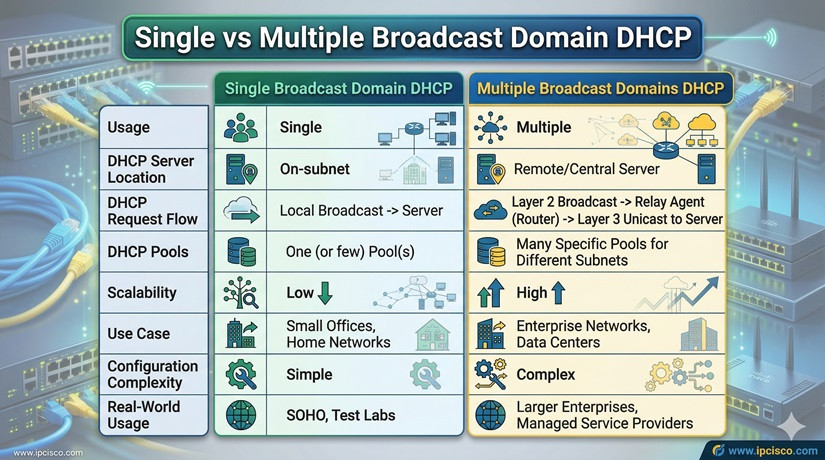
Single domain DHCP is not a scalable solution. Because all DHCP clients are in the same network. So, it is used in small local area networks like home networks. But mutli domain DHCP is scalable. It is used in enterprise networks, multi-VLAN environments etc.
Configuration complexity is also different. In single domian, it is esy to configure DHCP. But in multiple domain, we need extra commands and configurataion steps. So, it is more difficult.
In most real-world networks, multiple broadcast domains with DHCP Relay (ip helper-address) is used more. In other words, it is the most common real-life usage of Dynamic Host Configuration Protocol.
| Feature | Single Broadcast Domain DHCP | Multiple Broadcast Domains DHCP |
|---|---|---|
| Usage | Used within a single network | Used across multiple networks |
| DHCP Server Location | Same network as clients | Centralized or remote location |
| DHCP Request Flow | Direct broadcast | Forwarded via ip helper-address |
| DHCP Pools | Single DHCP pool | Multiple DHCP pools required |
| Scalability | Low (small networks) | High (enterprise networks) |
| Use Case | Home networks, small LANs | Enterprise, multi-VLAN environments |
| Configuration Complexity | Easy | More complex (requires relay configuration) |
| Real-World Usage | Less common | Most commonly used (DHCP Relay) |
Here, I would like to give you some information about how to configure a Cisco router on Packet Tracer basically. This is not a part of DHCP Configuration, but they are essentials for router configuration. So, here, we will learn how to set our laptop to connect a router, how to change a router’s name, how to set passwords on the Cisco routers, how to set console Access and basic static routing configuration step by step.
In Cisco Packet Tracer, you can directly click routers and connect them. But if you would like to do this via Console connection with a laptop with console cable as in real world, you can do it with a laptop and router. To do this, you need to set laptop terminal software setting and then a console cable to connect laptop and router.
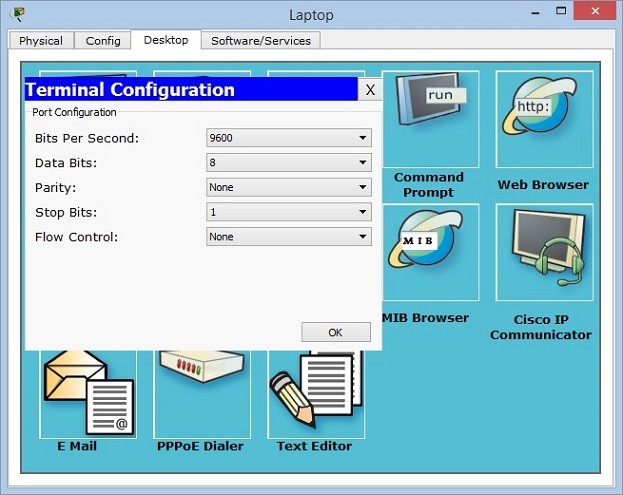
When you click laptop on cisco packet tracer, you will see some tabs. In the desktop tab, there is a terminal configuration. When you click it, you will see the terminal settings. If you would like to connect to a router, you should set the settings as below:
Bits Per Second: 9600
Data Bits: 8
Parity : None
Stop Bits : 1
Flow Control : None
In all routers, there are special configuration commands to start the router configuration. In Cisco routers this is also a standard. To start to configure a router on packet tracer, we should use firstly “enable” command. This will give us an administrator privilege and then we will use “configure terminal” to start our packet tracer router configuration. You can use this long version or you can use even “conf t” to do this.
Router> enable

Router# configure terminal
Enter configuration commands, one per line.  End with CNTL/Z.

Router(config) #
All routers have a default name. But generally, this name is changed to have more meaningful router names. These router names can show the location of a router, its level, importance etc. With one or more word, we can give a special name to the routers on packet tracer.
To give a router name to a Cisco router on packet tracer, we use “hostname” commands. We can use this command in configuration mode of Cisco routers. Here, we can set our router’s name as XYZ
Router(config)# hostname XYZ
To secure our router, firstly we should give a password to this router. There are different passwords used in Cisco routers. One of the basic passwords used in routers is “enable password”. This is the password that keeps the password as clear text. But there is also another password called “enable secret password”. This password keeps passwords with MD5 and it is more secure. You can see the value of enable password clearly in configuration, but you can not see enable secret password in configuration.
Here, let’s configure our enable secret password as abc123.
XYZ (config)# enable secret password abc123
By the way the command to encrypt passwords is “service password-encryption”. We will use this command to encrypt our passwords.
XYZ (config)# service password-encryption
Console connection is need to be done before your connection. It is the basic router configuration that is required to connect to the router with a laptop.
We use “line console 0” command to access console configuration. We will determine a password, let’s do it as abcdef. After that we will use “login” keyword.
XYZ (config)# line console 0
XYZ (config-line) # password abcdef
XYZ (config-line) # login
Beside this basic console configuration, there are also some other configuration steps under this console access that will help you during our packet tracer router configuration a lot. These commands are:
With logging synchronous, we can set console synchronization to avoid command corruption. If we do not use this command, router can print some outputs during we are entering the commands and after a while this can be annoying.
XYZ (config-line) # logging synchronous
Exec timeout is the command that is used to adjust router timeout. This can be set with minutes and seconds. If you do not want any timeout, you can use 0 with this command. Here, we will use 3 minutes 30 seconds. After this period, if there is no action, router will go to the timeout. By the way the default timeout time is 10 minutes for Cisco routers.
XYZ (config-line) # exec-timeout 3 30
The last command is related with the command history. We can set the last remembered commands with history command. Here, we will set is as 20 commands.
XYZ (config-line) # history 20
One of the most important and mostly done configuration is interface configurations on the routers. So, how to give an ip address and activate an interface of a Cisco router? We will use “ip address” command with the name of the interface on the routers. Here, let’s configure GigabitEthernet 0/0 of the router with the ip address 192.168.0.5/24.
XYZ (config) # interface GigabitEthernet 0/0
XYZ (config-if) # ip address 192.168.0.5 255.255.255.0
XYZ (config-if) # no shutdown
All the interfaces of the routers are shutdown by default. So, to open these ports, we should use “no shutdown” command.
After this configuration, our port can be up or down according to the other end. If there is no problem at the other end and there is configuration, then our port will be up.
Static Routing is the simplest and most used routing type on routers. Sometimes we need to use static routing in packet tracer router configurations. So, here, we will see how to configure static routing basically.
For static routing we will use “ip route” command with the destination network, subnet mask and the gateway that we will go firstly to access this network. Think about that, we should access 10.0.0.0/24 network and our gateway to access this network is 172.16.0.1. So, our static routing configuration will be like below:
XYZ (configf) # ip route 10.0.0.0 255.255.255.0 172.16.0.1
After basic configurations, you can check your configurations with basic router verification commands. Some of these commands are given below:
show startup-config shows the beginning configuration that is stored in NVRAM.
show running-config shows current configuration. It is stored in RAM.
With show interfaces command, you can check the status and the configurations of the interfaces.
With show ip route command, you can see the routing information both static routing and dynamic routing.
There are many other show commands used in routers. You will be familiar with all of these with more practice on Cisco Packet Tracer. In the following lessons, we will see all these commands one by one.


I really loved this article bitches
Always welcome Almaur:) Good luck!