- COURSES
- SPECIALS
- BLOG
- MEMBERS
- SHOP
- BOOKSHELF
- ABOUT
- ENROLL HERE
In this Packet Tracer configuration lesson, we will focus on How to Configure PAT on Cisco Packet Tracer. The other name of PAT (Port Address Translation) is NAT Overload. So, this config lab is also a CCNA NAT overload lab. Before Port Address Translation in Packet Tracer Configuration, let’s explain why we use NAT Overload (PAT) briefly.
In some cases there can be hundreds of Inside Local Addresses and at the same time your Global IP Addresses can be limited. At this time you can use PAT (Port Address Translation)instead of Static and Dynamic Dynamic NAT configuration In other words, with PAT (Port Address Translation), we translate each PC to a unique port number of a single public address.
Here, we will learn Cisco PAT Configuration with Cisco Packet tracer.
Access Complete Packet Tracer Configuration Course For Cisco Hands on Experience
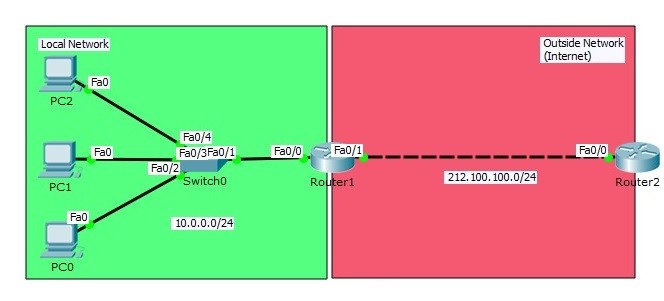
Firstly we identify the interfaces as inside and outside as before static and dynamic NAT configurations. Here, we will use the same topology like Dynamic NAT configuration article. Because, for PAT configuration, we need a small change on the configuration.
 topology")
PAT (Port Address Translation) Configuration Topology
Here, we will start with the IP address configurations firstly. Our PCs on Packet Tracer will be configured with below IP addresses.
PC0 : 10.0.0.2 255.255.255.0 GW:10.0.0.1
PC1 : 10.0.0.3 255.255.255.0 GW:10.0.0.1
PC2 : 10.0.0.4 255.255.255.0 GW:10.0.0.1
Router1(config)# interface FastEthernet0/0
Router1(config-if)# ip address 10.0.0.1 255.255.255.0
Router1(config-if)# no shutdown
Router1(config-if)# exit
Router1(config)# interface FastEthernet0/1
Router1(config-if)# ip address 212.100.100.2 255.255.255.0
Router1(config-if)# no shutdown
Router1(config-if)# exit
Router2(config)# interface FastEthernet0/0
Router2(config-if)# ip address 212.100.100.1 255.255.255.0
Router2(config-if)# no shutdown
Router2(config-if)# exit
Router2(config)# ip default-gateway 212.100.100.2
Router2(config)# no ip routing
Now, let’s do the classical NAT configuration and plus Port Address Translation configuration (overload).
Router1 (config)# interface FastEthernet0/0
Router1 (config-if)# ip nat inside
Router1 (config-if)# exit
Router1 (config)# interface FastEthernet0/1
Router1 (config-if)# ip nat outside
Router1 (config-if)# exit
After that we will use the below commands for PAT configuration:
Router1 (config)# access-list 10 permit 10.0.0.0 0.0.0.255
Router1 (config)# ip nat pool IPCISCO 50.50.50.80 50.50.50.80 netmask 255.255.255.0
Router1 (config)# ip nat inside source list 10 pool IPCISCO overload
Here, any match interface with access-list 10, will be translated with overload to the outgoing interface IP address of Router 1. The secret key word of PAT configuration is “overload“.
Let’s check the nat table on Router1.
Router1# show ip nat translations
Pro Inside global Inside local Outside local Outside global
icmp 50.50.50.80:1 10.0.0.4:1 212.100.100.1:1 212.100.100.1:1
icmp 50.50.50.80:2 10.0.0.4:2 212.100.100.1:2 212.100.100.1:2
icmp 50.50.50.80:3 10.0.0.4:3 212.100.100.1:3 212.100.100.1:3
icmp 50.50.50.80:4 10.0.0.4:4 212.100.100.1:4 212.100.100.1:4
You can also DOWNLOAD all Packet Tracer examples with .pkt format in Packet Tracer Labs
PC0>ping 212.100.100.1
Pinging 212.100.100.1 with 32 bytes of data:

Reply from 212.100.100.1: bytes=32 time=1ms TTL=254
Reply from 212.100.100.1: bytes=32 time=0ms TTL=254
Reply from 212.100.100.1: bytes=32 time=0ms TTL=254
Reply from 212.100.100.1: bytes=32 time=1ms TTL=254

Ping statistics for 212.100.100.1:
Packets: Sent = 4, Received = 4, Lost = 0 (0% loss),
Approximate round trip times in milli-seconds:
Minimum = 0ms, Maximum = 1ms, Average = 0ms
Router1# debug ip nat
IP NAT debugging is on
Router1#
NAT: s=10.0.0.2->50.50.50.80, d=212.100.100.1 [9]

NAT*: s=212.100.100.1, d=50.50.50.80->10.0.0.2 [32]

NAT: s=10.0.0.2->50.50.50.80, d=212.100.100.1 [10]

NAT*: s=212.100.100.1, d=50.50.50.80->10.0.0.2 [33]

NAT: s=10.0.0.2->50.50.50.80, d=212.100.100.1 [11]

NAT*: s=212.100.100.1, d=50.50.50.80->10.0.0.2 [34]

Router1#
NAT: s=10.0.0.2->50.50.50.80, d=212.100.100.1 [12]

NAT*: s=212.100.100.1, d=50.50.50.80->10.0.0.2 [35]
PC1>ping 212.100.100.1

Pinging 212.100.100.1 with 32 bytes of data:

Reply from 212.100.100.1: bytes=32 time=1ms TTL=254
Reply from 212.100.100.1: bytes=32 time=0ms TTL=254
Reply from 212.100.100.1: bytes=32 time=0ms TTL=254
Reply from 212.100.100.1: bytes=32 time=0ms TTL=254

Ping statistics for 212.100.100.1:
Packets: Sent = 4, Received = 4, Lost = 0 (0% loss),
Approximate round trip times in milli-seconds:
Minimum = 0ms, Maximum = 1ms, Average = 0ms
Router1#
NAT: s=10.0.0.3->50.50.50.80, d=212.100.100.1 [7]

NAT*: s=212.100.100.1, d=50.50.50.80->10.0.0.3 [42]

NAT: s=10.0.0.3->50.50.50.80, d=212.100.100.1 [8]

NAT*: s=212.100.100.1, d=50.50.50.80->10.0.0.3 [43]

...
PC2>ping 212.100.100.1

Pinging 212.100.100.1 with 32 bytes of data:

Reply from 212.100.100.1: bytes=32 time=1ms TTL=254
Reply from 212.100.100.1: bytes=32 time=11ms TTL=254
Reply from 212.100.100.1: bytes=32 time=0ms TTL=254
Reply from 212.100.100.1: bytes=32 time=0ms TTL=254

Ping statistics for 212.100.100.1:
Packets: Sent = 4, Received = 4, Lost = 0 (0% loss),
Approximate round trip times in milli-seconds:
Minimum = 0ms, Maximum = 11ms, Average = 3ms
Router1#
NAT: s=10.0.0.4->50.50.50.80, d=212.100.100.1 [23]

NAT*: s=212.100.100.1, d=50.50.50.80->10.0.0.4 [46]

NAT: s=10.0.0.4->50.50.50.80, d=212.100.100.1 [24]

NAT*: s=212.100.100.1, d=50.50.50.80->10.0.0.4 [47]
...
As a summary, PAT is used when you do not have enough public addresses for your inside network’s hosts. With Port Address Translation, you can use one public address and then you can multiple this address with port numbers.


Needed