- COURSES
- SPECIALS
- BLOG
- MEMBERS
- SHOP
- BOOKSHELF
- ABOUT
- ENROLL HERE
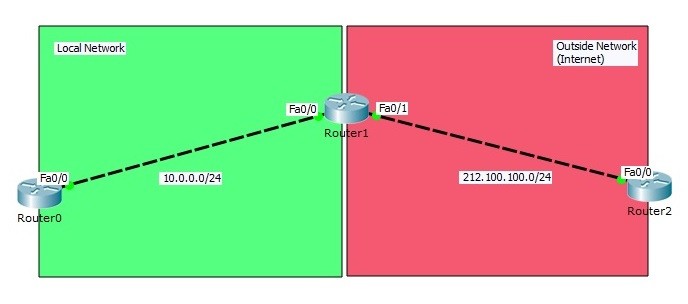
Table of Contents
In this example we will configure one of the NAT types, Static NAT (Network Address Translation) on Packet Tracer. For our Static NAT configuration, we will use the topology below.
You can DOWNLOAD the Cisco Packet Tracer example with .pkt format at the End of This Lesson.
You can also DOWNLOAD all Packet Tracer examples with .pkt format in Packet Tracer Labs section.
In this NAT topology, we will configure Static NAT on Router1. We wwill use Router0 and Router2 as host devices(For example like PCS).
 configuration")
Static NAT (Network Address Translation) Configuration Topology
Here firstly we will configure interface IP addresses on three of these routers. And then we will write static route from both ends to others. For IP connectivity, lastly we will ping from one end to other end. After this verification, our Static NAT configuration topology is ready for our NAT configuration.
In Router0 we will use private block IP address, because we will think that this area is our local network. In Router2, we will use public block IP addresses. Router2 will be like any place on internet.
Inside Local : 10.0.0.1
Inside Global : 212.100.100.10
Outside Local : 212.100.100.1
Outside Global : 212.100.100.1
Router0(config)# interface FastEthernet0/0
Router0(config-if)# ip address 10.0.0.1 255.255.255.0
Router0(config-if)# no shutdown
Router0(config-if)# end
Router0# copy running-config startup-config
Router1(config)# interface FastEthernet0/0
Router1(config-if)# ip address 10.0.0.2 255.255.255.0
Router1(config-if)# no shutdown
Router1(config-if)# exit
Router1(config)# interface FastEthernet0/1
Router1(config-if)# ip address 212.100.100.2 255.255.255.0
Router1(config-if)# no shutdown
Router1(config-if)# end
Router1# copy running-config startup-config
Router2(config)# interface FastEthernet0/0
Router2(config-if)# ip address 212.100.100.1 255.255.255.0
Router2(config-if)# no shutdown
Router2(config-if)# end
Router2# copy running-config startup-config
We will also set “no ip routing” on host devices (router0 and router2) and configure the default gateway address of host devices.
Router0(config)# no ip routing
Router0(config)# ip default-gateway 10.0.0.2
Router2(config)# no ip routing
Router2(config)# ip default-gateway 212.100.100.2
After IP connectivity, let’s check the packets situation by openning debug with “debug ip icmp” command. Till now, we did not configure any NAT on Packet Tracer. We will only see the packets source and destintion before Static NAT.
Firstly, we will open debug and then ping from Routere0 to Router2.
Router0# debug ip icmp
ICMP packet debugging is on
Router2# debug ip icmp
ICMP packet debugging is on
Router0# ping 212.100.100.1
Type escape sequence to abort.
Sending 5, 100-byte ICMP Echos to 212.100.100.1, timeout is 2 seconds:
!
ICMP: echo reply rcvd, src 212.100.100.1, dst 10.0.0.1
!
ICMP: echo reply rcvd, src 212.100.100.1, dst 10.0.0.1
!
ICMP: echo reply rcvd, src 212.100.100.1, dst 10.0.0.1
!
ICMP: echo reply rcvd, src 212.100.100.1, dst 10.0.0.1
!
Success rate is 100 percent (5/5), round-trip min/avg/max = 0/2/11 msRouter0#
ICMP: echo reply rcvd, src 212.100.100.1, dst 10.0.0.1
Router2# ping 212.100.100.1
Type escape sequence to abort.
Sending 5, 100-byte ICMP Echos to 212.100.100.1, timeout is 2 seconds:
!
ICMP: echo reply rcvd, src 212.100.100.1, dst 10.0.0.1
!
ICMP: echo reply rcvd, src 212.100.100.1, dst 10.0.0.1
!
ICMP: echo reply rcvd, src 212.100.100.1, dst 10.0.0.1
!
ICMP: echo reply rcvd, src 212.100.100.1, dst 10.0.0.1
!
Success rate is 100 percent (5/5), round-trip min/avg/max = 0/2/11 ms
As you can see, the ping reply is coming to destination 10.0.0.1. In real world, this is not possible, because this block is a private block and not routable on Internet. So, after our Static NAT configuration, this destination will change.
With help of NAT, we can still use our private blocks in our local network. And by changing our private blocks to public IP addresses, it allows us to reach internet.
Now, it is time to configure Static NAT. We will configure Static NAT on the middle router, on Router1. Here, FastEthernet0/0 will be configured as NAT inside and FastEthernet0/1 will be configured as NAT outside. Remember, your local network and internet.
Router1(config)# interface FastEthernet0/0
Router1(config-if)# nat inside
Router1(config-if)# exit
Router1(config)# interface FastEthernet0/1
Router1(config-if)# nat outside
Router1(config-if)# exit
Router1(config)# ip nat inside source static 10.0.0.1 212.100.100.10
Router1(config)# end
Router1# copy running-config startup-config
After this Static NAT configuration on Packet Tracer, let’s check the ICMP packets destination again. Again, we will ping from Router0 to Router2.
Router0# ping 212.100.100.1
Type escape sequence to abort.
Sending 5, 100-byte ICMP Echos to 212.100.100.1, timeout is 2 seconds:
!
ICMP: echo reply rcvd, src 212.100.100.1, dst 10.0.0.1
!
ICMP: echo reply rcvd, src 212.100.100.1, dst 10.0.0.1
!
ICMP: echo reply rcvd, src 212.100.100.1, dst 10.0.0.1
!
ICMP: echo reply rcvd, src 212.100.100.1, dst 10.0.0.1
!
Success rate is 100 percent (5/5), round-trip min/avg/max = 0/2/10 ms
Router2#
ICMP: echo reply sent, src 212.100.100.1, dst 212.100.100.10ICMP: echo reply sent, src 212.100.100.1, dst 212.100.100.10
ICMP: echo reply sent, src 212.100.100.1, dst 212.100.100.10
ICMP: echo reply sent, src 212.100.100.1, dst 212.100.100.10
ICMP: echo reply sent, src 212.100.100.1, dst 212.100.100.10
As you can se, our Static NAT configuration is OK. The destination of ICMP reply packets are 212.100.100.10. This is public block IP address and routable on internet. We can also check this on NAT table on Router1.

The other show command that can help you during NAT troubleshoooting are given below:
show ip nat translations show ip nat statistics clear ip nat translations
You can DOWNLOAD the Packet Tracer example with .pkt format HERE.

Gokhan Kosem is a Network Engineer, Instructor and the Founder of IPCisco.com with 15+ years of experience in Cisco, Nokia, Huawei, Juniper, Linux, Service Provider Networks, Routing and Switching technologies.
He has worked on the backbone networks of major service providers and network vendors including Nortel, Alcatel-Lucent (Nokia) and has extensive hands-on experience with Cisco, Huawei, Juniper and Nokia networking technologies.
He has trained thousands of networking students worldwide through IPCisco.com, Udemy, books, labs, quizzes, and educational content across multiple social media platforms.
IPCisco.com | Best Route to Your Dreams


Leave a Reply