- COURSES
- SPECIALS
- BLOG
- MEMBERS
- SHOP
- BOOKSHELF
- ABOUT
- ENROLL HERE
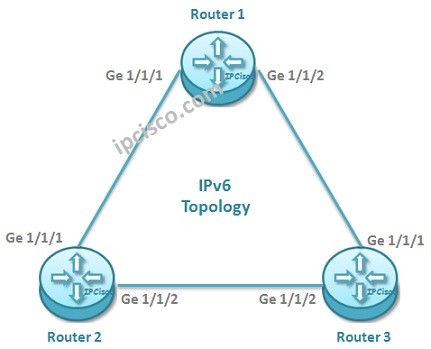
Table of Contents
In this configuration example, we will configure IPv6 Address on Juniper Routers. For our Juniper IPv6 Address Configuration Example, we will use the below IPv6 Topology consist of three Juniper routers. After this lesson, you can also check Cisco IPv6 Configuraiton with Packet Tracer.
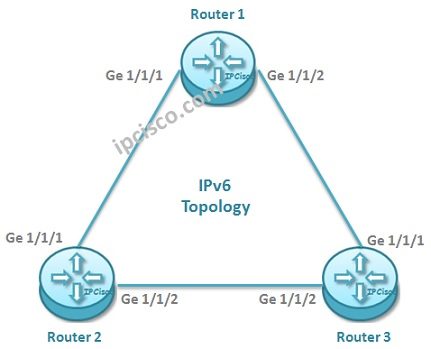
In this ipv6 configuration example, we will use the below IPv6 Addresses.
Router 1
Interface Ge 1/1/1 2001:aaaa::1/64 (To Router 2)
Interface Ge 1/1/2 2001:bbbb::1/64 (To Router 3)
Router 2
Interface Ge 1/1/1 2001:aaaa::2/64 (To Router 1)
Interface Ge 1/1/2 2001:cccc::1/64 (To Router 3)
Router 3
Interface Ge 1/1/1 2001:bbbb::2/64 (To Router 1)
Interface Ge 1/1/2 2001:cccc::2/64 (To Router 2)
Let’s configure each Juniper router interfaces with IPv6 addresses given above.
To configure IPv6 addresses on a Juniper router interface, firstly, we should go to the edit mode on a Juniper router. To do this, we will use “edit” command. After edit command, we can set interface ip addresses on our routers. To do this, we will use “set interfaces interface-name unit 0 family inet6 address ipv6-address” command.
To configure IPv6 Address of a Juniper router, firstly we should fo to the related IPv6 Interface. We will do this with the command “set interfaces ge-1/1/1 unit 0 family inet6“. After that, we will use “address” command and ip version 6 address of that interface. For this configuration, we will configure ge-1/1/1 interface of Router 1 with 2001:aaaa::2/64 address. And we will configure ge-1/!/2 interface with 2001:bbbb::1/64 address.
Router 1> edit
[edit]
Router 1# set interfaces ge-1/1/1 unit 0 family inet6 address 2001:aaaa::2/64
[edit]
Router 1# set interfaces ge-1/1/2 unit 0 family inet6 address 2001:bbbb::1/64
[edit]
Router 1# commit check
[edit]
Router 1# commit
We will configure second Juniper router with similar JUNOS commands.
Router 2> edit
[edit]
Router 2# set interfaces ge-1/1/1 unit 0 family inet6 address 2001:aaaa::2/64
[edit]
Router 2# set interfaces ge-1/1/2 unit 0 family inet6 address 2001:cccc::1/64
[edit]
Router 2# commit check
[edit]
Router 2# commit
Lastly, we will condifure interfaces of the third Juniper router with IP version 6 addresses.
Router 3> edit
[edit]
Router 3# set interfaces ge-1/1/1 unit 0 family inet6 address 2001:bbbb::2/64
[edit]
Router 3# set interfaces ge-1/1/2 unit 0 family inet6 address 2001:cccc::2/64
[edit]
Router 3# commit check
[edit]
Router 3# commit
After this Juniper ipv6 address configuration, we can check our interfaces with “show interfaces terse” and “show ipv6 neighbours” commands.
Router 1# show interfaces terse

Router 1# show ipv6 neighbours
Router 2# show interfaces terse

Router 2# show ipv6 neighbours
Router 3# show interfaces terse

Router 3# show ipv6 neighbours
Here, we need also a Static Route for all the routers. Or we can use a Routing Protocol. Because, there is one more network for each Router, that they are not directly connected. As you know, routers can reach only directly connected routers without an additional route.
Here, the better solution is writing a static route for each router. We will explain it in the Juniper Static Route configuration lessons. You can also check Cisco Packet Tracer IPv6 COnfiguration Example.


Leave a Reply