- COURSES
- SPECIALS
- BLOG
- MEMBERS
- SHOP
- BOOKSHELF
- ABOUT
- ENROLL HERE
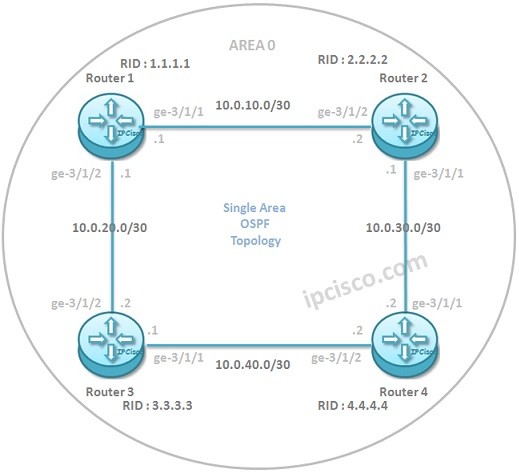
Table of Contents
In this Juniper OSPF Configuration, you will learn OSPFv2 Configuration on Juniper for Single Area OSPF. For this Juniper OSPF (Open Shortest Path First) Configuration Example, we will use the below OSPF topology consist of four routers. All of the Interfaces of these routers (each one has two interface here), will be in OSPF Area 0.
We will follow the below steps of Juniper OSPF Configuration one by one.
Let’s start to configure our OSPFv2 Example with Juniper Routes.
Juniper IS-IS Configuration Example
Cisco Packet Tracer Configuration Course
Cisco OSPF Configuration and Nokia OSPF Configuration
Firstly, we need to configure all the interface addresses as given above. The IP connectivity is the first must, to configure RIP or any other Routing Protocol.
We can do IP configuration with the below command set:
Router 1
Juniper-Router1@Kosem> configure

[edit]
Juniper-Router1@Kosem# set interfaces ge-3/1/1 unit 0 family inet address 10.0.10.1/30

[edit]
Juniper-Router1@Kosem# set interfaces ge-3/1/2 unit 0 family inet address 10.0.20.1/30
Router 2
Juniper-Router2@Kosem> configure

[edit]
Juniper-Router2@Kosem# set interfaces ge-3/1/1 unit 0 family inet address 10.0.30.1/30

[edit]
Juniper-Router2@Kosem# set interfaces ge-3/1/2 unit 0 family inet address 10.0.10.2/30
Router 3
Juniper-Router3@Kosem> configure

[edit]
Juniper-Router3@Kosem# set interfaces ge-3/1/1 unit 0 family inet address 10.0.40.1/30

[edit]
Juniper-Router3@Kosem# set interfaces ge-3/1/2 unit 0 family inet address 10.0.20.2/30
Router 4
Juniper-Router4@Kosem> configure

[edit]
Juniper-Router4@Kosem# set interfaces ge-3/1/1 unit 0 family inet address 10.0.30.2/30

[edit]
Juniper-Router4@Kosem# set interfaces ge-3/1/2 unit 0 family inet address 10.0.40.2/30
For OSPF Configuration, Router ID Configuration is very important. Many operations of OSPF is done by using Router ID. Router ID is an 32-bit number. To configure Router ID on the routers we will use the below commands.
By the way each router number will be used on the octets of OSPF Router ID. For example Router 1 ‘s OSPF Router ID will be configured as 1.1.1.1.
[edit]
Juniper-Router1@Kosem# set routing-options router-id 1.1.1.1

[edit]
Juniper-Router2@Kosem# set routing-options router-id 2.2.2.2

[edit]
Juniper-Router3@Kosem# set routing-options router-id 3.3.3.3

[edit]
Juniper-Router4@Kosem# set routing-options router-id 4.4.4.4
Our exact Juniper OSPF Configuration will be in this step. Here, we will add the networks under OSPF Area 0. This is Single Area OSPF Configuration, so we are using only one Area, Area 0 (Backbone Area).
Router 1
[edit]
Juniper-Router1@Kosem# set protocols ospf area 0.0.0.0 interface ge-3/1/1

[edit]
Juniper-Router1@Kosem# set protocols ospf area 0.0.0.0 interface ge-3/1/2
Router 2
[edit]
Juniper-Router2@Kosem# set protocols ospf area 0.0.0.0 interface ge-3/1/1

[edit]
Juniper-Router2@Kosem# set protocols ospf area 0.0.0.0 interface ge-3/1/2
Router 3
[edit]
Juniper-Router3@Kosem# set protocols ospf area 0.0.0.0 interface ge-3/1/1

[edit]
Juniper-Router3@Kosem# set protocols ospf area 0.0.0.0 interface ge-3/1/2
Router 4
[edit]
Juniper-Router4@Kosem# set protocols ospf area 0.0.0.0 interface ge-3/1/1

[edit]
Juniper-Router4@Kosem# set protocols ospf area 0.0.0.0 interface ge-3/1/2
Here, the configuration commands seem similar for all the routers. This is because we use the same interfaces on (ge-3/1/1 and ge-3/1/2) them.
After the OSPF Configuration, we need to commit all the configurations to take place. To do this, we use “commit” command on each router.
As a bect practice, before “commit”, we will ?use “commit check” on each router.
Juniper-Router1@Kosem# commit check
configuration check succeeds


Juniper-Router1@Kosem# commit
commit completed
After our configuration finishes, then we will verify our OSPF Configuration with some verification commands. We will use the below commands to verify our Juniper OSPF Configuration Example:
Let’s check Router 1’s configuration with this commands.
Juniper-Router1@Kosem# show ospf interface

Interface           State     Area            DR ID           BDR ID       Nbrs

ge-3/1/1           PtToPt   0.0.0.0        0.0.0.0         0.0.0.0         1

ge-3/1/2           PtToPt   0.0.0. 0       0.0.0.0         0.0.0.0         1
Juniper-Router1@Kosem# show ospf neighbor

Address         Interface             State      ID              Pri  Dead

10.0.10.2        ge-3/1/1                   Full      2.2.2.2       128   32

10.0.20.2        ge-3/1/2                 Full     3.3.3.3       128   34
Juniper-Router1@Kosem# show ospf database

OSPF link state database, area 0.0.0.10

Type       ID               Adv Rtr           Seq      Age  Opt  Cksum  Len

Router  *1.1.1.1       1.1.1.1        0x80000004  2553  0x2  0x1207  60

Router   2.2.2.2        2.2.2.2        0x80000004  2455  0x2  0x118a  60

Router   3.3.3.3        3.3.3.3        0x80000008  1454  0x2  0x11345  60

Router   4.4.4.4       “3.3.3.3       0x8000000c  1234  0x2  0x3569  60

OSPF external link state database

Type       ID               Adv Rtr           Seq      Age  Opt  Cksum  Len
Juniper-Router1@Kosem# show ospf statistics

Packet type             Total                  Last 5 seconds

Sent      Received        Sent      Received

Hello             14            15           0             0

DbD             12            24           0             0

LSReq              8             10           0             0

LSUpdate            345          1160           0             0

LSAck           2333           128           0             0

LSAs retransmitted: 2, last 5 seconds: 0

Flood queue depth: 0

Total rexmit entries: 0, db summaries: 0, lsreq entries: 0

Receive errors:
Juniper-Router1@Kosem# show route

inet.0: 4 destinations, 4 routes (4 active, 0 holddown, 0 hidden)

+ = Active Route, - = Last Active, * = Both


10.0.10.0/30       *[Direct/0] 00:54:11, metric 2, tag 0

> to 10.0.10.1 via ge-3/1/1

10.0.20.0/30        *[Direct/0] 00:54:11, metric 2, tag 0

> to 10.0.10.1 via ge-3/1/2

10.0.30.0/30        *[ OSPF/10] 00:54:11, metric 2, tag 0

> to 10.0.10.1 via ge-3/1/2

10.0.40.0/30        *[ OSPF/10] 00:54:11, metric 2, tag 0

> to 10.0.10.1 via ge-3/1/1
Juniper-Router1@Kosem# show ospf route

Prefix               Path   Route       NH   Metric  NextHop       Nexthop

Type   Type        Type         Interface     addr/label

10.0.30.0/30         Intra  Router      IP   1       ge-3/1/1.0

10.0.40.0/30         Intra  Router      IP   1       ge-3/1/2.0
Juniper-Router1@Kosem# show route protocol ospf

inet.0: 1 destinations, 1 routes (1 active, 0 holddown, 0 hidden)

+ = Active Route, - = Last Active, * = Both

10.0.30.0/30         [OSPF/10] 04:02:40, metric 1

> via ge-3/1/1

10.0.40.0/30         [OSPF/10] 04:02:40, metric 1

> via ge-3/1/2


Leave a Reply