- COURSES
- SPECIALS
- BLOG
- MEMBERS
- SHOP
- ABOUT
- ENROLL HERE
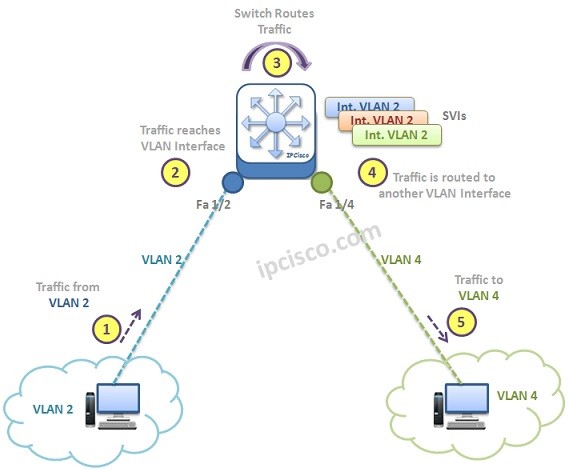
Table of Contents
A Switch Virtual Interface (SVI) is a logical Layer 3 interface configured on a multilayer switch to enable inter-VLAN routing. It allows devices in different VLANs to communicate with each other without using an external router. In other words, Inter VLAN Routing, Routing between VLANs can be achieved by SVIs (Switch Virtual Interfaces). Here, we need to have a Multi Layer Switch. Layer 2 switches can also have SVI, but only one. This is the default switch management SVI created for VLAN 1.
Want to configure SVI on a Cisco device? Check the Step-by-Step SVI Configuration Guide.
For Inter VLAN Routing, firstly, we need to use “ip routing” command on the multi layer switch that our VLANs reside. After this command, we can create a Switch Virtual Interface for each VLAN on the switch and we can assign an IP address to this SVI (Switch Virtual Interfaces). Then, At the multi layer switch, routing will be done and the communication between these VLANs will be provided.
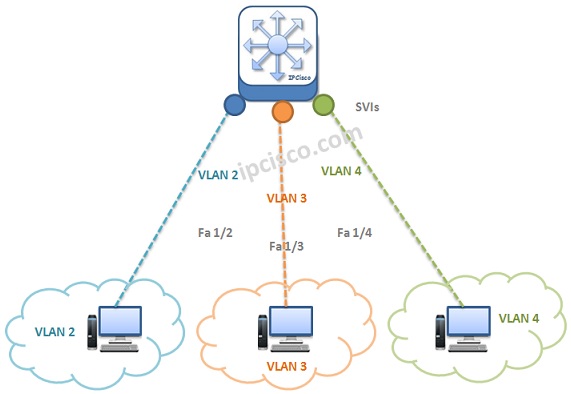
SVI (Switch Virtual Interfaces)
In a Multilayer switch, each VLAN is associated with an SVI. When a device in one VLAN wants to communicate with another VLAN, the traffic is sent to its default gateway (SVI). The switch routes the traffic internally and forwards it to the destination VLAN.
How SVI Works? What are the steps of SVI Operation? For Switch Virtual Interface (SVI) Operation, think about the below figure.
How SVI Works – Switch Virtual Interface Operation Steps
We have learned how SVI works and SVI operation steps one by one. How about Cisco SVI Configuration. Now, let’s talk about Cisco SVI Configuration Step By Step. We will follow the below steps for Cisco Switch Virtual Interface Configuration.
To create VLANs, we will use vlan vlan-id command. Here, we will create vlan 2 and vlan 4 on Cisco switch.
Switch# configure terminal
Switch(config)# vlan 2
Switch(config)># vlan 4
After creting VLANs on Cisco switch, it is time to configure SVIs on Cisco switch. We will create Switch Virtual Interfaces with interface vlan vlan-id command. After that we will assign an ip address from the subnet of that VLAN with ip address ip-address subnet-mask command. VLAN 2 is using 192.168.2.0/24 block and VLAN 4 is using 192.168.4.0/24 block. We will give the first addresses in these block to SVIs. Then, we will open the interface with no shutdown command.
Switch(config)# interface vlan 2
Switch(config-if)# ip address 192.168.2.1 255.255.255.0
Switch(config-if)# no shutdown
Switch(config-if)# interface vlan 4
Switch(config-if)# ip address 192.168.4.1 255.255.255.0
Switch(config-if)# no shutdown
After configuring VLANs and SVIs, it is time to add the most important command of this SVI configuration example. We will enable ip routing with ip routing command under the global configuration mode.
Switch(config)# ip routing
To verify Cisco SVI Configuration, you can use the below SVI verification commands:
Switch# show ip interface brief
Switch# show ip route
Switch# show vlan brief
After the verification, our SVI Configuration is ready! You can also learn SVI configuration with real CLI examples here: SVI (Switch Virtual Interfaces) Configuration
After learning what SVI is and how it works, now let’s compare it with another Inter VLAN Routing solution with Router-on-Stick scenarios. Below, you can find a comparison table as SVI vs Router-on-Stick.
| Feature | SVI (Switch Virtual Interface) | Router-on-a-Stick |
|---|---|---|
| Where routing happens | Inside Layer 3 switch | On router |
| Performance | High (hardware-based) | Lower (CPU-based) |
| Scalability | High | Limited |
| Configuration | Simple | More complex (subinterfaces) |
| Bottleneck | Very low | High (single trunk link) |
| Cost | Higher | Lower |
SVI is a virtual Layer 3 interface on a switch used for inter-VLAN routing.
No, a multilayer switch can perform routing internally.
It enables Layer 3 routing functionality on the switch.
To learn detailed SVI Configuraiton on Cisco devices, check also Step-by-Step SVI Configuration Guide.


Leave a Reply