- COURSES
- SPECIALS
- BLOG
- MEMBERS
- SHOP
- BOOKSHELF
- ABOUT
- ENROLL HERE
We use VPN Tunnels for secured packet transmission between two end points. If we use this VPN between two sites over Internet, this is called site-to-site VPN. We can use VPN with different tunnel methods. One of them is GRE Tunnel that we have talked about before. The other is IPSec Tunnels, IPSec for VPN. In this lesson, we will focus on how to configure IPSec VPN Tunnels on Cisco Routers. We will learn Cisco IPSec Configuration. You can also check Cisco GRE Tunnel Configuration.
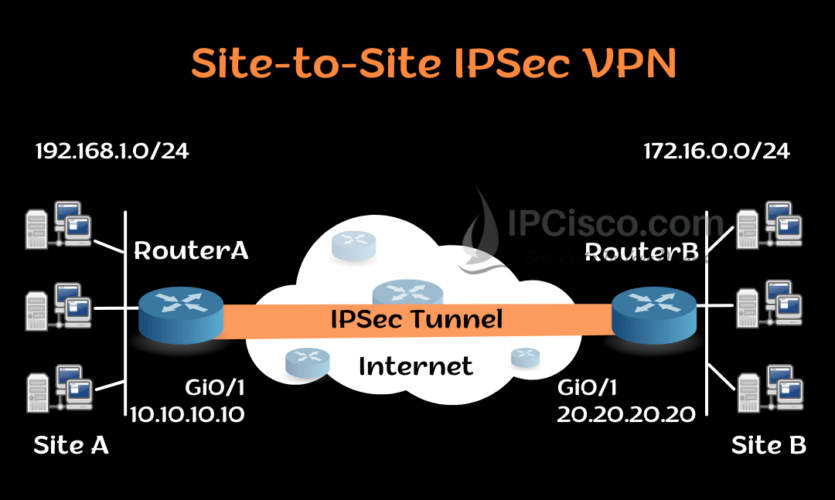
Here, for our IPSEC VPN Configuration Example, we will use the below site-to-site VPN topology.

You can DOWNLOAD Cisco Packet Tracer and GNS3 Labs.
Table of Contents
The first step of IPSec for VPN Configuration is ISAKMP Policy Configuration. We do this configuration for Phase 1 negotiations. To do this we will use “crypto isakmp policy” command with priority value 1. This priority number identifies the policy and gives a priority level. The lower priority number has higher priority.
And under this policy, we will define encryption method, hashing method, authentication method and group.
Let ’s start with RouterA.
RouterA(config)# crypto isakmp policy 1
RouterA(config-isakmp)# encryption aes
RouterA(config-isakmp)# hash md5
RouterA(config-isakmp)# authentication pre-share
RouterA(config-isakmp)# group 10
RouterA(config-isakmp)# exit
Now, let’s explain that what we have used here. Firstly, our encryption method is AES. We can also use DES, 3DES aes-192 and aes-256 methods. Our hashing method is MD5. Another option can be SHA hashing. We used pre-shared authentication method. We can also use rsa-sig and crack methods. As crypto isakmp policy group, we used group 10. There are other Diffie-Hellman groups available for here.
After these configuration steps, we will define pre-shared key for the authentication between two peers. We will configure pre-shared key with the ip address of the remote tunnel end. When RouterA wants to establish VPN Tunnel between RouterB, this pre-shared key will be used for the authentication. This pre-shared key must match at the other end.
Our pre-shared key is OurKey and the remote tunnel IP address is 20.20.20.20.
RouterA (config)# crypto isakmp key OurKey address 20.20.20.20
Now, let ‘s do the similar configuration on RouterB.
RouterB(config)# crypto isakmp policy 1
RouterB(config-isakmp)# encryption aes
RouterB(config-isakmp)# hash md5
RouterB(config-isakmp)# authentication pre-share
RouterB(config-isakmp)# group 10
RouterB(config-isakmp)# exit
RouterB (config)# crypto isakmp key OurKey address 10.10.10.10
The second step of our IPSec for VPN configuration is IPSec configuration. Before, we have created phase 1 policy. Now, we will create phase 2 policy. This policy will be used for IPSec negotiation.
We will define how to protect the traffic with “crypto ipsec transform-set” command with the name of transfer set. Here, we will use AES as encryption method and MD5 as hashing method. We will name this policy as IPCiscoSet.
RouterA(config)# crypto ipsec transform-set IPCiscoSet esp-aes esp-md5-hmac
The same configuration will be done on RouterB too.
RouterB(config)# crypto ipsec transform-set IPCiscoSet esp-aes esp-md5-hmac
To determine the encrypted traffic, we will use access list here. With an access-list, we will determine the traffic that will pass the VPN Tunnel. Here, we will define one network as source network and the other network as destination network. We will use this access list in the next step during crypto map creation.
RouterA(config)# ip access-list extended IPCiscoVPN
RouterA(config-ext-nacl)# permit ip 192.168.1.0 0.0.0.255 172.16.0.0 0.0.0.255
RouterA(config-ext-nacl)# exit
RouterB(config)# ip access-list extended IPCiscoVPN
RouterB(config-ext-nacl)# permit ip 172.16.0.0 0.0.0.255 192.168.1.0 0.0.0.255
RouterB(config-ext-nacl)# exit
Now, it is time to create crypto map which will attach ISAKMP configuration and IPSec configuration. We will use “crypto map” command with crypto map name MyMap.
RouterA(config)# crypto map MyMap 10 ipsec-isakmp
RouterA(config-crypto-map)# set peer 20.20.20.20
RouterA(config-crypto-map)# set transform-set IPCiscoSet
RouterA(config-crypto-map)# match address IPCiscoVPN
Now, we will add this crypto map under interface towards the other peer.
RouterA(config)# interface Gi0/1
RouterA(config- if)# crypto map MyMap
Now, we will do the same configuration on the other end.
RouterB(config)# crypto map MyMap 10 ipsec-isakmp
RouterB(config-crypto-map)# set peer 10.10.10.10
RouterB(config-crypto-map)# set transform-set IPCiscoSet
RouterB(config-crypto-map)# match address IPCiscoVPN
RouterB(config)# interface Gi0/1
RouterB(config- if)# crypto map MyMap
To verify Cisco IPSec for VPN Configuration, we can use several show commands. Let’s learn each of them one by one.
With “show crypto ipsec sa” command, we can check current Security Associations (SAs)’ settings, parameters, number of encapsulations and decapsulations etc.
RouterA# show crypto ipsec sa
interface: Serial2/0
Crypto map tag: MyMap, local addr 10.10.10.10
protected vrf: (none)
local  ident (addr/mask/prot/port): (192.168.1.0/255.255.255.0/0/0)
remote ident (addr/mask/prot/port): (172.16.0.0/255.255.255.0/0/0)
current_peer 20.20.20.20 port 500
PERMIT, flags={origin_is_acl,}
#pkts encaps: 21, #pkts encrypt: 21, #pkts digest: 21
#pkts decaps: 21, #pkts decrypt: 21, #pkts verify: 21
#pkts compressed: 0, #pkts decompressed: 0
#pkts not compressed: 0, #pkts compr. failed: 0
#pkts not decompressed: 0, #pkts decompress failed: 0
#send errors 0, #recv errors 0
local crypto endpt.: 10.10.10.10, remote crypto endpt.: 20.20.20.20
plaintext mtu 1438, path mtu 1500, ip mtu 1500, ip mtu idb GigabitEthernet0/0
current outbound spi: 0x8767D399(2271728537)
PFS (Y/N): N, DH group: none
inbound esp sas:
spi: 0x6A23472(127978330)
transform: esp-aes esp- md5-hmac ,
in use settings ={Tunnel, }
conn id: 2023, flow_id: Onboard VPN:7, sibling_flags 80234040, crypto map: MyMap
sa timing: remaining key lifetime (k/sec): (543240/3259)
IV size: 16 bytes
replay detection support: Y
Status: ACTIVE(ACTIVE)
inbound ah sas:
inbound pcp sas:
outbound esp sas:
spi: 0x821375699(2986328537)
transform: esp-aes esp- md5-hmac ,
in use settings ={Tunnel, }
conn id: 2024, flow_id: Onboard VPN:8, sibling_flags 80004040, crypto map: MyMap
sa timing: remaining key lifetime (k/sec): (1246240/9863)
IV size: 16 bytes
replay detection support: Y
Status: ACTIVE(ACTIVE)
outbound ah sas:
outbound pcp sas:
With “show crypto isakmp sa” command, we can check all the current IKE SAs status
RouterA# show crypto isakmp sa
dst                        src                        state                     conn-id                 slot        status
20.20.20.20        10.10.10.10      QM_IDLE              1                            0            ACTIVE
“show crypto map” command, shows crypto map structure.
RouterA# show crypto map
Crypto Map IPv4 " MyMap " 10 ipsec-isakmp
Peer = 20.20.20.20
Extended IP access list 100
access-list 100 permit ip 192.168.1.0 0.0.0.255 172.16.0.0 0.0.0.255
Current peer: 20.20.20.20
Security association lifetime: 1248000 kilobytes/3600 seconds
Responder-Only (Y/N): N
PFS (Y/N): N
Mixed-mode : Disabled
Transform sets={
IPCiscoSet:  { esp-aes esp-md5-hmac  } ,
}
Interfaces using crypto map MyMap:
GigabitEthernet1/0
“show crypto session remote ip-address detail” command shows the details of the crypto session.
RouterA# show crypto session remote 20.20.20.20 detail
Crypto session current status
Interface: GigabitEthernet1/0
Uptime: 00:11:11
Session status: UP-ACTIVE   >>>>> Status of the VPN
Peer: 20.20.20.20 port 500 fvrf: (none) ivrf: (none)
Phase1_id: 20.20.20.20
Desc: (none)
Session ID: 0
IKEv1 SA: local 10.10.10.10/500 remote 20.20.20.20/500 Active
Capabilities:(none) connid:1012 lifetime:14:10:23
IPSEC FLOW: permit ip 192.168.1.0/255.255.255.0 172.16.0.0/255.255.255.0
Active SAs: 2, origin: crypto map
Inbound:  #pkts dec'ed 25 drop 0 life (KB/Sec) 3458240/1743
Outbound: #pkts enc'ed 25 drop 0 life (KB/Sec) 3458240/1743
In this IPSec for VPN Configuration example, we have learned the details of how to configure IPSEC VPN on Cisco routers. You can try Cisco IPSec Configuration with different encryption, hashing and authentication methods.


Leave a Reply