- COURSES
- SPECIALS
- BLOG
- MEMBERS
- SHOP
- BOOKSHELF
- ABOUT
- ENROLL HERE
SSH and Telnet are two protocol that we use to access routers and switches. Telnet is not a secure protocol but SSH is the secure way to connect a network device. Here, we will focus on Cisco SSH Configuration and we will learn How to Configure SSH with GNS3.
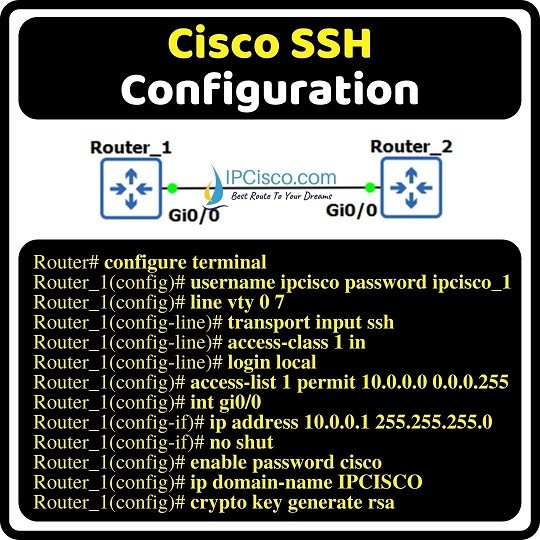
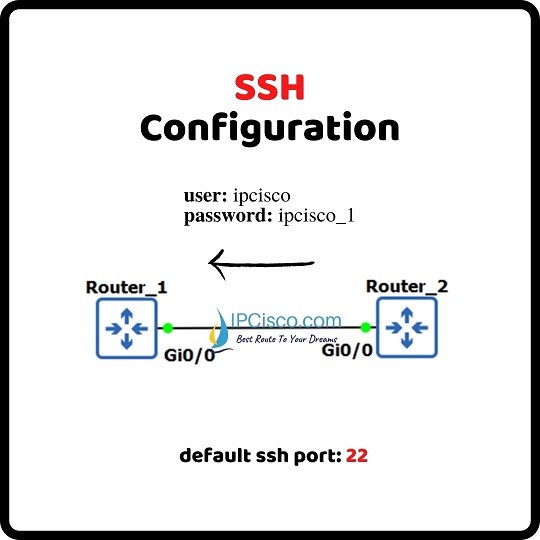
For our SSH Configuration, we will use the below simple topology. We will configure SSH on Router 1 and then we will try to access Router 1 from Router 2 with the configured credentials.
You can also check SSH Packet Tracer Configuration Example
Table of Contents
On Router_1, we will configure SSH with the below commands. Here, firstly we will create user and then we will select the connection type of virtual terminals. After that we will assign access lists that shows the allowed IP addresses for SSH. With this ACL, we will allow only specific IP addresses for SSH.
Router# configure terminal
Router_1(config)# username ipcisco password ipcisco_1 //Creating user for SSH
Router_1(config)# line vty 0 7 //Configuring VTY ports
Router_1(config-line)# transport input ssh //Type of connection
Router_1(config-line)# access-class 1 in //Access-list to filter SSH capable IPs
Router_1(config-line)# login local //Authentication with user&paswrd
Router_1(config)# access-list 1 permit 10.0.0.0 0.0.0.255 //Permitted IPs
Router_1(config)# interface gi0/0
Router_1(config-if)# ip address 10.0.0.1 255.255.255.0
Router_1(config-if)# no shutdown
Router_1(config)# enable password cisco //Enable password
Router_1(config)# ip domain-name IPCISCO //Creating domain name
Router_1(config)# crypto key generate rsa //Generating key for SSH
*Mar xx 07:57:13.993: %SSH-5-ENABLED: SSH 1.99 has been enabled
On Router_2, we will configure only the ip address for the connection.
Router_2(config)# interface GigabitEthernet0/0
Router_2(config-if)# ip address 10.0.0.2 255.255.255.0
Router_2(config-if)# no shutdown
You can also download all Cisco Labs on GNS3
To verify our Cisco SSH Configuration, we will try to start an SSH connection from Router_2 to Router_1. To do this, we will use “ssh -l username ip-address” command. Here, our username is ipcisco and the ip address of Router_1 interface is 10.0.0.1/24. After this command, we will enter the configured password ipcisco_1 to access the Router_1.
Above, we have also configured enable password. Do not mix these two passwords. Login password is used to login the router and this is configured with SSH. Enable password is used to enter config mode.


Leave a Reply