- COURSES
- SPECIALS
- BLOG
- MEMBERS
- SHOP
- BOOKSHELF
- ABOUT
- ENROLL HERE
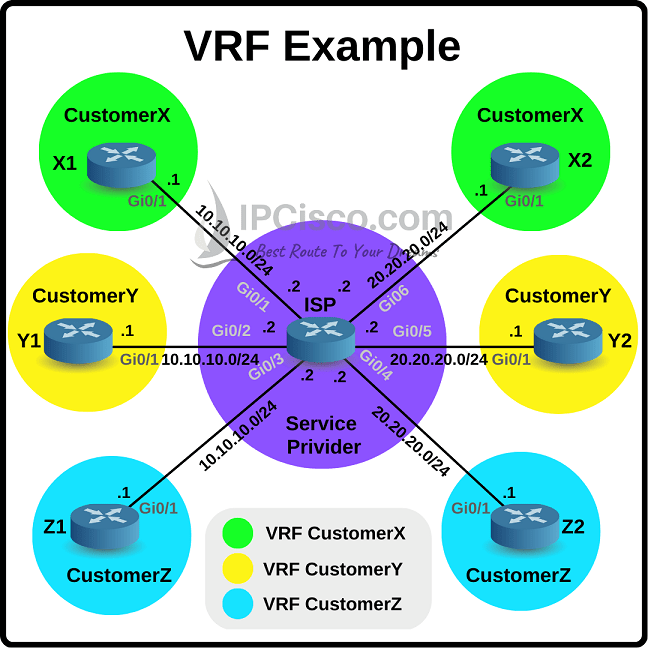
Table of Contents
VRF is the abbreviation of Virtual Routing and Forwarding. Basically, VRF is a technology with which we can create separate virtual routers on a physical router. With these separate virtual routers, we can use router interfaces, routing and forwarding tables isolated with VRFs. The network traffic in a VRF is not forwarded to another VRF. In other words, forwarding process is done only between the interfaces on the same VRF. In this lesson, we will focus on Cisco Virtual Routing and Forwarding.
As you know, service providers give services to different networks. And these different networks use overlapping IP addressing inside their network. So, how a service provider manage this without a conflict? Service providers uses VRF for multiple routing instances. By doing this, they connect customer locations without any conflict. From the point of customer view, their locations are connected to the ports of a router.
VRFs are similar to VLANs used in switches at layer 2 of the OSI Reference Model. But VRF technology works at Layer 3. As you know, with VLANs, we can create multiple virtual switches in a physical switch. With VRFs, we can create multiple routers in a physical router.
By default, a physical router has one global routing table and works as one router. This means that all the router interfaces and routing, forwarding tables are belong to Global VRF. But, with multiple VRFs, we can separate a router into multiple routers. Ans this is the answer of what is VRF question.
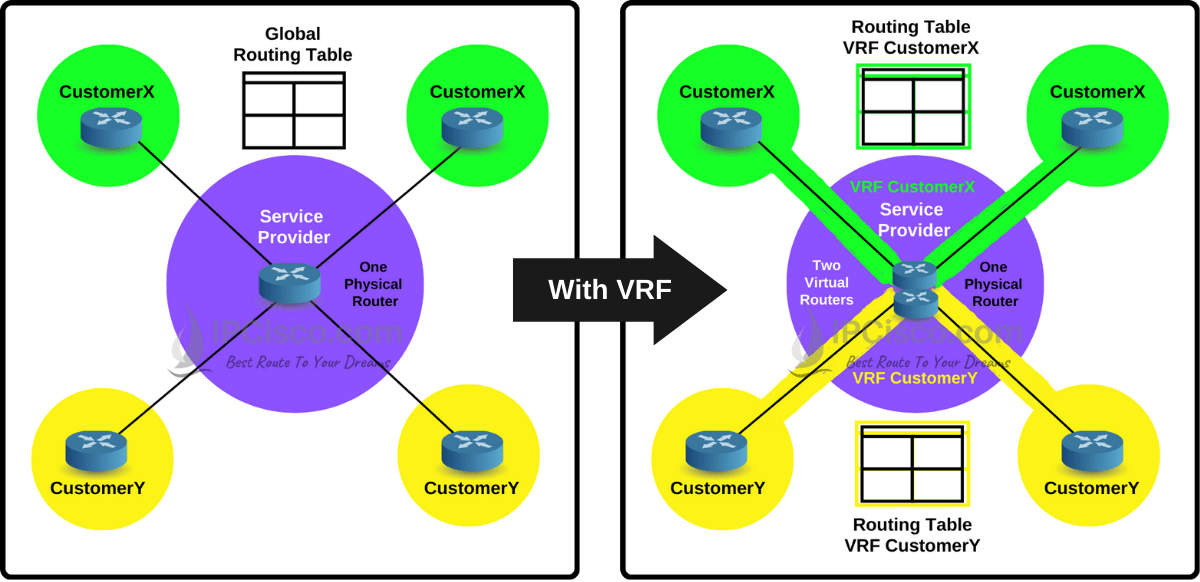
As you can see above, there is one physical router in the above Service Provider topology. But when we use VRF, we create two virtual routers with two VRFs. Each of these VRF Routing tables are separate from the other.
There are various benefits of VRFs (Virtual Routing and Forwarding). Below, you can find these VRF benefits.
You can also check Cisco Packet Tracer Labs Course!
We have talked about what is VRF and Cisco Virtual Routing and Forwarding benefits. Now, let’s learn how to configure VRF Lite on Cisco routers. Here, we will use the below VRF topology for our VRF example.
As you can see on the topology, there is one ISP router and there are three customers. Each customer has two branches and they are using the same IP address range for their interfaces. Normally, it is not possible to use same IP address on the interfaces of a router. But with VRF, this will be possible. Let’s see how it is possible.
For our Cisco VRF Lite Configuration example, we will follow the below steps:
Here, we will do Cisco Virtual Routing and Forwarding configuration on ISP router. So, customer routers will not know what is going on. They will think that, they are connected to a specific router which connects them to the other branch.
Now, let’s configure the routers on the topology for our Cisco Virtual Routing and Forwarding, VRF Lite Example.
You can also download Cisco Router and Switch Configuration Labs!
Our first step on this example is creating VRFs. We can create VRFs with two different commands. One of them is old “ip vrf vrf-name” command and the other is new “vrf definition vrf-name” command. Below, we will show both of them.
Here, we will create three VRFs:
Firstly, we will use use the new version of VRF create command like below:
ISP# configure terminal
ISP(config)# vrf definition CustomerX
ISP(config-vrf)# vrf definition CustomerY
ISP(config-vrf)# vrf definition CustomerZ
ISP(config-vrf)# end
Secondly, let’s use the old one that we can still use.
ISP# configure terminal
ISP(config)# ip vrf CustomerX
ISP(config-vrf)# ip vrf CustomerY
ISP(config-vrf)# ip vrf CustomerZ
ISP(config-vrf)# end
After creating VRFs on Service Provider router, let’s verify them with “show ip vrf” command.
Router# show ip vrf
To enable different address families like IPv4 and IPv6 we will use “address-family ipv4” and “address-family ipv6” commands.
ISP(config-vrf)# address-family ipv4
ISP(config-vrf-af)# exit
ISP(config-vrf)# address-family ipv6
ISP(config-vrf-af)# exit
After creating VRFs, now it is time to assign interfaces to these VRFs. This step will define the members of the VRFs. In other words, we will define which interface is belong to which VRF. To do this, we will use “ip vrf forwarding vrf-name” command, under the interfaces of this VRF.
ISP(config)# interface gi0/1
ISP(config-if)# ip vrf forwarding CustomerX
ISP(config-if)# do show run interface gi0/1
As you can see above, VRF creation will remove the interface IP address. So, we should reconfigure the interface IP address.
ISP(config-if)# ip address 10.10.10.2 255.255.255.0
ISP(config-if)# no shutdown
ISP(config-if)# exit
ISP(config)# interface gi0/6
ISP(config-if)# ip vrf forwarding CustomerX
ISP(config-if)# ip address 20.20.20.2 255.255.255.0
ISP(config-if)# no shutdown
ISP(config-if)# end
ISP# show ip vrf
ISP(config)# interface gi0/2
ISP(config-if)# ip vrf forwarding CustomerY
ISP(config-if)# ip address 20.20.20.2 255.255.255.0
ISP(config-if)# end
ISP(config)# interface gi0/5
ISP(config-if)# ip vrf forwarding CustomerY
ISP(config-if)# ip address 20.20.20.2 255.255.255.0
ISP(config-if)# end
ISP(config)# interface gi0/3
ISP(config-if)# ip vrf forwarding CustomerZ
ISP(config-if)# ip address 20.20.20.2 255.255.255.0
ISP(config-if)# end
ISP(config)# interface gi0/4
ISP(config-if)# ip vrf forwarding CustomerZ
ISP(config-if)# ip address 20.20.20.2 255.255.255.0
ISP(config-if)# end
Here, I will show you the configurations of the different routing alternatives.
To configure default route for VRF CustomerX, we will use the below command:
ISP(config)# ip route vrf CustomerX 0.0.0.0 0.0.0.0 172.16.16.2
To enable OSPFv2 for VRF CustomerX, we will use the below vrf command:
ISP(config)# router ospf 1 vrf CustomerX
To assign CustomerX VRF to IPv4 unicast address family:
ISP(config-router)# address-family ipv4 unicast vrf CustomerX
To enable OSPFv3, we will use the below command:
ISP(config)# router ospfv3 1
To assign CustomerX VRF to IPv6 unicast address family:
ISP(config-router)# address-family ipv6 unicast vrf CustomerX
To enable EIGRP and to assign CustomerX VRF to IPv4 unicast address family for AS 100
ISP(config)# router eigrp IPCisco
ISP(config-router)# address-family ipv4 unicast vrf CustomerX autonomous-system 100
To enable BGP for AS 100 and to assign CustomerX VRF to IPv4 unicast address family.
ISP(config)# router bgp 100
ISP(config-router)# address-family ipv4 vrf CustomerX
Now, let’s use “show vrf” and “show vrf detail vrf-name” commands to see the interfaces under the related VRFs.
ISP# show vrf
ISP# show vrf detail vrf-name
And, we can check the interface ip addresses with “show ip interface brief” command. As you can see, different interfaces can use same ip addresses with VRFs. Normally, this is not possible in a router.
ISP# show ip int brief
And can check routing table with “show ip route” command. This is global routing table, which can be called also as Global VRF. Global routing table is empty because we do not have any interfaces using this global routing table.
ISP# show ip route
We can check each VRF’s routing table with “show ip route vrf vrf-name” command.
ISP# show ip route vrf CustomerX
ISP# show ip route vrf CustomerY
ISP# show ip route vrf CustomerZ
To verify the connection between two branches of the customers, let’s use “ping vrf vrf-name interface-ip-address” command. Here, when we ping the same address with different vrf names, we will ping the related vrf interface.
ISP# ping vrf CustomerX 10.10.10.1
ISP# ping vrf CustomerX 20.20.20.1
ISP# ping vrf CustomerY 10.10.10.1
ISP# ping vrf CustomerY 20.20.20.1
ISP# ping vrf CustomerZ 10.10.10.1
ISP# ping vrf CustomerZ 20.20.20.1


Leave a Reply