- COURSES
- SPECIALS
- BLOG
- MEMBERS
- SHOP
- BOOKSHELF
- ABOUT
- ENROLL HERE
802.1x Port-based Authentication is one of the authentication methods used for user authentication in a network. In this Cisco 802.1x Configuration lesson, we will learn how to configure Cisco 802.1x Port-based Authentication.
Table of Contents
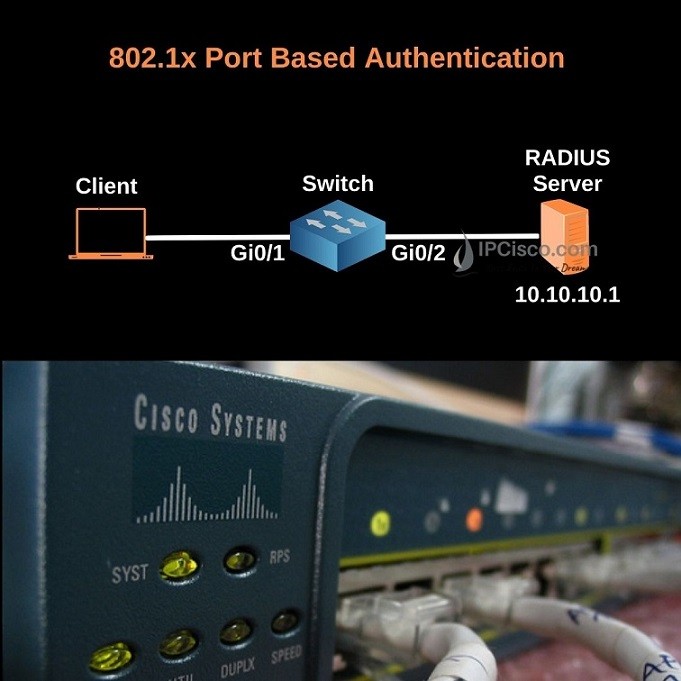
For Cisco 802.1x Configuration, we will use the below simple topology. We will configure switch for 802.1x Port-based Authentication.
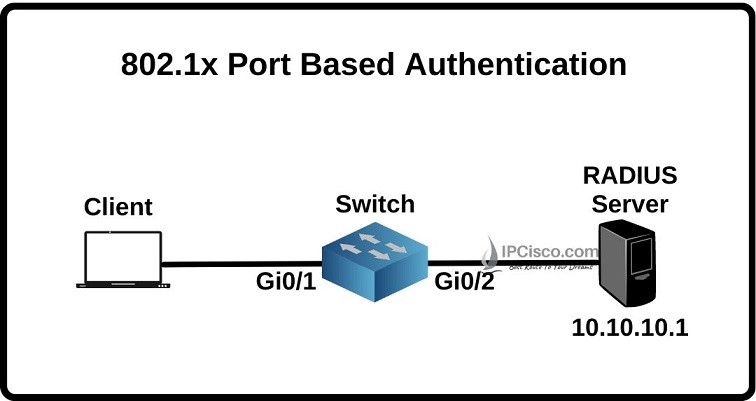
Now, let’s start to do our Cisco 802.1x Configuration step by step.
You can also check Cisco Packet Tracer Configuration Examples and Cisco GNS3 Examples.
To configure Cisco 802.1x Port-based Authentication, we will enable AAA firstly. To do this, we will use “aaa new-model” command.
Switch# configure terminal
Switch(config)# aaa new-model
After enabling AAA on our switch, now it is time to create authentication method list. What is authentication method list? An authentication method list is a list which gives the sequence of the authentication methods that will be used. Here, firstly the firth method is used. If it fails, then the second method is used for the authentication.
Switch(config)# aaa authentication dot1x {default} method1 [method2...]
When a named list is not specified in the authentication command, default keyword provide the default settings to all the ports. After this part, you can specify the methods used for authentication. Here, we will use “group radius” to use all RADIUS servers for authentication.
Switch(config)# aaa authentication dot1x default group radius
If we use “non” keyword here, there will be no authentication. The client will be automatically authenticated with this keyword.
After enabling AAA and creating authentication method list, now, we will enable 802.1x Authentication. To enable 802.1x Authentication on the switch globally, we will use “dot1x system-auth-control” command.
Switch(config)# dot1x system-auth-control
After enabling 802.1x globally, it is time to enable it on the ports connected to the user. To do this, we will use “dot1x port-control auto” command under the related interface.
Switch(config)# interface gigabitethernet0/1
Switch(config-if)# switchport mode access
Switch(config-if)# dot1x port-control auto
Switch(config-if)# exit
To configure RADIUS Server parameters, we will use “radius-server host” command with hostname or ip address of the RADIUS Server.
radius-server host {hostname | ip-address} auth-port port-number key string
Here, authentication port is a UDP port between 0 and 65536. The default one is 1812.
Key is a string which shows authentication and encryption key between RADIUS Server and the switch.
Here, we will use 10.10.10.1 as RADIUS Server IP address. We will use UDP port 1200 and ipcisco123 key as authentication and encryption key.
Switch(config)# radius-server host 10.10.10.1 auth-port 1200 key ipcisco123
Sometimes, we need re-authentication for security reasons. There are two ways to do this. One of them is periodic auto re-authentication. The other one is manual re-authentication. Re-authentication is disabled by default. Let’s firstly configure periodic auto re-authentication.
To enable auto periodic re-authentication, we will use “dot1x reauthentication” command. We will also set the re-authentication period. Here, we can give any value between 1 and 65535. The default value is 3600 seconds.
Switch(config-if)# dot1x reauthentication
Switch(config-if)# dot1x timeout reauth-period 2000
Sometimes we need manual reauthentication. We can do this manual reauthentication anytime we want with “dot1x re-authenticate interface interface” command.
Switch# dot1x re-authenticate interface gigabitethernet0/1
To reset the configurable 802.1X parameters to the default values we will use “dot1x default” command.
Switch(config)# interface gigabitethernet0/1
Switch(config-if)# dot1x default
Switch(config-if)# exit
To verify our Cisco 802.1x Configuration, we can use “show dot1x” command. We can use this command with different parameters like below:
show dot1x
show dot1x interface interface
show dot1x all statistics
show dot1x statistics interface interface-id
Switch# show dot1x interface gigabitethernet0/1

Supplicant MAC
AuthSM State      = N/A
BendSM State      = N/A
PortStatus        = N/A
MaxReq            = 3
MaxAuthReq        = 3
HostMode          = Single
PortControl       = Auto
QuietPeriod       = 50 Seconds
Re-authentication = Disabled
ReAuthPeriod      = 2000 Seconds
ServerTimeout     = 30 Seconds
SuppTimeout       = 30 Seconds
TxPeriod          = 30 Seconds
Guest-Vlan        = 0
In this 802.1x Authentication Configuration lesson, we have focused Cisco 802.1x Configuration. We have learned how to configure 802.1x Port-based Authentication on Cisco switches.


Leave a Reply