- COURSES
- SPECIALS
- BLOG
- MEMBERS
- SHOP
- ABOUT
- ENROLL HERE

DHCP Relay Agent is used to forward, requests and replies between DHCP Server and DHCP Client if DHCP server resides in another network than client. In this Cisco DHCP Relay Agent GNS3 Example lesson, we will configure DHCP Relay Agent on Cisco routers and you will learn Cisco DHCP Relay Agent Configuration detaily. Our DHCP Server will be in another network and we will use Cisco ip helper-address” command to configure DHCP Relay Agent and forward requests and replies.
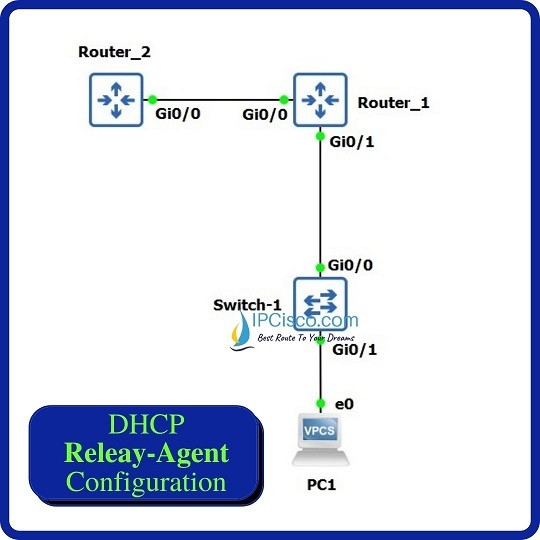
We will use the below topology consist of two routers, one switch and one PC for our DHCP example.
For our Cisco DHCP Relay Agent Configuration on GNS3, we will follow the below steps one by one.
So, let’s start our example.
You can also download GNS3 Labs
Table of Contents
Firstly, let’s configure ip addresses of the interfaces on the routers. Here, we ill configure one interface on Router_2 and two interfaces on Router_1.
Router_2# configure terminal
Router_2(config)# interface GigabitEthernet0/0
Router_2(config-if)# ip address 20.0.0.2 255.255.255.0
Router_2(config-if)# no shutdown
Router_1# configure terminal
Router_1(config)# interface GigabitEthernet0/0
Router_1(config-if)# ip address 20.0.0.1 255.255.255.0
Router_1(config-if)# no shutdown
Router_1(config-if)# interface GigabitEthernet0/1
Router_1(config-if)# ip address 10.0.0.1 255.255.255.0
Router_1(config-if)# no shutdown
To teach 10.0.0.0/24 network (other interface network of Router_1), we need to use a static route through this network on Router_2. After that, we will ping 10.0.0.1 to test the static route.
Router_2(config)# ip route 10.0.0.0 255.255.255.0 20.0.0.1
Router_2(config)# end
Router_2# ping 10.0.0.1
After ip addressing and static routing, we can start to learn how to configure Cisco DHCP relay agent on GNS3. Here, Router 2 will be our DHCP Server. So, firstly, we will configure DHCP Relay Agent on Router 2. We will use “ip dhcp pool pool-name” command to create a DHCP Pool. Then we will specify the pool range. After configuring the default router address for the hosts, we will configure DNS Server address.
Out DHCP Pool name will be IPCISCO and the ip pool range will be 10.0.0.0/24. We will use 10.0.0.1 as default router address for the clients.
Router_2(config)# ip dhcp pool IPCISCO
Router_2(dhcp-config)# network 10.0.0.0 255.255.255.0
Router_2(dhcp-config)# default-router 10.0.0.1
Router_2(dhcp-config)# dns-server 8.8.8.8
After configuring DHCP Server on Cisco Router, Router_2, now we came to the key part of this configuration lesson. This is Cisco DHCP Relay Agent Configuration. We will configure Router_1 as a DHCP Relay Agent which will forward DHCP request and replies between DHCP Server and DHCP Host.
Here, we will use the IP address of the DHCP Server with Cisco “ip helper-address” command on Router_1. This ip address will be 20.0.0.2, the interface ip address of the Router_2.
Router_1(config)# interface GigabitEthernet0/1
Router_1(config-if)# ip address 10.0.0.1 255.255.255.0
Router_1(config-if)# ip helper-address 20.0.0.2
You can check also DHCP Packet Tracer Example
After our Cisco DHCP Relay Agent Configuration on GNS3, now it is time to verify our configuration. To do this, we will check the ip address of the PC. And we will see the ip address that is assigned by DHCP server from DHCP Server pool range.
On DHCP Server, we can check DHCP bindings with “show ip dhcp bindings” command. Here, we will see PC MAC number with assigned ip address.
We can also check dhcp pool configuration with “show ip dhcp pool” command.
Router_2# show ip dhcp pool

Pool IPCISCO :

Utilization mark (high/low) : 100 / 0

Subnet size (first/next) : 0 / 0

Total addresses : 254

Leased addresses : 1

Excluded addresses : 0

Pending event : none

1 subnet is currently in the pool

Current index IP address range Leased/Excluded/Total

10.0.0.1 10.0.0.1 - 10.0.0.254 1 / 0 / 254
In this GNS3 Configuration Example, we have configured Cisco DHCP Relay Agent on GNS3.
Leave a Reply