- COURSES
- SPECIALS
- BLOG
- MEMBERS
- SHOP
- ABOUT
- ENROLL HERE

Syslog is a messaging system that warns network engineers about a situation in the network. This can be a notification or an error. To see these messages in a router, that router need to be configured as syslog server. So, here, we will do Cisco Syslog Server Configuration with GNS3.
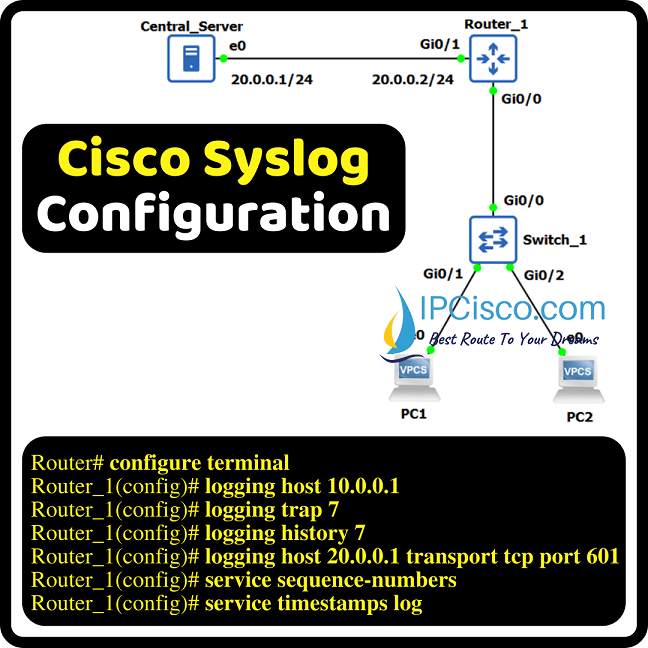
For Cisco Syslog Server Configuration with GNS3, we will use the below GNS3 Syslog topology. In this topology, we will configure Router_1 as a Syslog Server and on this device, we can see the notification, error messages.
With Syslog Server configuration, we can send these messages to different destination. These destinations can be:
The default one is console line. In other words, syslog messages go to the console line that we see on the screen by default.
You can also check Syslog Cisco Packet Tracer Configuration Example
Before learning how to configure syslog on Cisco routers, let’s remember the levels of syslog messages. There are levels from 0 to 7. 0 is the most important emergency messages. And 7 is the least important debugging messages. Below, you can see each level name, level number, description and syslog definition of the level that you will see on the router as messages.
| Level Name | Level Number | Level Description | Syslog Definition |
| emergencies | 0 | System unstable | LOG_EMERG |
| alerts | 1 | Immediate action needed | LOG_ALERT |
| critical | 2 | Critical conditions | LOG_CRIT |
| errors | 3 | Error conditions | LOG_ERR |
| warnings | 4 | Warning conditions | LOG_WARNING |
| notifications | 5 | Normal but significant condition | LOG_NOTICE |
| informational | 6 | Informational messages only | LOG_INFO |
| debugging | 7 | Debugging messages | LOG_DEBUG |
Now, let’s go to the configuration and learn how to configure Syslog on Cisco Routers with GNS3.
You can download this lab on GNS3 Cisco Labs page
To configure Syslog Server on a Cisco router, firstly we will use “logging host ip-address” command to configure syslog server ip address. Then, we will configure the severity levels of the logs. For example, when we configure this level as 3, the messages level 3 and lower message levels will be showed. This means that we will see the messages of 3, 2,1 and 0 levels.
Router_1(config)# logging host 10.0.0.1 //Server IP address
Router_1(config)# logging trap 7 //Severity of the logs that needs to send to server
We can also configure the history of the logs. With this syslog command we determine the level of messages stored in history. The default one is 4, warnings, errors, critical, alerts and emergency messages.
Router_1(config)# logging history 7 //History of logs severity to be send to server
To configure the server that we transer logs, we will use the below command with the port 601.
Router_1(config)# logging host 20.0.0.1 transport tcp port 601 //Defining transport mode
More than one log message cannot have the same timestamp. So, we can give sequence numbers to logs. By default, it is not displayed. To create timestamps for the logs, we can use “service timestamps log” command.
Router_1(config)# service sequence-numbers //Creating sequence number for logs
Router_1(config)# service timestamps log //Creating timestamps for logs that will be generated
This is basically, how to do Cisco Syslog Server configuration on Cisco routers.
You can check also how to Configure SSH on Cisco Routers with Packet Tracer
Leave a Reply