- COURSES
- SPECIALS
- BLOG
- MEMBERS
- SHOP
- ABOUT
- ENROLL HERE

Inter VLAN Routing is one of the important lessons of Cisco CCNA Certification. Especially Inter VLAN Routing Router on Stick topology is one of the well-known topologies for this configuration. In this lesson, we will focus on Cisco Inter VLAN Routing Configuration with a Router on Stick Topology on GNS3.
Our main aim is to provide routing between VLANs. In other words, we will provide pinging between PCs that are in different VLANs by the help of a layer 3 device, Router.
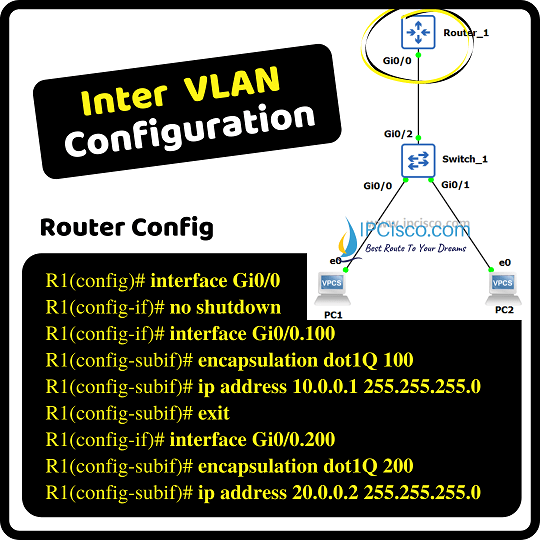
For our Inter VLAN Configuration Example, we will use the below Router on Stick topology on GNS3.
You can download this lab on GNS3 Cisco Labs page
In this topology, we will create sub interfaces on Router and we will also assign dot1q encapsulation on them. We will also configure the switch with VLANs, we will assign access and trunk ports on it.
In this topology, our sub interfaces and their ip addresses will be:
Gi0/0.100 10.0.0.1/24
Gi0/0.200 20.0.0.1/24
And PC ip addresses will be:
PC 1 10.0.0.2/24
PC 2 20.0.0.2/24
Here, the ip addresses of the sub interface and the PC connected to it will be in the same network.
Now, let’s go to the configuration and learn how to configure VLAN Routing with Router on stick Topology with GNS3.
You can also view Packet Tracer Inter VLAN Routing Example
Table of Contents
On the router, we will open the interface with “no shutdown” command firstly. Because by default, as you know the router ports are shutdown. Here, our port is Gigabit ethernet 0/0.
R1# configure terminal
R1(config)# interface Gi0/0
R1(config-if)# no shutdown
Then, we will create sub interfaces under this Gigabit ethernet 0/0 interface. Our sub interfaces will be Gi0/0.100 and Gi0/0.200. We will set the encapsulation type as dot1.q with VLAN identifier under these sub interfaces. VLAN identifier will show that this sub interfaces is belong to that VLAN. We will also give the ip addresses of the sub interfaces. Here, the ip addresses are in different networks asa you can see below.
R1(config-if)# interface Gi0/0.100
R1(config-subif)# encapsulation dot1Q 100
R1(config-subif)# ip address 10.0.0.1 255.255.255.0
R1(config-subif)# exit
R1(config-if)# interface Gi0/0.200
R1(config-subif)# encapsulation dot1Q 200
R1(config-subif)# ip address 20.0.0.2 255.255.255.0
With this configuration, we have finished router part of this Inter VLAN Routing Configuration Example. Now, we will configure the switch part of this configuration example.
On the switch of router on stick topology, we will configure the switch port modes firstly. Then we set the encapsulation types of this ports. Below, we sill set this on the trunk port of switch 1, on Gigabit Ethernet 0/2.
Switch_1# configure terminal
Switch_1(config)# interface Gi0/2
Switch_1(config-if)# switchport trunk encapsulation dot1q
Switch_1(config-if)# switchport mode trunk
Then, we will configure the access ports. We will set the ports as member of a VLAN. We will add Gi0/0 port under VLAN 100 and Gi0/1 port under VLAN 200.
Switch_1(config)# interface Gi0/0
Switch_1(config-if)# switchport mode access
Switch_1(config-if)# switchport access vlan 100
Switch_1(config)# interface Gi0/1
Switch_1(config-if)# switchport mode access
Switch_1(config-if)# switchport access vlan 200
To verify our Inter VLAN Routing Router on Stick Configuration, we will check the routing table of the router with “show ip route” firstly.
Then, we will test our Inter VLAN Configuration with Router on Stick topology by pinging PCs each other. This is the key verification part of this configuration. Because, our aim was to achieve ping between PCs that resides in different VLANs.
Before this test, firslt, let’s check the PC ip configurations. On the PCs, interface ip addressing configuration must be done before this with also adding sub interface ip address as gateway ip address.
When we ping from PC 1 to PC 2, our ping will be successful. And ping form PC 2 to PC 1 will also successful.
In this Cisco Inter VLAN Configuration Router on Stick Example with GNS3, we have learned how to configure Inter VLAN Routing on Cisco Routers and Switches.
Leave a Reply