- COURSES
- SPECIALS
- BLOG
- MEMBERS
- SHOP
- ABOUT
- ENROLL HERE

Table of Contents
Routing is one of the most important tasks in networking. Before, we have talked about static routing and routing with routing protocols. Here, we will focus on a different type of routing, the more flexible one, Policy-Based Routing (PBR). We will learn what is policy-based routing, how it works and how to configure Cisco policy-based routing on Cisco routers.
When we use routing protocols for routing, routing protocols calculates best paths and we can see these paths in routing tables. According to the routing tables, destinations are determined. But in Policy-Based Routing (PBR), we are flexible. We can manipulate traffic way with the help of different policies. We assign a policy to a specific traffic flow and after that that traffic flow follows the path that we have determined. By doing this, we change the next hop for the traffic according to the matched criteria.
So, why we use policy-based routing and manipulate routing process? We do this because, PBR gives us more control over routing. Here, we are bypassing the default routing behavior to provide for resiliency, availability and performance.
Download Packet Tracer Labs and Cisco GNS3 Labs!
After learning what is policy-based routing, now it is time to learn Cisco Policy-Based Routing. To do Cisco Policy-Based Configuration, let’s firstly determine our configuration steps.
First of all, we should classify the traffic. We can do this classification with the help of Extended Access Lists, Route Maps. With Extended Access Lists, we can classify traffic going to a specific direction, traffic of a specific protocol or a specific port etc.
After classifying the traffic, secondly, we will route these traffic flows to the desired destination by adding the route maps to the incoming interface.
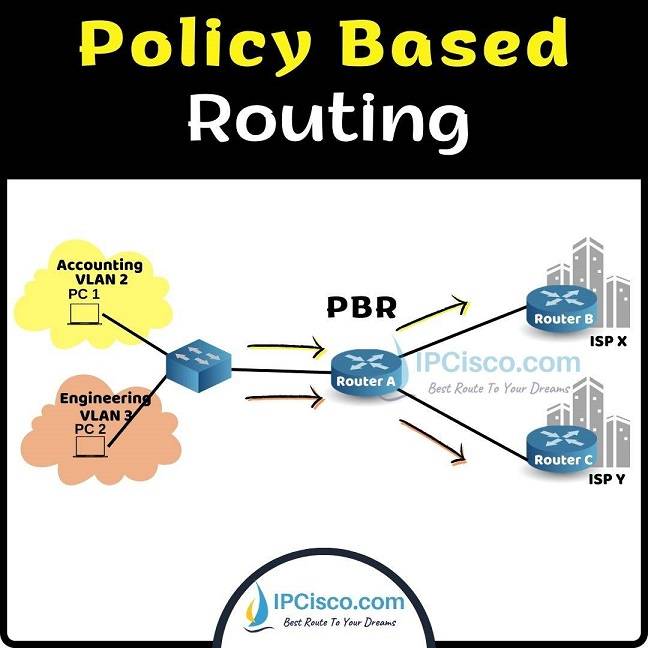
Here, we will use the below PBR topology.
In this topology, at LAN side, we have two VLANs. We will route the traffic of these different VLANs to a different ISP with the help of Policy-Based Routing.
For our Cisco policy-based routing example, firstly, we will configure the IP addresses of the router interfaces according to the topology.
Router A# configure terminal
Router A(config)# interface GigabitEthernet 0/0/0
Router A(config-if)# no ip address
Router A(config-if)# interface GigabitEthernet 0/0.100
Router A(config-if)# encapsulation dot1Q 100
Router A(config-if)# ip address 192.168.1.100 255.255.255.0
Router A(config-if)# interface GigabitEthernet 0/0.100
Router A(config-if)# ip address 192.168.2.200 255.255.255.0
Router A(config-if)# exit
Router A(config)# interface GigabitEthernet 0/0/1
Router A(config-if)# ip address 10.0.0.1 255.255.255.0
Router A(config-if)# no shutdown
Router A(config-if)# interface GigabitEthernet 0/0/2
Router A(config-if)# ip address 20.0.0.1 255.255.255.0
Router A(config-if)# no shutdown
Router A(config-if)# exit
Here, not to mix the lesson, we will not do VLAN and Trunk configurations. But for this configuration example, you should do Router on Stick (Inter VLAN) Configuration.
Now, let’s configure access-list which will determine the traffic flow that we will route.
In this step, we will create access-list which will select the traffic flow that we will set policy-based routing for. Here, we have two VLAN on the LAN side and we will direct the traffic coming from these two different VLAN to a different ISP.
Router A(config)# access-list 1 permit 192.168.1.0 0.0.0.255
Router A(config)# access-list 2 permit 192.168.2.0 0.0.0.255
After creating access-list, now we will create route map. This is the critical part of policy-based routing. Because in this step, we are determining how we behave to the selected traffic.
For this configuration, we will set a different next hop for the selected traffic. We have two different VLANs and we will direct the traffic coming from these VLANs to a different ISP.
We will configure route-map with “route-map route-map-name permit” command. Ayt the end of this map command, we will also use a sequence number. The default one is 10. So, the command will be “route-map route-map-name permit 10”. The second one will use 20 and the third will use 30 as sequence number.
We will set the rule under this route-map command. For the first two, we will set next hop ip address. For the third one, we will set a default route. Here, we set null0. This means that, the remaining traffic other than our two VLANs will be dropped.
Router A(config)# route-map IPCisco_PBR permit 10
Router A(config-route-map)# match ip address 1
Router A(config-route-map)# set ip next-hop 10.0.0.100
Router A(config-route-map)# route-map IPCisco_PBR permit 20
Router A(config-route-map)# match ip address 2
Router A(config-route-map)# set ip next-hop 20.0.0.100
Router A(config-route-map)# route-map IPCisco_PBR permit 30
Router A(config-route-map)# set default interface null0
Router A(config-route-map)# exit
After access list and route-map creation, now, we will apply this route-map to the incoming interfaces. To do this, we will go under each interface and add the created route-map.
Router A(config)# interface GigabitEthernet 0/0/0.100
Router A(config-if)# ip policy route-map IPCisco_PBR
Router A(config-if)# interface GigabitEthernet 0/0/0.200
Router A(config-if)# ip policy route-map IPCisco_PBR
Router A(config-if)# end
Router A# write
Here, we have learned how to configure Cisco Policy-Based Routing on Cisco Routers.
Download Packet Tracer Labs and Cisco GNS3 Labs!
Leave a Reply