
- COURSES
- SPECIALS
- BLOG
- MEMBERS
- SHOP
- BOOKSHELF
- ABOUT
- ENROLL HERE

Table of Contents
An IPv6 Static Route is a manually configured route used to reach a destination IPv6 network. Instead of learning the route through a dynamic routing protocol, we manually define how the router should reach the destination. IPv6 static routes are commonly used in small networks or specific parts of larger networks beside dynamic routing. In this lesson, you will learn how to configure IPv6 Static Routes on Cisco IOS and how to verify IPv6 connectivity on Cisco routers. After this Cisco IPv6 Static Route Configuration example, you will be ready to configure IPv6 static routes by yourself.
If you would like to test your IPv6 knowledge, you can do this on IPv6 Quizes Page
In this IPv6 Static Route Example, we will use the below IPv6 static routing topology. Here, we will use three routers. We will configure IPv6 static rotues on Router A and Router C.
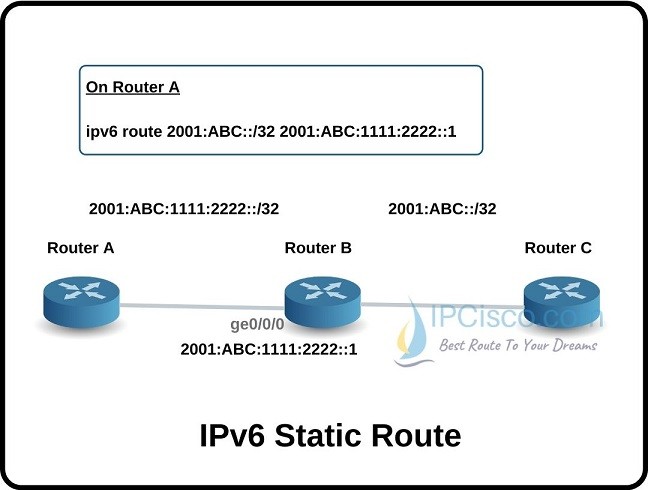
IPv6 Static Routing Topology
Before configuring IPv6 static routes, we should enable IPv6 unicast routing on the Cisco router. To do this, we use the ipv6 unicast-routing command under global configuration mode.
Router(config)# ipv6 unicast-routing
This command enables the router to forward IPv6 packets between different IPv6 networks.
To configure an IPv6 static route on a Cisco router, we use the ipv6 route command. In a basic static route configuration, we specify the destination IPv6 prefix and the next-hop IPv6 address. The complete command is ipv6 route <destination-prefix> <next-hop-address>.
Router(config)# ipv6 route 2001:ABC::/32 2001:ABC:1111:2222::1
In this example, 2001:ABC::/32 is the destination IPv6 prefix and 2001:ABC:1111:2222::1 is the next-hop IPv6 address.
Now, let’s configure IPv6 Static Routing on Cisco routers with a configuration example. In our topology, we have three routers: Router1, Router0 and Router2. Router0 is located between Router1 and Router2.
Router1 is connected to the 2001:1234:0:111::/64 network, while Router2 is connected to the 2001:1234:0:222::/64 network. To provide connectivity between these IPv6 networks, we will configure IPv6 static routes on Router1 and Router2.
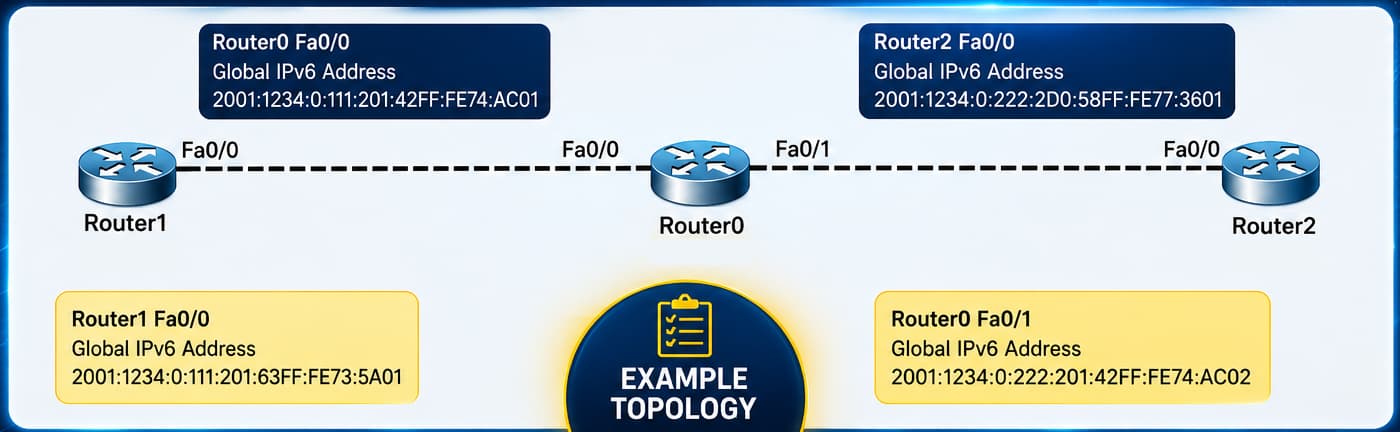
IPv6 Static Routing EXampleTopology
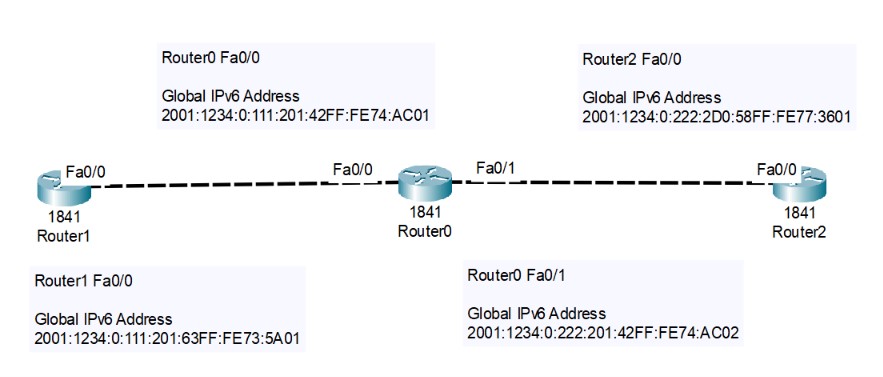
IPv6 Static Routing Example Packet Tracer Topology
Firstly, we will configure an IPv6 Static Route on Router1. Router1 needs a route towards the remote 2001:1234:0:222::/64 network. To reach this network, we will use 2001:1234:0:111:201:42FF:FE74:AC01, the IPv6 address of the Router0 interface connected to Router1, as the next-hop address.
Router1> enable
Router1# configure terminal
Router1(config)# ipv6 route 2001:1234:0:222::/64 2001:1234:0:111:201:42FF:FE74:AC01
Router1(config)# end
With this configuration, traffic destined for the 2001:1234:0:222::/64 network is forwarded towards Router0.
Now, we will configure an IPv6 static route on Router2 for the network located on the Router1 side. Our destination network is 2001:1234:0:111::/64. To reach this network, we will use 2001:1234:0:222:201:42FF:FE74:AC02, the IPv6 address of the Router0 interface connected to Router2, as the next-hop address.
Router2> enable
Router2# configure terminal
Router2(config)# ipv6 route 2001:1234:0:111::/64 2001:1234:0:222:201:42FF:FE74:AC02
Router2(config)# end
With this configuration, traffic destined for the 2001:1234:0:111::/64 network is forwarded towards Router0.
After configuring IPv6 static routes on Router1 and Router2, we can verify our configuration with the show ipv6 route command. This command displays the IPv6 routing table of the router. Firstly, let’s check the IPv6 routing table of Router1.
Router1#show ipv6 route
IPv6 Routing Table - 4 entries
Codes: C - Connected, L - Local, S - Static, R - RIP, B - BGP
U - Per-user Static route, M - MIPv6
I1 - ISIS L1, I2 - ISIS L2, IA - ISIS interarea, IS - ISIS summary
ND - ND Default, NDp - ND Prefix, DCE - Destination, NDr - Redirect
O - OSPF intra, OI - OSPF inter, OE1 - OSPF ext 1, OE2 - OSPF ext 2
ON1 - OSPF NSSA ext 1, ON2 - OSPF NSSA ext 2
D - EIGRP, EX - EIGRP external
C 2001:1234:0:111::/64 [0/0]
via ::, FastEthernet0/0
L 2001:1234:0:111:201:63FF:FE73:5A01/128 [0/0]
via ::, FastEthernet0/0
S 2001:1234:0:222::/64 [1/0]
via 2001:1234:0:111:201:42FF:FE74:AC01
L FF00::/8 [0/0]
via ::, Null0
As you can see, the 2001:1234:0:222::/64 network is marked with S, which indicates a static route. The [1/0] values show the Administrative Distance and metric of the route. Router1 uses 2001:1234:0:111:201:42FF:FE74:AC01 as the next-hop IPv6 address to reach this remote network.
We can also see that 2001:1234:0:111::/64 is marked with C, which means that it is directly connected to Router1 through FastEthernet0/0.
Let’s use show ipv6 route command on Router2 also.
Router2#show ipv6 route
IPv6 Routing Table - 4 entries
Codes: C - Connected, L - Local, S - Static, R - RIP, B - BGP
U - Per-user Static route, M - MIPv6
I1 - ISIS L1, I2 - ISIS L2, IA - ISIS interarea, IS - ISIS summary
ND - ND Default, NDp - ND Prefix, DCE - Destination, NDr - Redirect
O - OSPF intra, OI - OSPF inter, OE1 - OSPF ext 1, OE2 - OSPF ext 2
ON1 - OSPF NSSA ext 1, ON2 - OSPF NSSA ext 2
D - EIGRP, EX - EIGRP external
S 2001:1234:0:111::/64 [1/0]
via 2001:1234:0:222:201:42FF:FE74:AC02
C 2001:1234:0:222::/64 [0/0]
via ::, FastEthernet0/0
L 2001:1234:0:222:2D0:58FF:FE77:3601/128 [0/0]
via ::, FastEthernet0/0
L FF00::/8 [0/0]
via ::, Null0
On Router2, the 2001:1234:0:111::/64 network is marked with S and installed in the IPv6 routing table as a static route. Router2 uses 2001:1234:0:222:201:42FF:FE74:AC02 as the next-hop IPv6 address to reach this remote network.
The 2001:1234:0:222::/64 network is marked with C, because it is directly connected to Router2 through FastEthernet0/0.
As a result, Router1 has a static route towards 2001:1234:0:222::/64, while Router2 has a static route towards 2001:1234:0:111::/64. Now, both routers have the necessary routing information to reach the remote IPv6 network.
After verifying the IPv6 static routes in the routing tables, we can test the connectivity between Router1 and Router2 with the ping command. Firstly, let’s send a ping from Router1 to the IPv6 address of Router2.
Router1# ping 2001:1234:0:222:2D0:58FF:FE77:3601

Type escape sequence to abort.
Sending 5, 100-byte ICMP Echos to 2001:1234:0:222:2D0:58FF:FE77:3601, timeout is 2 seconds:
!!!!!
Success rate is 100 percent (5/5)
The successful ping shows that Router1 can reach Router2 through the configured IPv6 Static Route. Then, we can test the connectivity in the opposite direction by sending a ping from Router2 to Router1.
Router2# ping 2001:1234:0:111:201:63FF:FE73:5A01

Type escape sequence to abort.
Sending 5, 100-byte ICMP Echos to 2001:1234:0:111:201:63FF:FE73:5A01, timeout is 2 seconds:
!!!!!
Success rate is 100 percent (5/5)
This successful ping verifies that Router2 can also reach Router1. So, our IPv6 Static Route Configuration provides connectivity in both directions.
Lastly, we can use the traceroute command to verify the path that IPv6 packets follow towards the destination. From Router1, we will run traceroute towards the IPv6 address of Router2.
Router1# traceroute 2001:1234:0:222:2D0:58FF:FE77:3601

Type escape sequence to abort.
Tracing the route to 2001:1234:0:222:2D0:58FF:FE77:3601

1 2001:1234:0:111:201:42FF:FE74:AC01 0 msec 0 msec 0 msec
2 2001:1234:0:222:2D0:58FF:FE77:3601 0 msec 0 msec 0 msec
The traceroute output shows the Layer 3 hops that IPv6 packets pass through to reach the destination. Here, the first hop is Router0 with the IPv6 address 2001:1234:0:111:201:42FF:FE74:AC01 and the second hop is the destination, Router2.
While ping verifies IPv6 connectivity, traceroute helps us verify the actual routing path towards the destination.
You can also watch IPv6 Static Routing Configuration video.
An IPv6 Default Static Route is a type of static route. It is used when the router does not have a more specific route to the destination in its routing table. In this case, the router forwards the traffic towards the next hop configured in the default route.
Default rotues for IPv4 is configured with IPv4 addresses. IPv6 Default routes are configured with IPv6 addresses. In IPv6, the default route is represented by the ::/0 prefix. It matches any IPv6 destination when there is no more specific route in the IPv6 routing table.
To configure an IPv6 default route on a Cisco router, we use the ipv6 route ::/0 <next-hop-address> command.
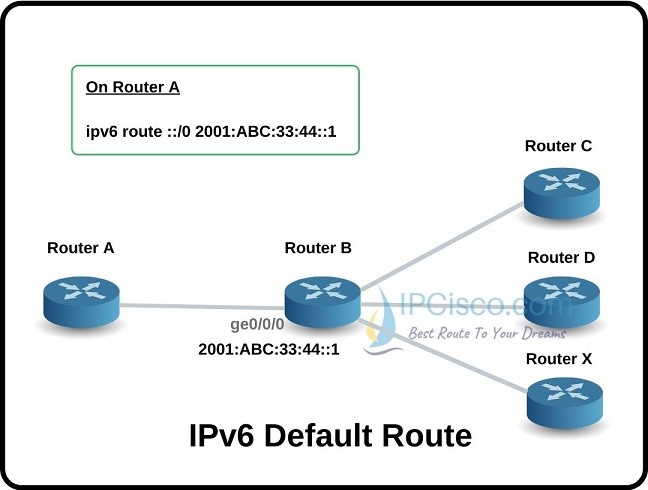
IPv6 Default Route Configuration
For example, let’s configure an IPv6 default route with 2001:ABC:33:44::1 as the next-hop IPv6 address.
Router(config)# ipv6 route ::/0 2001:ABC:33:44::1
With this Cisco IPv6 Default Route Configuration, if there is no more specific route for the destination IPv6 address in the routing table, the traffic is forwarded to the next-hop address 2001:ABC:33:44::1.
After configuring the IPv6 default route, we can verify it with the show ipv6 route command.
Router# show ipv6 route
IPv6 Routing Table - 4 entries
S   ::/0 [1/0]
     via 2001:ABC:33:44::1
C   2001:ABC:33:44::/64 [0/0]
     via GigabitEthernet0/0/0, directly connected
L   2001:ABC:33:44::2/128 [0/0]
     via GigabitEthernet0/0/0, receive
As you can see, the IPv6 default route is marked with S, which indicates a static route. The ::/0 prefix represents the IPv6 default route, while [1/0] shows the Administrative Distance and metric.
We can specifically verify the default route with show ipv6 route ::/0 command.
Router# show ipv6 route ::/0
Routing entry for ::/0
  Known via "static", distance 1, metric 0
  Route count is 1/1, share count 0
  Routing paths:
    2001:ABC:33:44::1
      Last updated 00:00:25 ago
The show ipv6 route ::/0 command displays detailed information about the IPv6 default route. Here, the route is learned via static configuration, its Administrative Distance is 1, and the next-hop IPv6 address is 2001:ABC:33:44::1.
Both IPv6 static routes and IPv6 default routes are manually configured routes. The main difference is the destination prefix they are used for.The table below summarizes the main differences between them.
| Feature | IPv6 Static Route | IPv6 Default Route |
|---|---|---|
| Destination | Specific IPv6 prefix | ::/0 |
| Purpose | Reach a specific IPv6 network | Forward traffic with no more specific route |
| Configuration | ipv6 route prefix next-hop |
ipv6 route ::/0 next-hop |
| Route Selection | Matches its specific prefix | Used when no more specific route exists |
An IPv6 static route is generally configured to reach a specific IPv6 network, while an IPv6 default route uses ::/0 and is used when there is no more specific route towards the destination.
In other words, the router always prefers a more specific matching route over the IPv6 default route.
A next-hop IPv6 address is used to specify the next router towards the destination. The router then determines the outgoing interface from its IPv6 routing table.
The default Administrative Distance of an IPv6 static route on Cisco routers is 1. A higher value can be used to configure a Floating Static Route.
No. We can configure an IPv6 static route with only a next-hop IPv6 address. We can also specify both the outgoing interface and next-hop address.
If the route becomes unavailable, the router can use another valid route towards the destination if one exists in the routing table.
Yes. Static and dynamic routes can be used together. Static routes are often used for specific destinations or as backup routes.
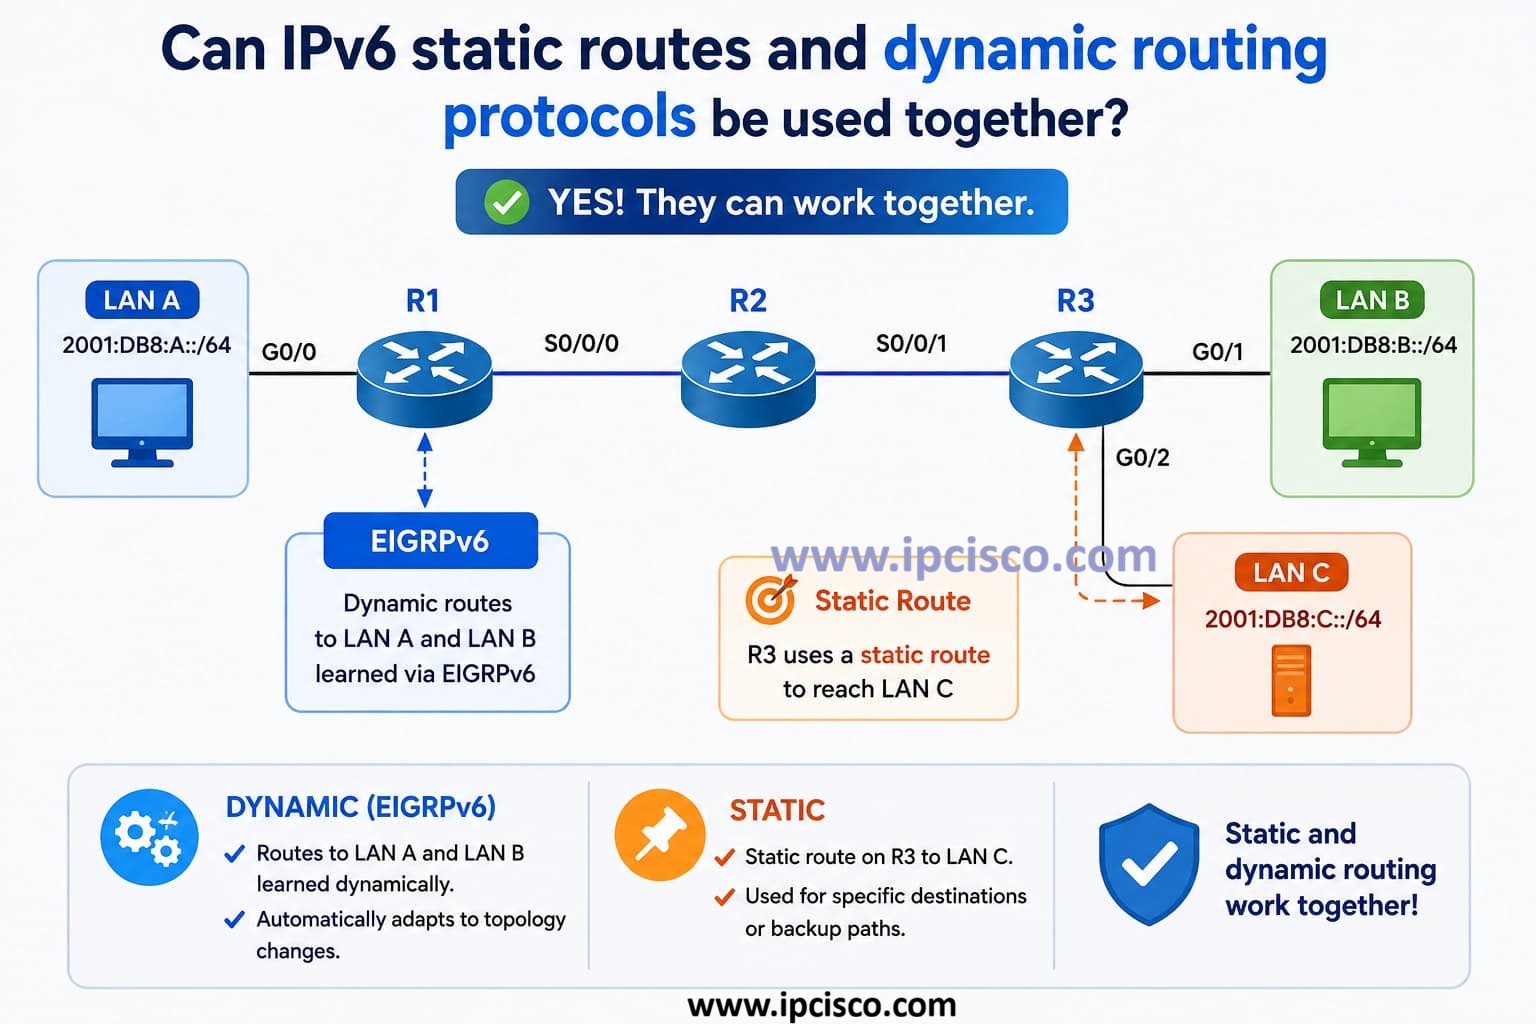
IPv6 Static Routes and Dynamic Routing Protocols
IPv6 static routing is simple, predictable and uses fewer router resources. It is especially useful in small and simple networks.
Static routes must be configured and maintained manually. Therefore, they are less scalable for large or frequently changing networks.
Yes. By configuring a higher Administrative Distance, an IPv6 static route can be used as a Floating Static Route and provide a backup path.
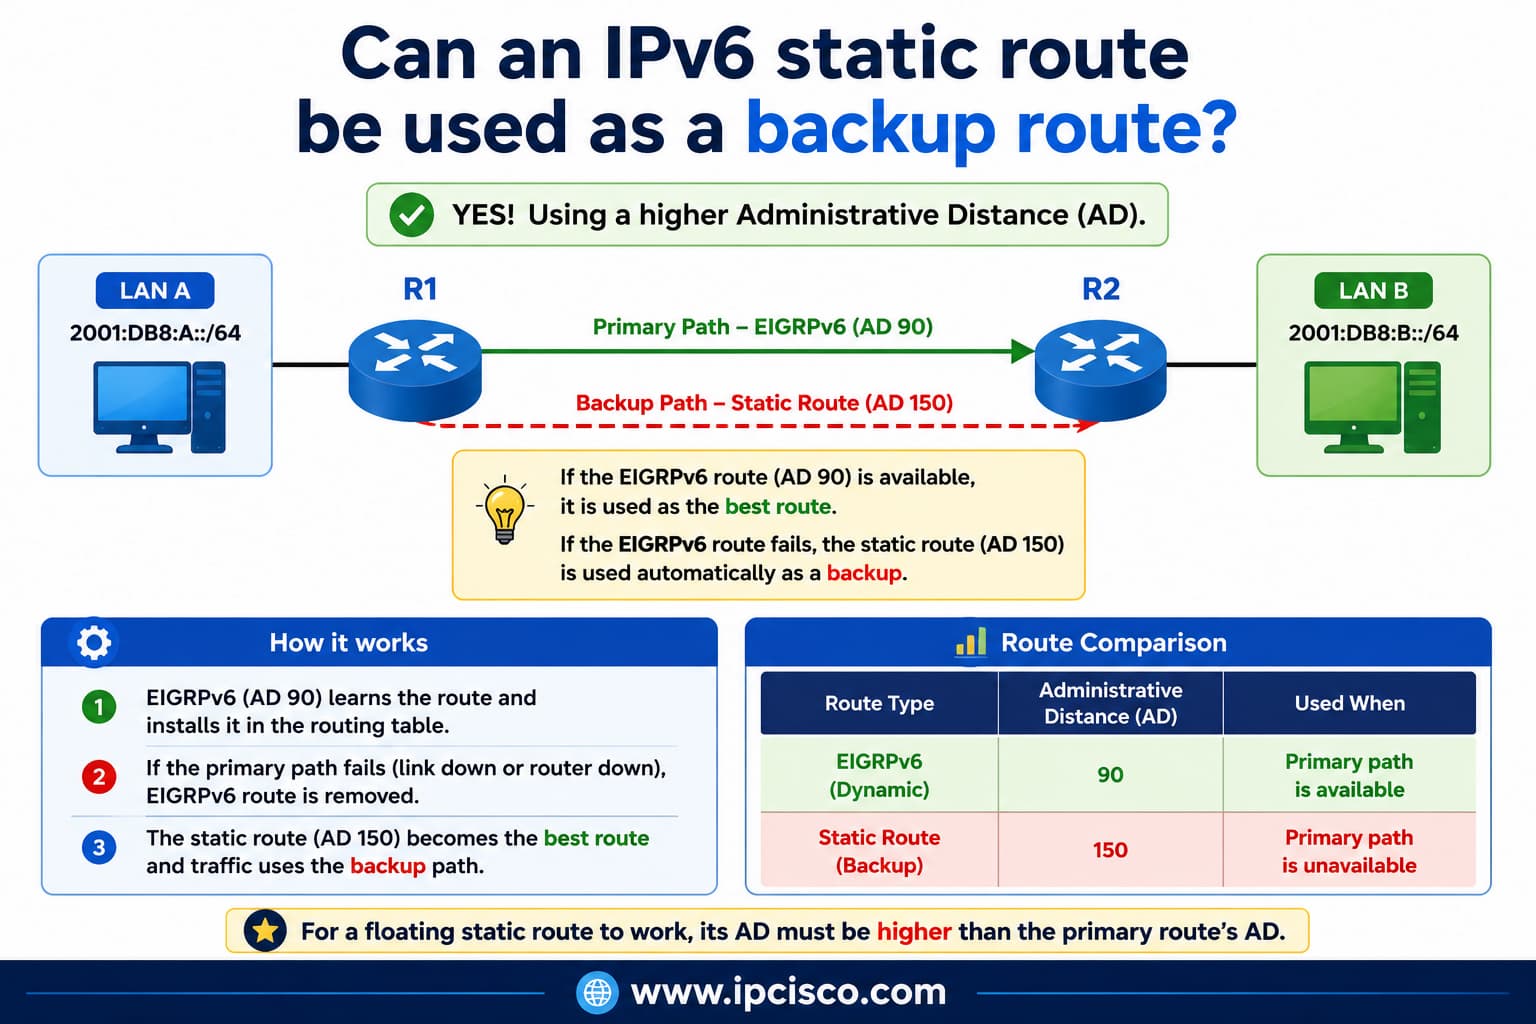
IPv6 Static Route as a Backup Route
It depends on the prefix length and Administrative Distance. For the same destination prefix, a standard static route with an AD of 1 is normally preferred over routes learned by common dynamic routing protocols.
No. IPv6 static routes are configured manually and do not automatically adapt to network topology changes.
Yes. We can configure multiple static routes towards the same destination. Their Administrative Distance can also be changed to create primary and backup routes.

Gokhan Kosem is a Network Engineer, Instructor and the Founder of IPCisco.com with 15+ years of experience in Cisco, Nokia, Huawei, Juniper, Linux, Service Provider Networks, Routing and Switching technologies.
He has worked on the backbone networks of major service providers and network vendors including Nortel, Alcatel-Lucent (Nokia) and has extensive hands-on experience with Cisco, Huawei, Juniper and Nokia networking technologies.
He has trained thousands of networking students worldwide through IPCisco.com, Udemy, books, labs, quizzes, and educational content across multiple social media platforms.
IPCisco.com | Best Route to Your Dreams







Leave a Reply