
- COURSES
- SPECIALS
- BLOG
- MEMBERS
- SHOP
- BOOKSHELF
- ABOUT
- ENROLL HERE

Table of Contents
In this lesson, we will learn how to configure and verify WLAN within the GUI using WPA2 PSK. We will use Cisco Packet Tracer for this configuration example and we will configure our wireless network step by step through the Graphical User Interface (GUI). WPA2 PSK (Wi-Fi Protected Access 2 Pre-Shared Key) is commonly used to secure wireless networks. With WPA2 PSK, the wireless router or access point and the wireless clients use the same pre-shared key for authentication. Unlike RADIUS-based authentication, we do not need a separate authentication server or individual usernames and passwords.
In this example, firstly, we will configure the WLAN settings on the wireless router. Then, we will configure the wireless clients to connect to the WLAN using the configured SSID and WPA2 pre-shared key. Lastly, we will verify our wireless connections.
For our WPA2 PSK WLAN Configuration example, we will use the simple wireless topology below. In this topology, we have one Wireless Router (WRT300N) and three wireless clients: two laptops and one smartphone. We will configure the WLAN on the Wireless Router through its GUI and connect all wireless clients to the network using the same WPA2 pre-shared key.
Before this configuration you can check what is WPA2, What is the diffence between WPA2 and WEP, WPA, and WPA3 on Wireless Security Protocols lesson.
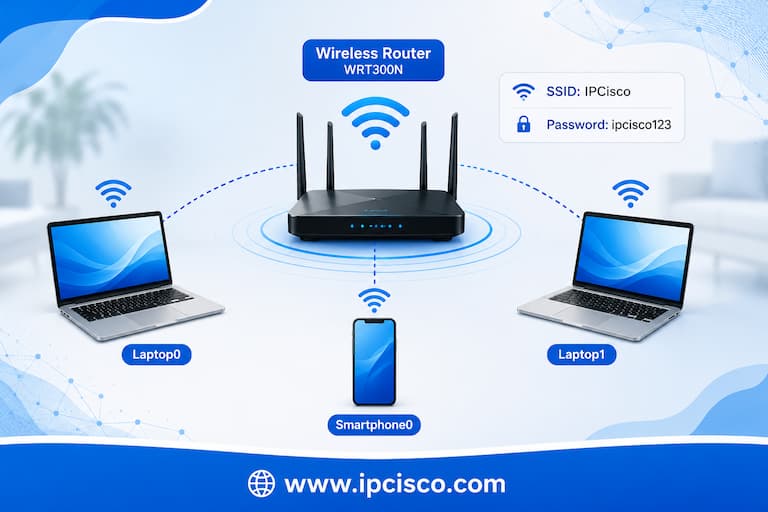
Real Life Wireless Network Topology
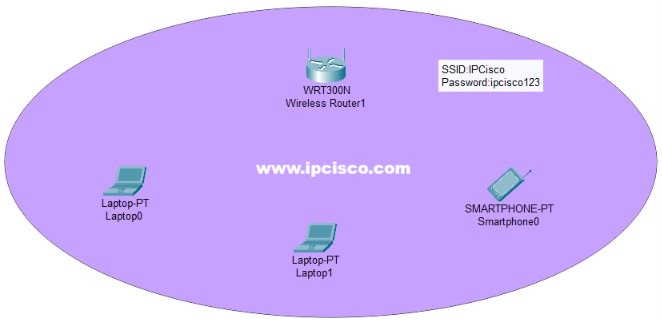
Packet Tracer Wireless Network Topology
Download All Cisco Packet Tracer Labs For CCNA and CCNP Exams!
To start our WLAN configuration, we will click the router and then click the GUI tab to do the configuration. Here, we will go to the Setup tab. Here, we will configure the basic DHCP Server settings. These settings are also given by default on GUI. Here, we will configure the below settings:
After these configurations, click Save Settings to apply the changes.
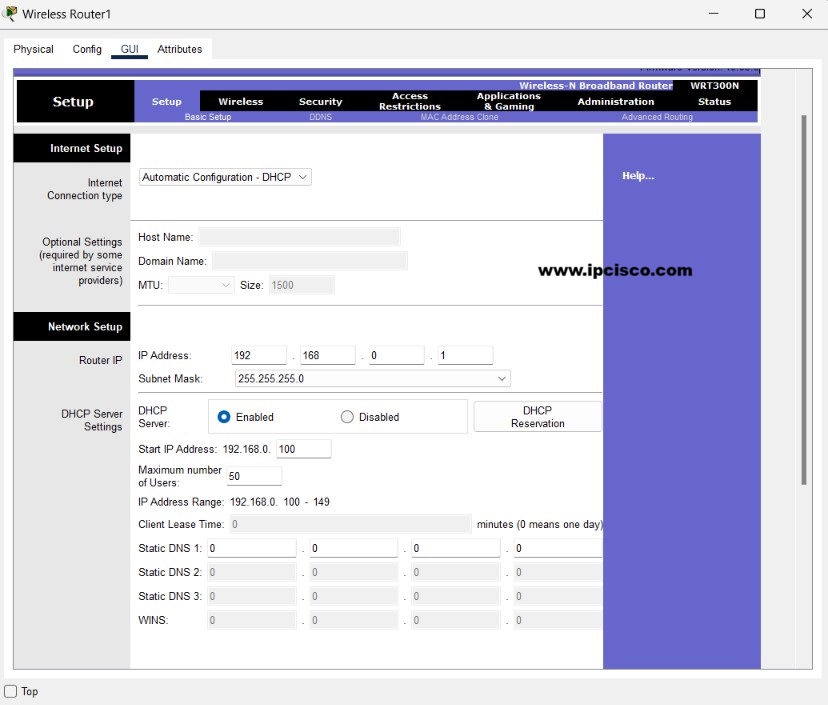
Wireless Router GUI DHCP Settings
After this configuration, the DHCP Server on the Wireless Router will automatically assign IP addresses to our wireless clients after they successfully connect to the WLAN.
After DHCO configuration, now, it is time to configure our WLAN. On the GUI of the Wireless Router, we will go to Wireless and then Basic Wireless Settings. Here, we will configure the basic wireless settings below.
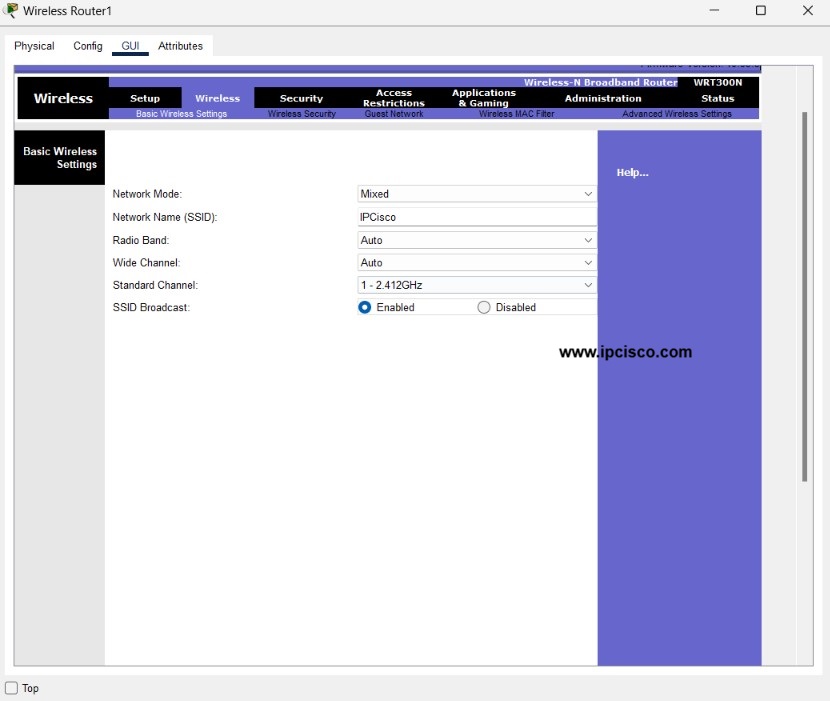
WLAN SSID GUI Configuration
Network Mode determines which wireless standards can be used by the wireless clients. Here, we will select Mixed mode to allow clients using different supported wireless standards (802.11b/g/n) to connect to the WLAN.
The SSID (Service Set Identifier) is the name of the wireless network. Laptops and smartphone will see IPCisco in the list of available wireless networks.
We will leave the Radio Band, Wide Channel and Standard Channel settings as default. Radio Band determines the frequency band used by the wireless network. Wide Channel is used to configure the wider channel for higher bandwidth, while Standard Channel determines the specific wireless channel used for communication. For this basic WLAN configuration, we do not need to change these settings.
Lastly, we will enable SSID Broadcast so that our wireless clients can discover the IPCisco WLAN.
After the configuration, click Save Settings.
After WLAN and SSI configuration, now we are in the security part of this configuration. We will secure our WLAN with WPA2 PSK. On the Wireless Router GUI, we will go to Wireless and under this tab Wireless Security tab.
Here, we will configure WPA2 PSK for our wireless network. We will select WPA2 Personal as the security mode and configure a pre-shared key. We will use the below settings:
The WPA2 pre-shared key is used to authenticate wireless clients. All devices that want to connect to our IPCisco WLAN must use the same pre-shared key.
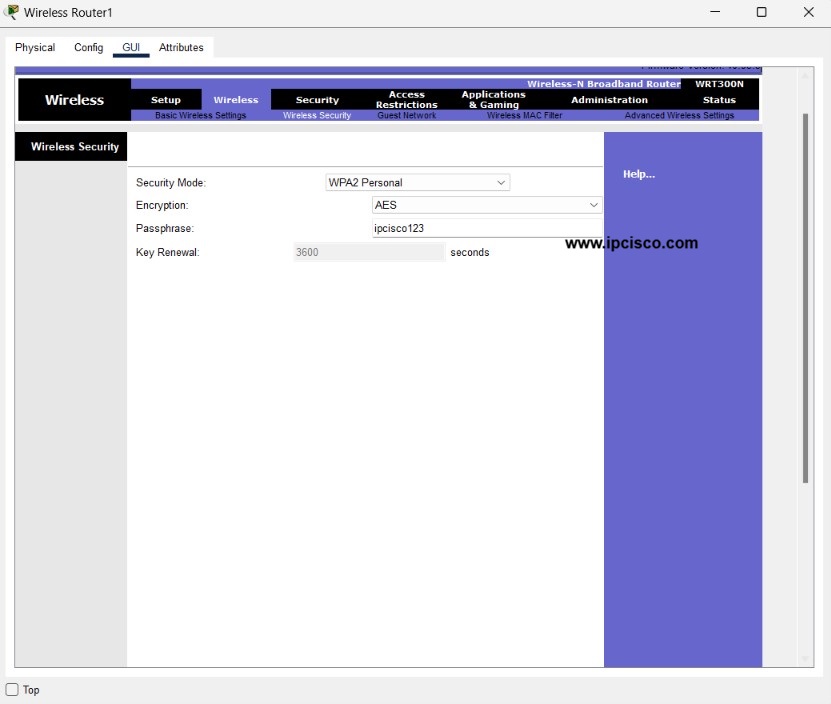
WPA2 PSK GUI Configuration
On encryption part, we will select AES to encrypt the wireless traffic between the wireless clients and the Wireless Router.
As Password, we will use ipcisco123. After these configurations, click Save Settings to apply the changes.
After configuring the Wireless Router and WPA2 PSK, now it is time to configure our wireless clients. Firstly, we will configure Laptop0.
Click Laptop0 and power off the laptop to change module. By default, there is an ethernet module, we will change it with a wireless module (WPC300N). We will remove the default module and then add wireless module. We will power on the laptop.
After power on, we will go to the Desktop tab. Then, click PC Wireless. Under this tab, we will go to connect tab and refresh the connection.
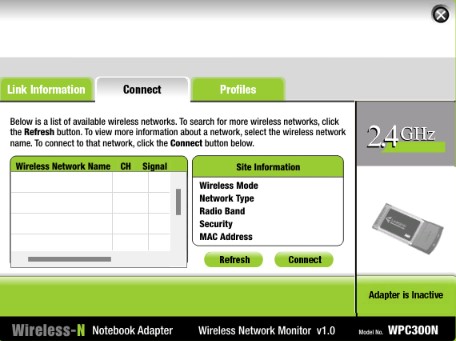
WLAN List on GUI
After refresh, IPCisco SSID will appear. We will select IPCisco and then we will click connect.
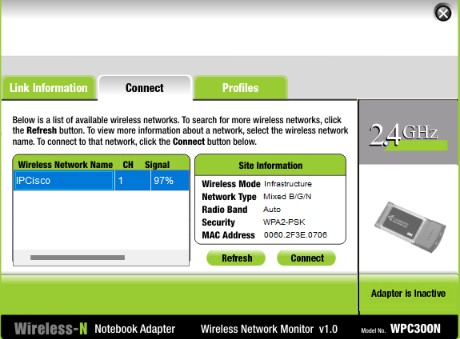
Connecting to a WLAN
Here, we will search for the available wireless networks and select our IPCisco WLAN. Then, we will connect to this WLAN by using the same WPA2 pre-shared key, “ipcisco123” that we have configured on the Wireless Router. After entering the correct pre-shared key, Laptop0 will associate with the Wireless Router.
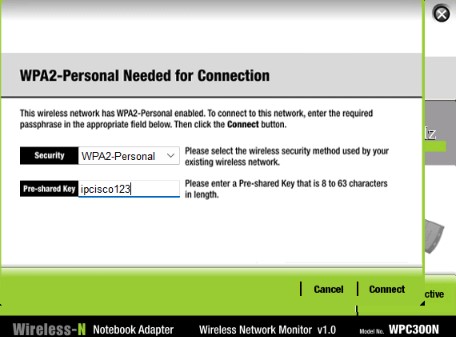
Setting Pre-Shared Key (Password) on GUI
After setting this password, Laptop0 will connect to the wireless router as below.
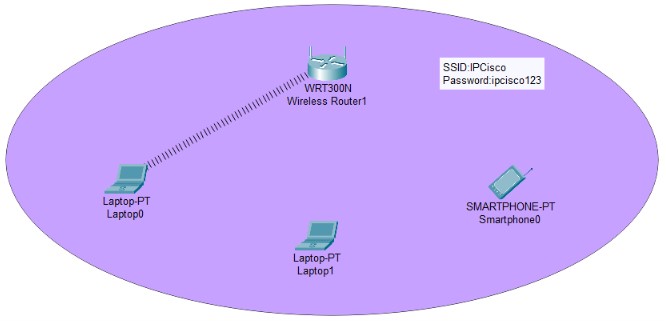
We will do the same configuration on Laptop1. Since WPA2 PSK uses a common pre-shared key, both laptops will use the same key to connect to the IPCisco WLAN. After adding the password, Laptop1 will also connect to the wireless router.

We can check ip addresses of the laptops. Their ip addresses will be automatically assigned by DHCP Server. To see these ip settings, we will go to desktop and then ip configuration part.
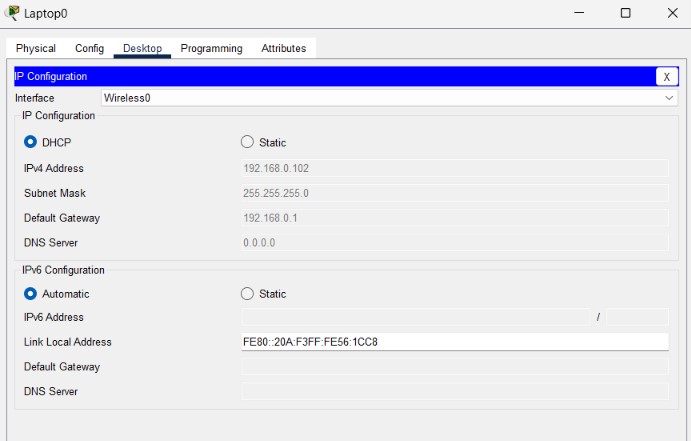
Client IP Check (Laptop0)
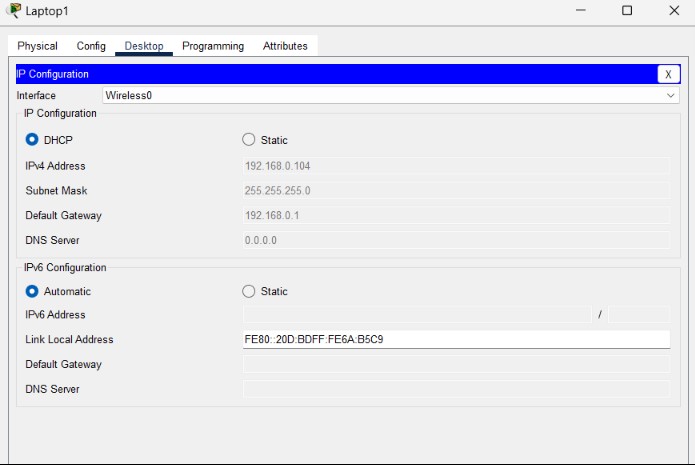
Client IP Check (Laptop1)
On smartphone, we will go to config tab and then wireless0 interface to configure the wireless settings of the smartphone. In this screen, we will set SSID as IPCisco. Then, we will select WPA2-PSK authentication. Lastly, we will enter the WPA2 pre-shared key, PSK Pass Phrase as “ipcisco123”.
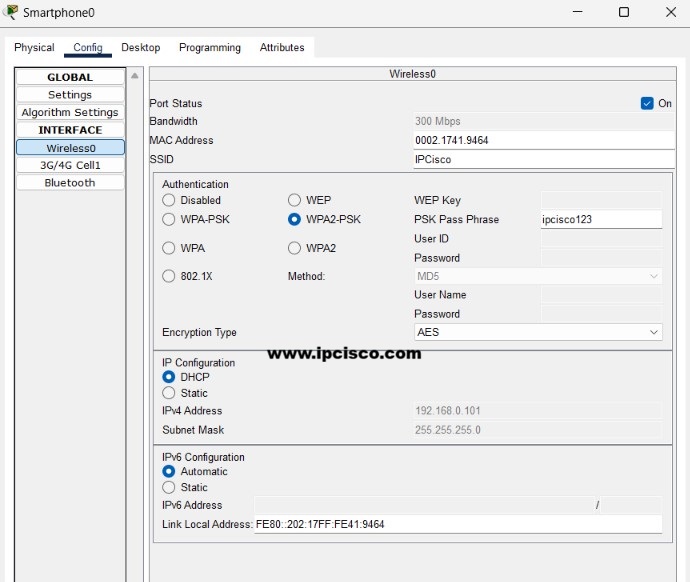
Smartphone SSID and Pre-Shared Key Configuration
After setting these parameters, smartphone will also connect to the wireless router.
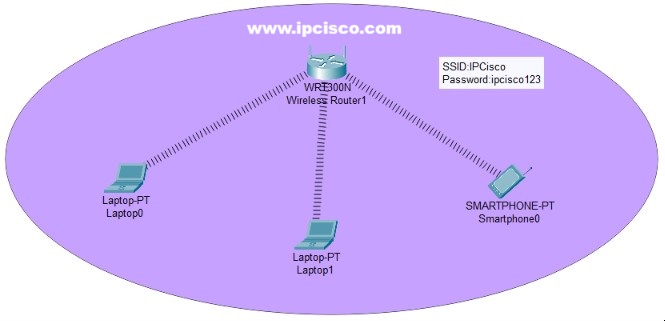
All Hosts are Connected to WLAN
Now, all our devices are connected to the wireless router.
After completing all these configurations, it is time to verify our WPA2 PSK WLAN Configuration. To do this, we will go to Laptop0 and ping Laptop1 and Smartphone from this laptop.
Firstly, let’s check our ip address again.
C:\> ipconfig

Wireless0 Connection:

Connection-specific DNS Suffix..:

Link-local IPv6 Address.........: FE80::20A:F3FF:FE56:1CC8

IPv6 Address....................: ::

IPv4 Address....................: 192.168.0.102

Subnet Mask.....................: 255.255.255.0

Default Gateway.................: 192.168.0.1
Now, let’s ping Smartphone. IP address of the smartphone is 192.168.0.101.
C:\>ping 192.168.0.101


Pinging 192.168.0.101 with 32 bytes of data:


Reply from 192.168.0.101: bytes=32 time=41ms TTL=128

Reply from 192.168.0.101: bytes=32 time=12ms TTL=128

Reply from 192.168.0.101: bytes=32 time=17ms TTL=128

Reply from 192.168.0.101: bytes=32 time=22ms TTL=128


Ping statistics for 192.168.0.101:

Packets: Sent = 4, Received = 4, Lost = 0 (0% loss),

Approximate round trip times in milli-seconds:

Minimum = 12ms, Maximum = 41ms, Average = 23ms
It is successful. Now, let’s ping the other laptop, laptop1. Its IP address is 192.168.0.104.
C:\>ping 192.168.0.104


Pinging 192.168.0.104 with 32 bytes of data:


Reply from 192.168.0.104: bytes=32 time=33ms TTL=128

Reply from 192.168.0.104: bytes=32 time=15ms TTL=128

Reply from 192.168.0.104: bytes=32 time=15ms TTL=128

Reply from 192.168.0.104: bytes=32 time=15ms TTL=128


Ping statistics for 192.168.0.104:

Packets: Sent = 4, Received = 4, Lost = 0 (0% loss),

Approximate round trip times in milli-seconds:

Minimum = 15ms, Maximum = 33ms, Average = 19ms
It is also successful.
We have verified that the wireless clients are successfully connected to the WLAN and can communicate through the Wireless Router. Our WLAN Configuration Using WPA2 PSK is working successfully.
WPA2 PSK is the abbreviation fo Wi-Fi Protected Access 2 Pre-Shared Key. It is a wireless security method that uses a shared password (pre-shared key) to authenticate devices connecting to a WLAN. In this method,the same pre-shared key is configured on the wireless router and wireless clients as its name implies.
To configure a WLAN using WPA2 PSK, first configure the SSID on the wireless router or access point. Then, select WPA2 Personal as the security mode and configure a pre-shared key. Wireless clients can connect to the WLAN by selecting the SSID and entering the same password.
WPA2 PSK uses a common pre-shared key for wireless authentication and does not require an authentication server. On the other hand, WPA2 Enterprise uses individual user credentials and a RADIUS server for the authentication.
No. WPA2 PSK does not require a RADIUS server. Wireless clients authenticate by using the same pre-shared key configured on the wireless router or access point.
SSID is the abbreviation of Service Set Identifier. It is the name of the wireless network. Wireless clients find a wireless network name (SSID) and enters the correct password to connect that network.
You can verify WPA2 PSK WLAN configuration by checking whether the wireless client successfully connects to the correct SSID using the configured pre-shared key. You can also check the client’s IP address and use the ping command to test connectivity between devices in the wireless network.

Download All Cisco Packet Tracer Labs For CCNA and CCNP Exams!

Gokhan Kosem is a Network Engineer, Instructor and the Founder of IPCisco.com with 15+ years of experience in Cisco, Nokia, Huawei, Juniper, Linux, Service Provider Networks, Routing and Switching technologies.
He has worked on the backbone networks of major service providers and network vendors including Nortel, Alcatel-Lucent (Nokia) and has extensive hands-on experience with Cisco, Huawei, Juniper and Nokia networking technologies.
He has trained thousands of networking students worldwide through IPCisco.com, Udemy, books, labs, quizzes, and educational content across multiple social media platforms.
IPCisco.com | Best Route to Your Dreams