- COURSES
- SPECIALS
- BLOG
- MEMBERS
- SHOP
- BOOKSHELF
- ABOUT
- ENROLL HERE
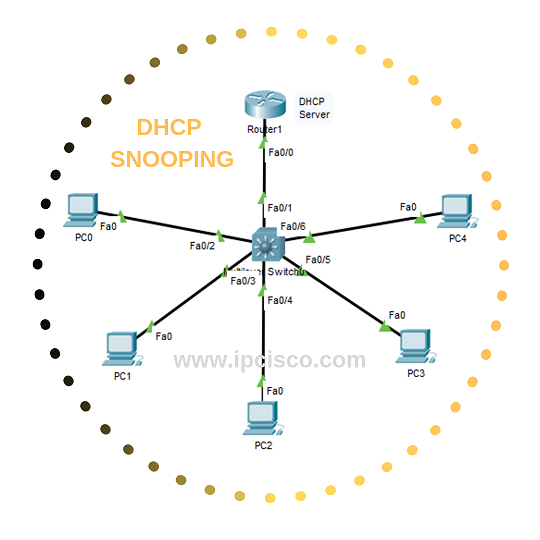
Table of Contents
DHCP Snooping Configuration is an important security mechanims towards any malicious DHCP attacks. In this lesson, we will learn How to use this important mechanims and How to Configure DHCP Snooping on Cisco swithes.
For our DHCP Snooping Configuration Example, we will use the below simple topology:
We will do the configuration below step by step:
Now, let’s focus on our DHCP Snooping Example and learn DHCP Snooping Config step by step.
Firstly, we will configure interace ip addresses of the router and the switch. Here, router will be our DHCP Server.
Router# config terminal
Router(config)# interface fastethernet 0/1
Router(config-if)# ip address 192.168.0.1 255.255.255.0
Router(config-if)# no shutdown
Router(config-if)# exit
Router(config)#
Secondly, we will create our DHCP Server with DHCP Pool with the name XYX. Our DHCP Server will be the router above. And our DHCP Pool addresses will be the ip address in 192.168.0.0/24 block.
Router(config)# ip dhcp pool XYZ
Router(dhcp-config)# network 192.168.0.0 255.255.255.0
Router(dhcp-config)# end
Router# copy run start
Here, we will enable DHCP Snooping on the switch. DHCP Snooping will work on it. DHCP Snooping can be enabled globallay with “ip dhcp snooping” command or it can be enabled on a specific or a range of VLANs with “ip dhcp snooping vlan vlan-id” command. Here, we will enable DHCP Snooping, globally.
Switch# configure terminal
Switch(config)# ip dhcp snooping
Switch(config)# end
In DHCP Snooping mechanims there are wo port types as we have talked about before in the DHCP Snooping lesson. One of them is trusted and the other is untrusted. Here, we will set the trusted ports. Here, simply, we will set one trusted port. The port on the switch that is connected to the DHCP Server (router).
We will go to the interface that is connected to the router and set it as trusted port with “ip dhcp snooping trust” command.
Switch(config)# interface fastethernet 0/1
Switch(config-if)# ip dhcp snooping trust
Switch(config-if)# end
There is one more important configuration steps here. We can also set DHCP Requests that can be received in a second. If this rate exceeds the configured one, the traffic is dropped. Here,let’s set it 20.
Switch(config)# interface fastethernet 0/1
Switch(config-if)# ip dhcp snooping limit rate 20
Switch(config-if)# end
To verify our DHCP Snooping configuration, we can use the below verification commands:
Router# show ip dhcp snooping bindings
Router# show ip dhcp snooping
Trusted ports are interfaces connected to legitimate DHCP servers or trusted network devices. Untrusted ports are typically connected to end users and cannot send DHCP server messages.
DHCP Snooping creates a DHCP binding table containing MAC addresses, IP addresses and VLAN information. Dynamic ARP Inspection (DAI) uses this table to validate ARP packets and prevent ARP spoofing attacks.
Yes. DHCP Snooping blocks unauthorized or rogue DHCP servers by allowing DHCP offer and acknowledgment messages only from trusted switch ports.
Most Cisco Layer 2 and Layer 3 switches support DHCP Snooping, including Catalyst series switches commonly used in enterprise networks.
No. DHCP Snooping is disabled by default on Cisco switches and must be manually configured for specific VLANs and interfaces.
If all ports are untrusted, legitimate DHCP server responses will also be blocked, preventing clients from receiving IP addresses automatically.


Networking is life
Certainly yes :)
Thanx
Welcome