- COURSES
- SPECIALS
- BLOG
- MEMBERS
- SHOP
- BOOKSHELF
- ABOUT
- ENROLL HERE
HSRP (Hot Standby Router Protocol) is one of the First Hop Redundancy Protocol (FHRP) that is Cisco proprietary. To configure HSRP on Cisco devices, there are specific configuraiton commands. In this lesson, we will learn HSRP Configuration, on Cisco routers.
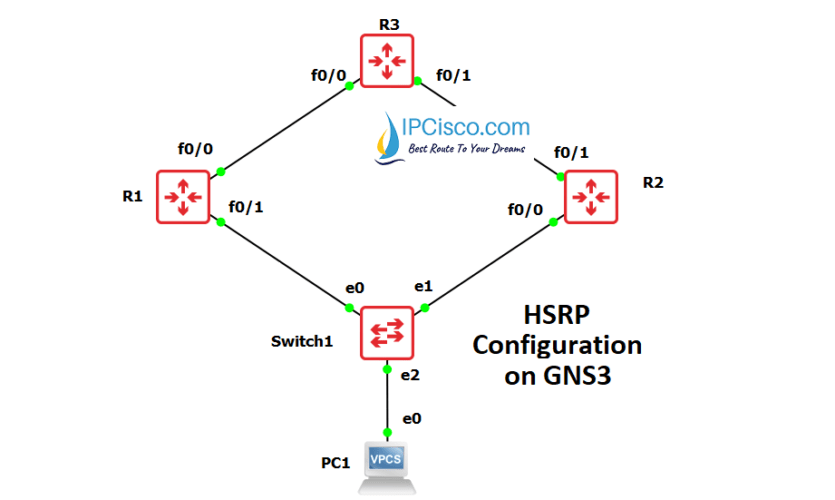
For our Cisco HSRP Configuration Example on GNS3, we will use the below GNS3 network topology. Some of the below configurations has done before this example. Here, we will focus on HSRP part only. As a summary, on each router, below configurations is needed.
R1 & R2
R3
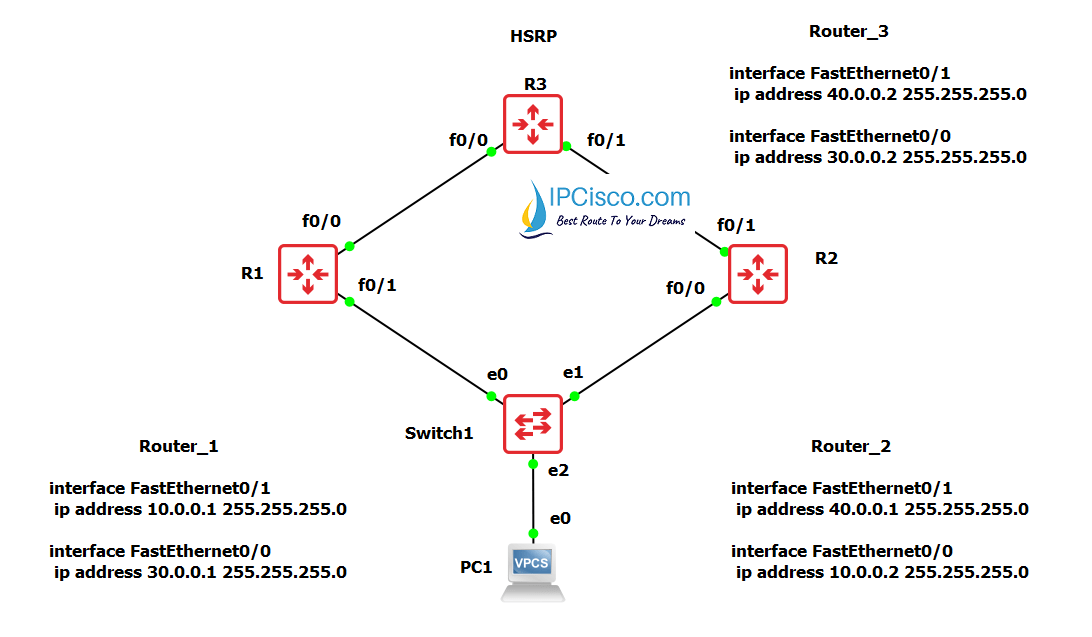
The ip configurations of the topology will be done, like the topology picture.
Now, let’s start our Cisco HSRP Configuration with Router 1.
You can Download GNS3 HSRP Configuration File.
Table of Contents
On Router 1, at the beginning, we will configure the interface ip address. After that we will start HSRP Configuration. Firstly, we will assign HSRP Group Number as 10. Then, we will assign a Priority value as 110. As you know, by default HSRP priority is 100. And the router that has the highest HSRP priority is elected as Active Router. After that, we will usee “preempt” command to open preemption. Laslty, for tracking, we will assign a decrement value for a link. If a failure occurs in this link, then priority value will decrease and this will effect Active router selection.
R1(config)#int fa0/1
R1(config-if)# ip address 10.0.0.1 255.255.255.0
R1(config-if)# standby 10 ip 10.0.0.3 //Assigning group for HSPR ‘10’
R1(config-if)# standby 10 priority 110 // Assigning priority
R1(config-if)# standby 10 preempt // Forceful assignment of active role
R1(config-if)# standby 10 track FastEthernet0/0 20 //Tracking the WAN interface for Failover
We will configure Router 2 like Router 1. Here, we will only not used a tracking command and give a different HSRP priority value. The physical interface of this router will be different but the Standby IP address will be the same of Router 1.
R2(config)#int fa0/0
R2(config-if)# ip address 10.0.0.2 255.255.255.0
R2(config-if)# standby 10 ip 10.0.0.3 //Assigning group for HSPR ‘10’
R2(config-if)# standby 10 priority 100 // Assigning priority (100 – Default)
R2(config-if)# standby 10 preempt // Forceful assignment of active role
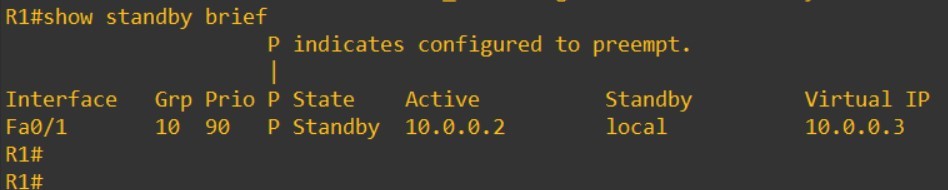
To verify our Cisco HSRP Configuration, firstly we will use “show standby brief” command onn R1 and R2. With this command, we will see the Active and Standby routers. As you can see below, R1 is the Active Router.

And, R2 is the Standby router, in other words, backup router.

The traffic will traverse via R1, because R1 is the Active router..

To test our HSRP Configuration during a failure, we will shut down fa0/0 interface of R1 . Remember, we have track configured in HSRP for fa0/0 whose action is to decrement the priority value by 20 when the interface goes down.
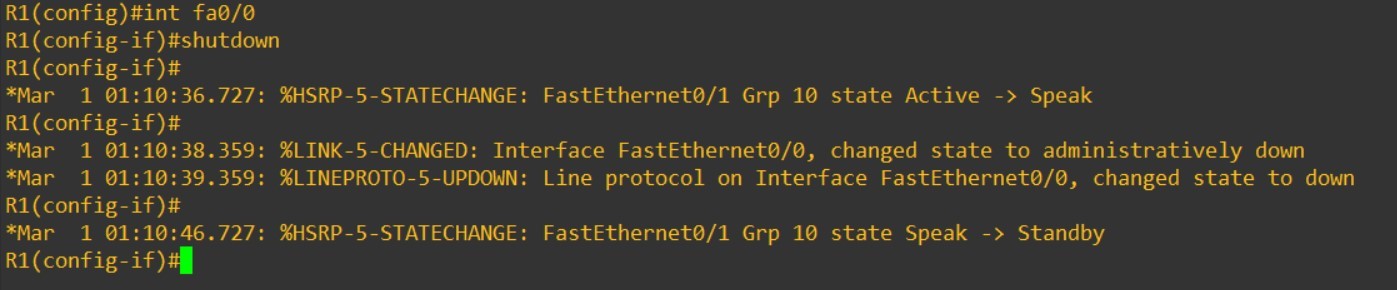
After this shutdown, Router 1 fa0/0 interface HSRP priority will decrement 90 from 110. And this will make Router 1 as new Standby router. Because, Router 2 has priority value as 100 and this is higher that the new priority value of Router 1.
As you can see below, Router 2 is now in Active state.

And if we use, trace command to check the traffic way, we will see that, traffic will go through Router 2.

In this lesson, we have learned Cisco HSRP Configuration on GNS3. If you would like to learn HSRP more, you can also check HSRP Lesson and HSRP Cisco Configuration on Packet Tracer.


Leave a Reply