- COURSES
- SPECIALS
- BLOG
- MEMBERS
- SHOP
- BOOKSHELF
- ABOUT
- ENROLL HERE
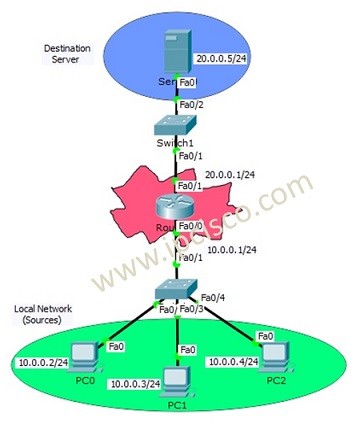
Table of Contents
In this lesson we will see Cisco Standard ACL Configuration and how to configure Standart Access-List in Packet Tracer. There are three types Access Contol Lists in common. These access list types are :
You can DOWNLOAD the Cisco Packet Tracer example with .pkt format at the End of This Lesson.
Standard Access-Lists are the simplest one. With Standard Access-List you can check only the source of the IP packets. On the other hand, with Extended Access-Lists, you can check source, destination, specific port and protocols. Lastly, with Named Access-Lists, you can use names instead of the numbers used in standard and extended ACLs. It do not have too much difference, but it is different with its named style.
In this lesson, we will focus on Standart Access-List Configuration with Cisco Packet Tracer. We will focus on the below topology.
Here, with our Standard Access-List, we will prohibit PC2 to access the server. But PC0 and PC1 can still access the server.
For our Standard Access-List, we can use the ACL Number 1 to 99. These numbers can be 100 to 199, if you use extended ACLs.
Let’s start to do Cisco Standard ACL Configuration. We will configure the Standard Access-List on router .
Router # configure terminal
Router (config)# ip access-list standard 1
Router (config-std-nacl)# permit 10.0.0.2 0.0.0.0
Router (config-std-nacl)# permit 10.0.0.3 0.0.0.0
With this ACL configuration that we have written, we permit PC0 and PC1 to access the server. At the end of ACLs, there is an “Implicit Deny”. These Implicit Deny, prohibits the other IP addresses. Because of the fact that we did not, allow PC2’s IP address, it is automatically denied and can not access the server.
Here, there is no need to write but to show how to write deny, I will write the deny command also. As I said before, for this scenario, it is not necesary. But, you can write.
Router (config-std-nacl)# deny 10.0.0.4 0.0.0.0
Router (config-std-nacl)# end
Router # copy run start
After creating ACLs, we need to apply this ACL to the interface. For Standard Access-List, it is better to apply this ACL, close to the destination. So, for this configuration, we will apply our standard acceess list to the fastethernet 0/1 interface of the router.In other words, we will add ACL to the server face of the router.
You can also DOWNLOAD all the Packet Tracer examples with .pkt format in Packet Tracer Labs section.
Router (config)# interface fastethernet 0/1
Router (config-if)# ip access-group 1 out
Router (config-if)# end
Router # copy run start
As you see above, to write a Standard Access-List, firstly we enter the standard ACL configure mode, then we write permit/deny statement. After that we write the IP Address that we would like to effect. Then, we write the wildcard mask for that subnet. Here, we only deny a specific IP, so our wildcard mask will be 0.0.0.0.
Lastly, we apply the standard access-list that we write, to the interface close to the destination.
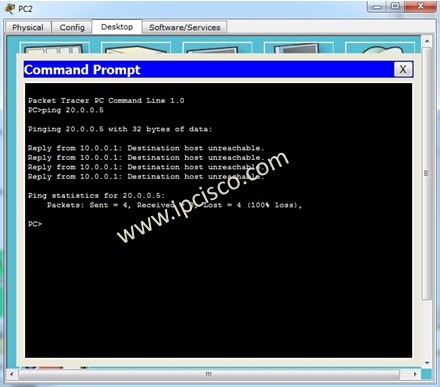
Now, it is time to verify. Let’s verify our Standard ACL Configuration with Cisco Packet Tracer.Our aim was restricting PC2 to access the server. But PC0 and PC1 would still access the server.
Here we will ping the server ip address, 20.0.0.5 from each PC.
PC0> ping 20.0.0.5
PC1> ping 20.0.0.5
PC2> ping 20.0.0.5
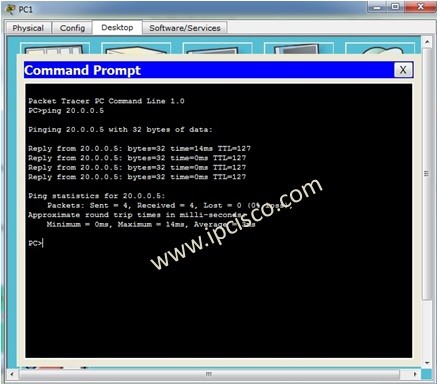
Here, the ping from PC0 and PC1 will be successfull. But, ping from PC2 will be unsuccessfull. The fastethernet 0/0 interface of router, willl send a “destination host unreachable” message to the PC2.
In this lesson, we have configured Standard Access-List with Packet Tracer. For Extended and Named Access-list configurations, you can check other ACL lessons.


Leave a Reply