- COURSES
- SPECIALS
- BLOG
- MEMBERS
- SHOP
- BOOKSHELF
- ABOUT
- ENROLL HERE
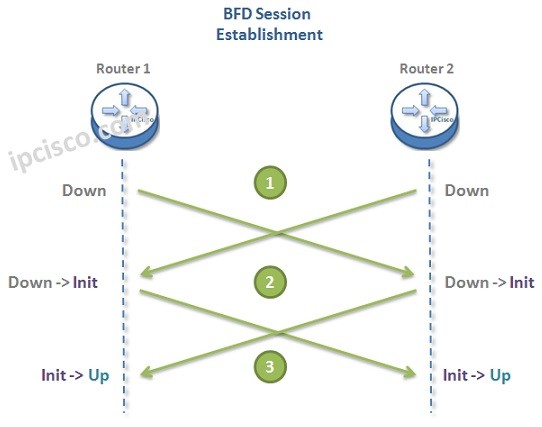
Table of Contents
For networks, failure detection is very important. There are vairous mechanisms used for this purpose. One of them is BFD (Bidirectional Forwarding Detection). In this lesson, we will learn bfd meaning, what is BFD and why we use this mechanism between nodes.
BFD is basically another Hello protocol based on UDP that detects link failures on forwarding plane. It runs on top of Layer 2 protocols that is in use between two adjacent systems. You can also view wiki definion for BFD.
Bidirectional Forwarding Detection is independent from media, routing protocols and data protocols. By being independant from media, routing protocols and data protocols, BFD mechanism can be used with all routing protocols and data protocols.
Routing protocols has an hello mechanism by default to detect the link failures. But this mechanism is differenciate from router to router. With Bidirectional Forwarding Detection, a common link failure detection mechanism created. And this mechanism can be used with all routing protocols. So, using Bidirectional Forwarding Detection mechanism provides a very fast convergence after a link failure if you compare with routing protocol hello mechanism.
Bidirectional Forwarding Detection is one way protocol. So tu use this mechanism, you need to configure both ends with this protocol.
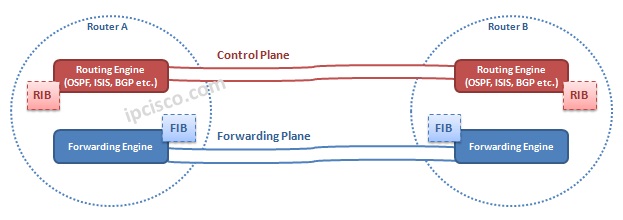
As you know there are two planes in a network. One of them is control plane, in which, route processing is done. And the other is forwarding plane, in which, the data sending is done after the establishment of the session.
Bidirectional Forwarding Detection has two versions. These are Version 0 and Version 1.
You can Download Cisco Packet Tracer Labs!
After learning bfd meaning and answering what is BFD question and learnign some general information about it, now, let’s learn BFD Session Establishment. Session establishment is done throught BFD messages. These messages sets the states of both ends as mentioned below:
Bidirectional Forwarding Detection has two different Session Establishment modes. This is divided into two according to how is the discriminators that differ Bidirectional Forwarding Detection sessions are configured. What are these Session Establishement modes? These are :
In Static Session Establishment, local and remote discriminators in BFD messages are configured with commands. In Dynamic Session Establishment, this is done by system dynamically. Let’ s check these Session Establishment Steps one by one.
As you can below, BFD Session Establishment is done with a three-way handshake. There are three basic steps to establish BFD Session in other words.
Bidirectional Forwarding Detection mechanism uses packets to inform both ends that the protocol is configured. With these packets, it provides basic connectivity and the parameter negotiation.
The main role of Bidirectional Forwarding Detection is detecting the link failures by sending BFD packets in regular intervals. It sends the packet and wait. If there is no reply until a certain of time, it determines that the link is down. This is the same as Hello messages.
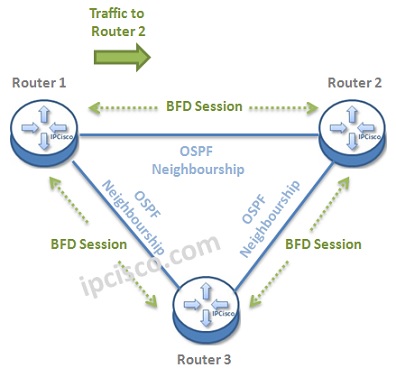
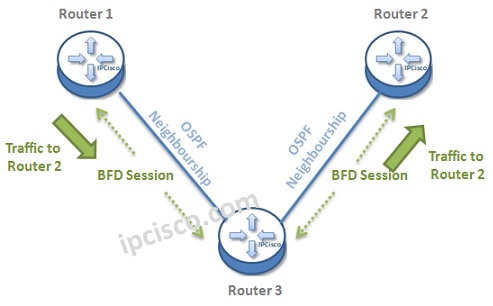
Let’s give an example to understand this mechanism better. Below, there is a topology, that BFD Sessions are also established in each ends. Think about that a traffic is coming from Router 1 to Router 2.
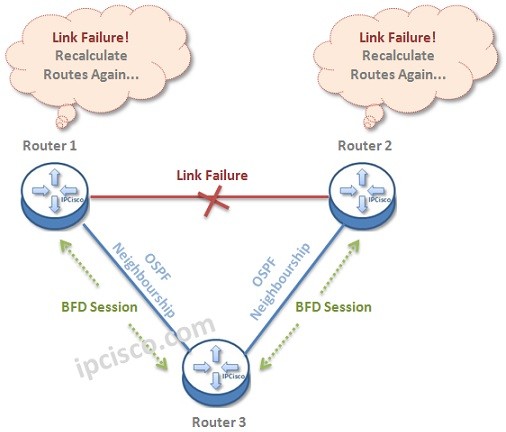
What if the connection between these two routers fails?
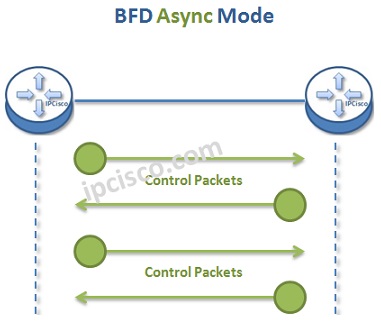
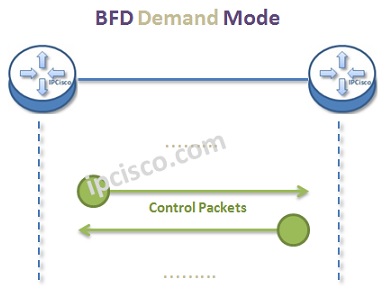
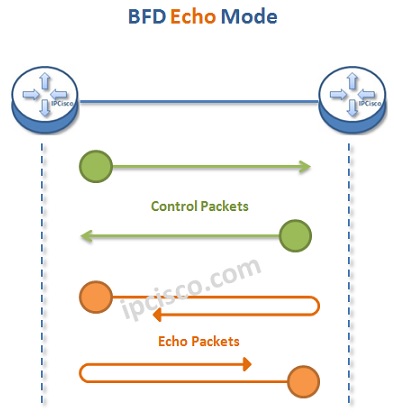
Bidirectional Forwarding Detection has different operation modes. These are :
In Asyncronous Mode, two end nodes send Conrol Packets each other periodically. If they do not get some of the Control Packets, they decide that there is a failure. In Async Mode, Conrol Packets flow in each direction.
AS we mentioned above, Bidirectional Forwarding Detection is used to detect link failure. But, there can be many types of link failures. BFD is generally used to check the below availabilities:
Bidirectional Forwarding Detection is used with many protocols for link failure detection. These protocols are:
Beside the advantages of BFD, it has also some disadvantages. First of all it can have more resource demands. This changes from platform to platform.
Secondly, Bidirectional Forwarding Detection is not aware of Layer 2 link bundelling. When you configure it on one link, it operetas for single link, rather than the other bunde member.
What is the different between two Bidirectional Forwarding Detection versions? Mainlly, these versions shows how device exchange BFD control packets to detect any link failure. Let’s focus on each and learn the details of BFD versions.
The first version of Bidirectional Forwarding Detection. It uses hello packets , detection times and session establishment. There is no authentication and not good at error handling. So, it is not used in production networks.
The second version and the up to date version is BFD version 1. It is explained in RFC 5880. It is the enhanced version of version 0. Version 1 supports Authentication like MD5 and SHA1, diagnostic codes and admin control (up, down and init states).
To enable bfd on a Cisco router interface, firstly, we will go under that interface. Here, we will configure it for GigabitEthernet1/1. Under this interface, we will use bfd interval, min_rx and multiplier parameters. Here, bfd interval means, send bfd packet every this interval. Here, we will set it to 30 ms. Min_rx shows the interval of received bfd packets. We will use 30 ms Min_rx time. And multiplier means if you miss this number of packets, this means that connection is down. Here, we will use 5 as multiplier.
Router# configure terminal
Router(config)# interface GigabitEthernet1/1
Router(config-if)# bfd interval 30 min_rx 30 multiplier 5
Router(config-if)# exit
We can activate bfd under routing protocols. Below, you can find configuration examples that shows how to enable bfd under OSPF, EIGRP and BGP.
To enable bfd under OSPF, we should go udenr OSPF process and here, with “bfd all-interfaces” command, we can enable it under all OSPF interfaces.
Router# configure terminal
Router(config)# router ospf 1
Router(config-router)# bfd all-interfaces
Router(config-router)# exit
To enable BFD under EIGRP, we use “bfd all-interfaces” command again to enable it for all EIGRP interafces under the EIGRP process.
Router# configure terminal
Router(config)# router eigrp 100
Router(config-router)# bfd all-interfaces
Router(config-router)# exit
To enable BFD for a BGP neighbor, firstly, we go under that bgp area and then we will define the neighbor. After neighbor configuration, we will use “fall-over bfd” command with the related neighbor. For our neighbor, we will use “neighbor 10.0.0.1 fall-over bfd” command. This command will enable BGP to register with BFD to receive fast peering session deactivation messages from BFD.
Router# configure terminal
Router(config)# router bgp 64000
Router(config-router)# neighbor 10.0.0.1 remote-as 65000
Router(config-router)# neighbor 10.0.0.1 fall-over bfd
Router(config-router)# exit
To configure authentication for BFD, firstly, we will use “bfd-template single-hop template-name” command. This command creates BFD template and goes to BFD configuration mode. Here, we will use MYBFD-AUTH as template name.
Under this mode, we can configure interval, min_rx and multiplier parameters again.
Then, we will use “authentication authentication-type keychain keychain-name ” command. We will use MD5 as authentication type and MYBFD_KEYS as keychain-name.
Router# configure terminal
Router(config)# bfd-template single-hop MYBFD-AUTH
Router(config-bfd-tmpl)# interval 30 min_rx 30 multiplier 5
Router(config-bfd-tmpl)# authentication md5 keychain MYBFD_KEYS
Router(config-bfd-tmpl)# exit
To configure key chain, we will enter key chain with “key chain chain-name” command. This defines an authentication key chain needed to enable authentication for routing protocols and enters key-chain configuration mode.
Then we will use “key key-id” command. This command defines an authentication key on the key chain and enters keychain-key configuration mode. We will use 1 as key id.
After that, we will use “key key-id” command. This command defines an authentication string for a key. Here, our key is ipciscokey.
Router(config)# key chain MYBFD_KEYS
Router(config-keychain)# key 1
Router(config-keychain-key)# key-string ipciscokey
Router(config-keychain-key)# exit
Router(config-keychain)# exit
For BFD Authentication, lastly, we will add this bfd authentication template MYBFD-AUTH, to interface. To do this, we will use “bfd template BFD-AUTH” command under the related interface.
Router(config)# interface GigabitEthernet1/1
Router(config-if)# bfd template MYBFD-AUTH
Router(config-if)# exit
To verify bfd, we use “show bfd neighbors” and “show bfd neighbors detail” Cisco commands on Cisco routers. These commands verifies if BFD neigbor active or not. And it displays the routing protocols that use Bidirectional Forwarding Detection.
We have learned BFD meaning and the details of how it works. This one way protocol is basically a Hello protocol to detect link failures quickly. You will use this key protocol a lot in your networking operations.


Leave a Reply