- COURSES
- SPECIALS
- BLOG
- MEMBERS
- SHOP
- BOOKSHELF
- ABOUT
- ENROLL HERE
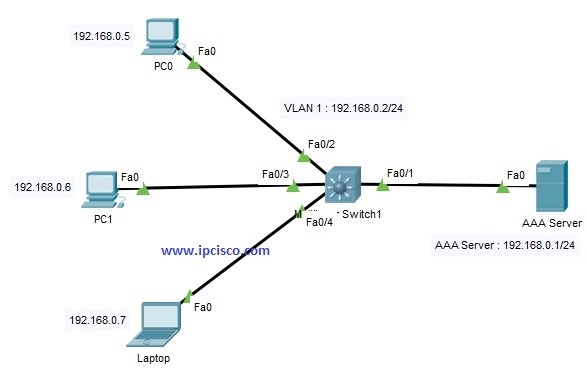
Table of Contents
TACACS+ is one of the AAA Protocols originally created by Cisco. But after a while it became a Standard AAA Protocol. In this lesson, we will learn Cisco TACACS+ Configuration on Packet Tracer.
We will configure the below topoology for Cisco TACACS+ Configuration.
Here, we will do the TACACS+ Configuration on Cisco Switch. And in the AAA Server, we will define AAA Credentials. Anyone who is defined in AAA Server, can access to the switch via Telnet. For this, we will also define telnet login method on Cisco switch.
Now, let’s see that what will we do in this Packet Tracer Configuration lesson step by step:
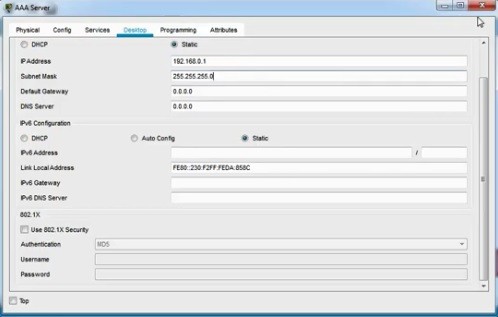
Our AAA Server IP will be 192.168.0.1/24. We will configure it on the server. We can configure it in the desktop, ip configuration part.
On the switch, we will give an IP address to VLAN 1 interface. Then we will use “no shutdown” command to open this vlan interface.
Switch# configure terminal
Switch(config)# interface Vlan 1
Switch(config-vlanif)# ip address 192.168.0.2 255.255.255.0
Switch(config-vlanif)# no shutdown
Switch(config-vlanif)# end
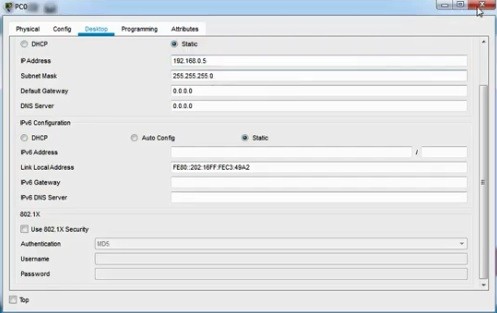
We will configure the IP addressses of each PC and Laptop like below:
PC0 : 192.168.0.5/24
PC1 : 192.168.0.6/24
Laptop : 192.168.0.7/24
After the configurations, we will successfully ping from PCs to switch VLAN interface and AAA Server Address.
On the switch we will define the below AAA configuration steps. Firstly, we will enable AAA with “aaa-new model” command.
Switch(config)# aaa new-model
Then, we will define username and password for our user. Here, our username will be “ipcisco” and password will be “abc123”.
Switch(config)# username ipcisco password abc123
In this step we will define the authentication as TACACS+ and we will set the used list name. Here, our list name is IPCISCOAUTH here.
Switch(config)# aaa authentication login IPCISCOAUTH group tacacs+ local
At the end of our command, there is a keyword “local”. This provide using username database for authentication. We can use “enable” instead of this. At tthat time, enable password is used for authentication.
In this step, we will set the TACACS+ Server that we will use with a key. This key will be “xyz”. It is used only between the switch and the TACACS+ Server.
Switch(config)# tacacs-server host 192.168.0.1 key xyz
We will configure telnet sessions to use IPCISCOAUTH as login authentication.
Switch(config)# line vty 0 4
Switch(config-line)# login authentication IPCISCOAUTH
In this step we will configure TACACS+ Authorisation with the below commands. Here, “exec” command configures TACACS+ only if the users has privileged “exec” access. Instead, we can use “network” keyword, to configure for this for all network services.
Switch(config)# aaa authorisation exec default group tacacs+
In this step we will set accounting for TACACS+. Here, again there is an “exec” command and a “network” command. “exec” is used for priviledged exec mode and “network” is used for all network activities.
Switch(config)# aaa accounting exec start-stop tacacs+
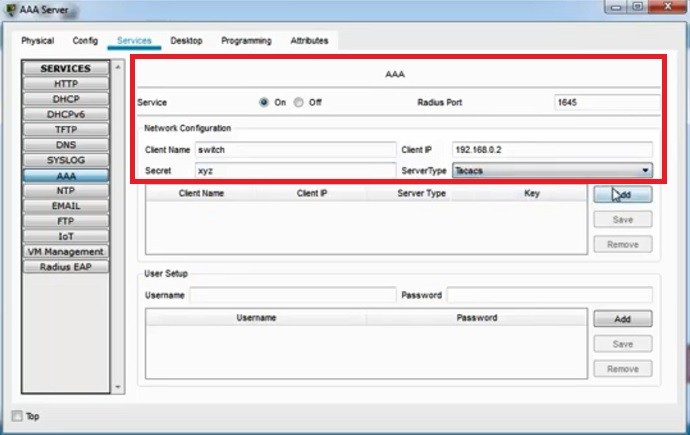
On the AAA Server, we will go to the services tab and in this tab, we will select AAA at the left hand. In here, we will enable the service with selecting “on” and we will do the required configuration.
We will set the client name, here, our client name is switch (swithc’s name).
We will set the client IP, it is 192.168.0.2 (VLAN 1 Interface IP).
We will set the secret key, it is “xyz” like we have configured on switch.
We will set the server type as TACACS.
After setting all these, we will add this to the configuration with “add” button.
After that we will set the user setup part with the user login information. We have also set these credentials like below:
username : ipcisco
password : abc123

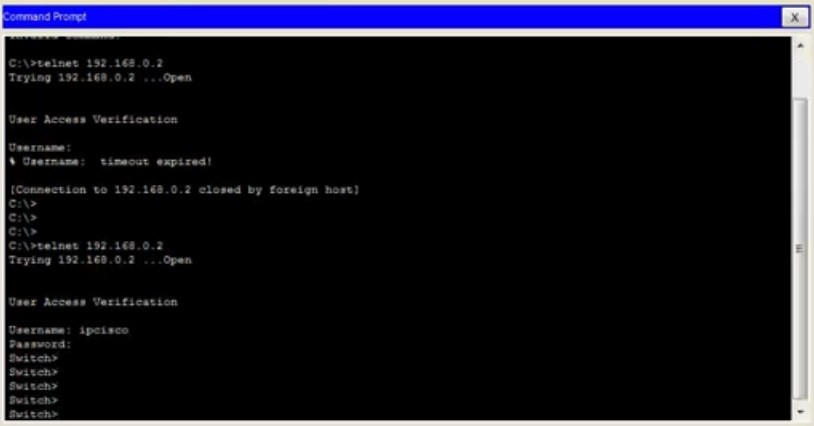
Testing TACACS+ Via Telnet
After all these configurations, we will test our TACACS+ Configuration via Telnet. TO do this, we will enter the command prompt on a PC and then start a telnet session towards the switch VLAN interface 1.
C:\> telnet 192.168.0.2
After this command, we will be asked username and password. With our user credentials, we will access the switch cli.
username : ipcisco
password : abc123


Great Lab and thank you for the experience.
Thank you very much, always welcome Jr ;)
Very clear instruction with given explanation was awesome! This is not something that you come by everyday when learning Cisco, and I have only seen it with less than 5 people who instruct.
Deverick
Thank you very much for your kind words Deverick :) I hope you will benefit from IPCisco during your career a lot. Good luck! Gokhan
Great lab! Thanks for sharing
Always welcome Boyle ;) Enjoy!
thanks for sharing and detail explanation
Always welcome Iqra. Enjoy!
Thank you for this reference.
Always welcome Nmin :) Good luck!