- COURSES
- SPECIALS
- BLOG
- MEMBERS
- SHOP
- ABOUT
- ENROLL HERE

Table of Contents
SSH (Secure Shell) is one of the most used protocols in network World. As a secured alternative of Telnet, SSH is always in the life of a network engineer. It helps us to connect our routers, swithces and any other network equipments. Especially because of SSH is more secure, it is always prefered more than Telnet. In this lesson, we will focus on SSH Configuration on Cisco routers and we will learn how to configure ssh on cisco routers with cisco packet tracer. Here you will learn configuring SSH with Cisco SSH Config Example. By the way, the default SSH port is TCP port 22.

So, what will we do in SSH configuration tutorial for Cisco routers and what will be our SSH Config steps? In this example, we will go through the below six steps one by one:
So, let’s start SSH Configuration and see how is the backplane config of our SSH connection on routers.
You can visit Cisco Hands On Course with Packet Tracer
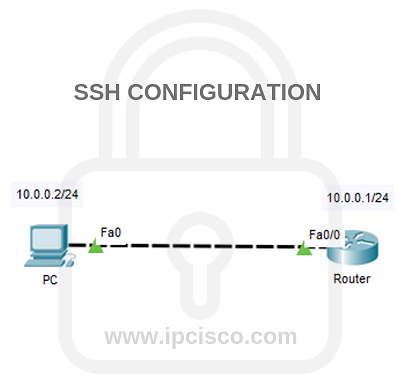
Before configuring SSH, firstly, we will configure IP addresses of router interface and the PC. We will use the below IP addresses:
Router fa0/0 Interface
IP : 10.0.0.1
Subnet : 255.255.255.0
PC
IP : 10.0.0.2
Subnet : 255.255.255.0
Gateway : 10.0.0.1
Router  # configure terminal
Router (config) # interface fa0/0
Router (config-if) # ip address 10.0.0.1 255.255.255.0
Router (config-if) # no shutdown
We need to change the default router name to generate rsa key. Here, the default name is Router, let’s change this name to ABC.
Router (config) # hostname ABC
In this step, we will set the domain name. Our domain name will be SSHabc. And after that, we will encrypt the data in it with “crypto key generate rsa” command.
During this configuration we will set the module sizes. So we will use 512 here.
ABC (config) # ip domain-name SSHabc
ABC (config)# crypto key generate rsa general-keys modules 512
This step is the classical user definion on the router. We will do it with username, password and the priviledge level. Our user is gokhan, password is abc123 and the priviledge mode is 15.
ABC (config) # username gokhan privilege 15 password abc123
We will use this username and password for SSH connection.
The main configuration step of this Configuring SSH lesson is this step. Here, we will do the SSH configuration in line mode.
Firstly, we will go to line mode and configure SSH for 16 users from 0 to 15. And then we will use “transport input ssh”. This command will allow only SSH access. Telnet accesses will be rejected.
Then, we will set the login as local with “login local” command. With this command, we can use local router users to ssh access.
After that , we will configure the the version of SSH. There are two SSH versions, SSH version 1 and SSH version 2. The second one provide more enhanced security agorithm. Here, we will use SSH version 2. To configure it, we will use “ip ssh version 2” command.
Lastly, we will save our SSH Configuration.
ABC (config) # line vty 0 15
ABC (config-line) # transport input ssh
ABC (config-line) # login local
ABC (config-line) # ip ssh version 2
ABC (config-line) # end
ABC # write
At the last step of Configuring SSH, SSH Config Example, we can try to connect via SSH from PC to the router. To do this, we will open the command line on the PC and connect to the router with the below command. Here our Router interface ip is 10.0.0.1.
PC> ssh –l gokhan 10.0.0.1
Most Cisco IOS routers support SSHv1 by default, but SSH v2 is more secure.
Sure. You can configure both of them. But it’s recommended to use only SSH for security.
Yes, the router must have a hostname and domain name configured for SSH key generation.
iam interesting to make course.
You are always welcome Silva:)