
- COURSES
- SPECIALS
- BLOG
- MEMBERS
- SHOP
- BOOKSHELF
- ABOUT
- ENROLL HERE

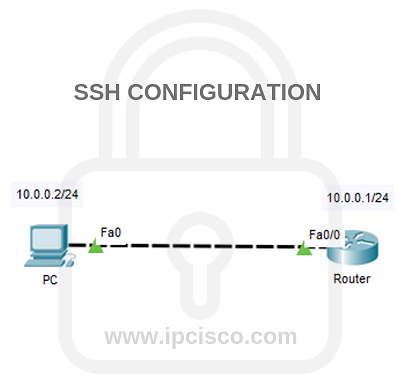
Table of Contents
SSH (Secure Shell) is a secure remote access protocol used to manage network devices such as routers, switches, firewalls, and servers. It provides a secure alternative to Telnet by encrypting all communication between the client and the remote device, protecting usernames, passwords and transmitted data from eavesdropping. Because of its strong security features, SSH is the preferred method for remote device management in modern networks. In this lesson, we will focus on SSH Configuration on Cisco routers and we will learn how to configure ssh on cisco routers with cisco packet tracer. Here you will learn configuring SSH with Cisco SSH Config Example. By the way, the default SSH port is TCP port 22.
So, what will we do in SSH configuration tutorial for Cisco routers and what will be our SSH Config steps? In this example, we will go through the below six steps one by one:
So, let’s start SSH Configuration and see how is the backplane config of our SSH connection on routers.
You can visit Cisco Hands On Course with Packet Tracer
Before configuring SSH, firstly, we will configure IP addresses of router interface and the PC. We will use 10.0.0.1/24 ip address on router fastethernet0/0 interface. On PC, we will use 10.0.0.2/24 ip address. And as default-gateway, we will set 10.0.0.1
Router  # configure terminal
Router (config) # interface fa0/0
Router (config-if) # ip address 10.0.0.1 255.255.255.0
Router (config-if) # no shutdown
We need to change the default router name to generate rsa key. Here, the default name is Router, let’s change this name to ABC.
Router (config) # hostname ABC
ABC (config) # hostname ABC
Before generating the RSA key pair, the router must have both a hostname and a domain name configured. SSH uses these values to generate the RSA keys required for secure communication.
Note: SSH requires both a hostname and a domain name before RSA keys can be generated. If either one is missing, the router will not allow RSA key generation.
In this step, we will configure the domain name as SSHabc and then generate the RSA key pair by using the crypto key generate rsa command.
During the RSA key generation process, we need to specify the modulus size, which determines the strength of the encryption key. In this Packet Tracer example, we will use a 512-bit modulus for simplicity. In production environments, however, Cisco recommends using a modulus size of at least 2048 bits for better security.
In production networks, Cisco recommends using a modulus size of at least 2048 bits. In this Packet Tracer example, we will use 512 bits to simplify the configuration.
ABC (config) # ip domain-name SSHabc
ABC (config)# crypto key generate rsa general-keys modulus 512
After the RSA key pair is generated successfully, the router is ready to accept SSH connections.
In this step, we will create a local user account that will be used for SSH authentication. The user account consists of a username, a password and a privilege level. In this example, we will create a user named gokhan with the password abc123 and assign it privilege level 15, which provides full administrative access to the router.
ABC (config) # username gokhan privilege 15 password abc123
The username command creates a local user account in the router’s configuration. The privilege parameter specifies the user’s privilege level, while the password parameter defines the password required for authentication.
Later in this lesson, we will configure the router to use this local user database for SSH authentication by applying the login local command on the VTY lines. Once SSH is configured, users must enter this username and password to establish a secure remote session with the router.
The main configuration step of this Configuring SSH lesson is this step. Here, we will do the SSH configuration in line mode.
Firstly, we will configure the the version of SSH. There are two SSH versions, SSH version 1 and SSH version 2. The second one provide more enhanced security agorithm. Here, we will use SSH version 2. To configure it, we will use “ip ssh version 2” command.
Secondly, we will go to line mode and configure all 16 VTY lines (0–15).
And then we will use “transport input ssh”. This command will allow only SSH access. Telnet accesses will be rejected.
Then, we will set the login as local with “login local” command. With this command, we can use local router users to ssh access.
Lastly, we will save our SSH Configuration.
ABC (config) # ip ssh version 2
ABC (config) # line vty 0 15
ABC (config-line) # transport input ssh
ABC (config-line) # login local
ABC (config-line) # end
ABC # write
At the last step of SSH configuration example, we can try to connect via SSH from PC to the router. To do this, we will open the command line on the PC and connect to the router with “ssh -l gokhan 10.0.0.1” command. Here 10.0.0.1 is our Router interface IP address.
PC> ssh -l gokhan 10.0.0.1

Open

Password:

ABC#
To check if SSH is active or not, we use “show ip ssh” command.
ABC# show ip ssh

SSH Enabled - version 2.0

Authentication timeout: 120 secs

Authentication retries: 3
To see the active ssh sessions, we use “show ssh” command.
ABC# show ssh

Connection Version Mode Encryption Hmac State                 Username

0          2.0     IN   aes128    sha1 Session started        gokhan
To check VTY configuration we can use “show running-config | section vty” command.
ABC# show running-config | section vty

line vty 0 15

login local

transport input ssh
To check RSA, we will use “show crypto key mypubkey rsa” command.
ABC# show crypto key mypubkey rsa

% Key pair was generated at:

09:41:15 UTC Jul 14 2026

Key name: ABC.SSHabc

Usage: General Purpose Key

Key Data:

3082010A0282010100...
Most Cisco IOS routers support SSHv1 by default, but SSH v2 is more secure.
Sure. You can configure both of them. But it’s recommended to use only SSH for security.
Yes, the router must have a hostname and domain name configured for SSH key generation.

Gokhan Kosem is a Network Engineer, Instructor and the Founder of IPCisco.com with 15+ years of experience in Cisco, Nokia, Huawei, Juniper, Linux, Service Provider Networks, Routing and Switching technologies.
He has worked on the backbone networks of major service providers and network vendors including Nortel, Alcatel-Lucent (Nokia) and has extensive hands-on experience with Cisco, Huawei, Juniper and Nokia networking technologies.
He has trained thousands of networking students worldwide through IPCisco.com, Udemy, books, labs, quizzes, and educational content across multiple social media platforms.
IPCisco.com | Best Route to Your Dreams





iam interesting to make course.
You are always welcome Silva:)