
- COURSES
- SPECIALS
- BLOG
- MEMBERS
- SHOP
- BOOKSHELF
- ABOUT
- ENROLL HERE

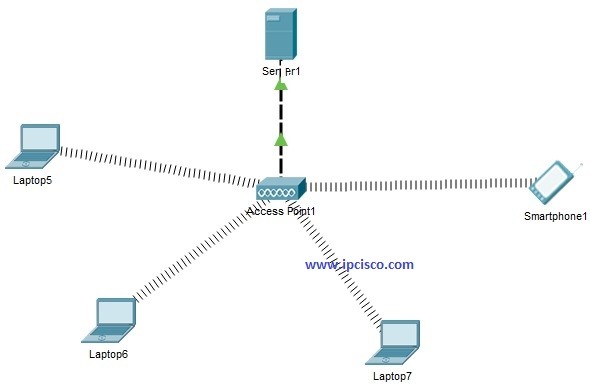
Table of Contents
WLANs (Wireless LANs) are very common in today’s World. Everywhere there are a lot of wireless networks. Even now, you are in many of these wireless signals. It is not an healthty life but they are in our lives. In this lesson we will focus WLAN Packet Tracer Configuration and we will learn How to Configure a WLAN on Packet Tracer.
In this Cisco WLAN Configuration on Packet Tracer example, we will build a simple wireless network and connect laptops to the WLAN through an Access Point. We will also configure a DHCP Server to dynamically assign IP addresses to wireless clients.
During this Packet Tracer lab, we will install wireless network interfaces on the laptops, establish wireless connectivity, check IP addressing before DHCP configuration, configure the DHCP service and finally verify the WLAN connection.
You can reach all Cisco packet tracer config files on Cisco Packet Tracer Labs
Now, let’s sumamrize what will we do for Packet Tracer WLAN Configuration :
Cisco Packet Tracer WLAN Configuration Topology
By default laptops has classic Ethernet card. To involve in a wireless network, we should have wireless interface card. So, in each laptop, we should turn off the laptop, remove the classical Ethernet, instead of it we place Wireless Interface Card (WPC300N). Then, we power on the laptop again.
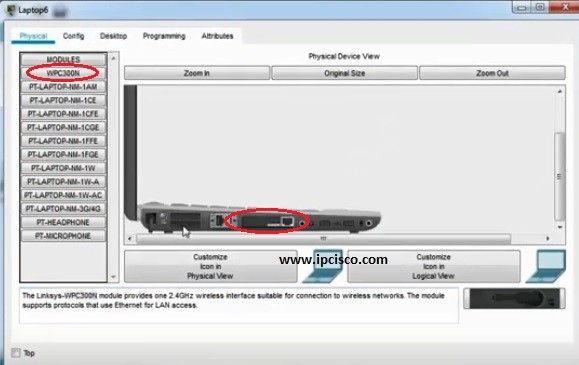
Removing Ethernet Interface Card
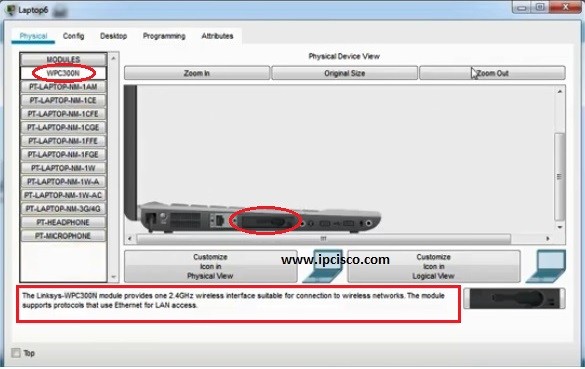
Wireless Interface Card Installation
After this processi each laptop connects to th wireless Access Point in Packet Tracer. Smartphone devices in Packet Tracer connects to Access Points (AP) by default. So, there is nothing to do on them.
You can also check GNS3 Configurations Labs
In this basic Packet Tracer WLAN lab, we can use the Access Point with its default wireless settings. Therefore, additional Access Point configuration is not required before connecting the wireless clients.
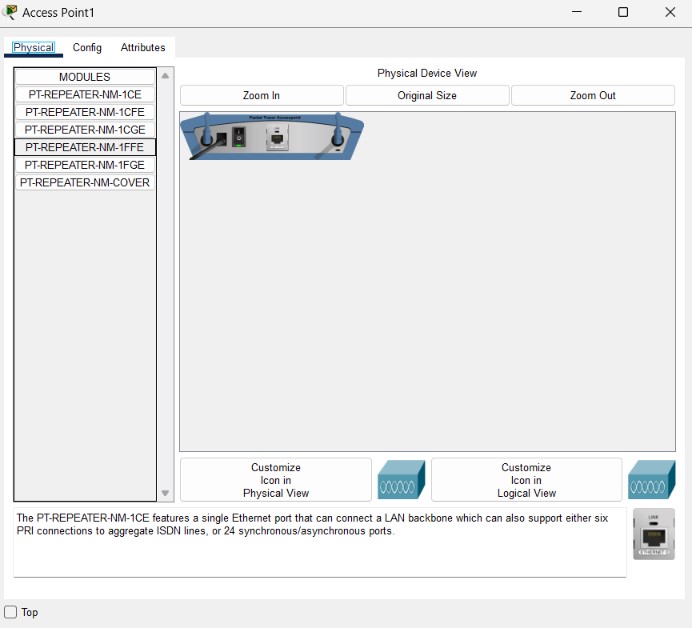
Wireless Access Point on Packet Tracer
The Access Point provides the wireless connection between the WLAN devices and the wired network. Once the laptops have compatible wireless interfaces, they can detect the wireless network provided by the Access Point.
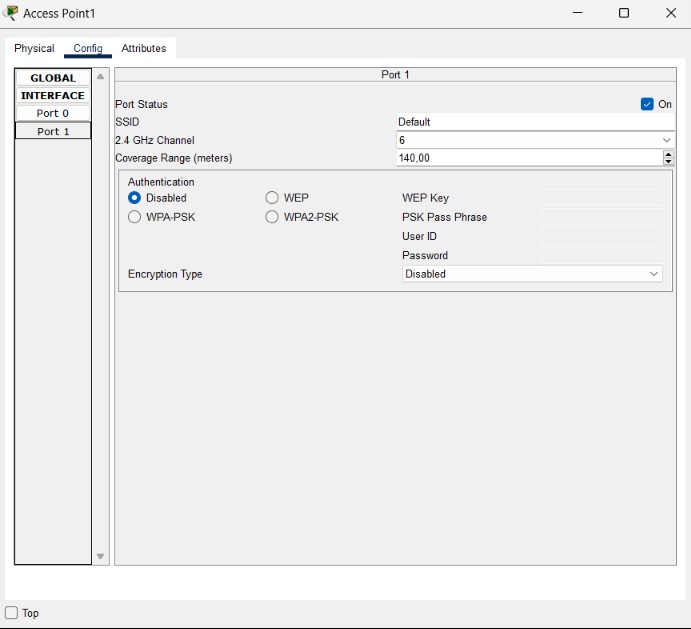
Wireless Access Point Configuration – Config Tab
In real-world wireless networks, however, parameters such as SSID, authentication, wireless security and channel selection are usually configured according to the network requirements.
We will check the IP addresses of the laptops. For now, chekcing only one of them is enough. Because, at the beginning if there is no Static IP Configuration and no DHCP, an IP from a special block is assigned to the devices. This is APIPA (Automatic Private IP Addressing) addresses. These addresses are from the block “169.254.x.x/25”. Simple, when we say this type of IP address in a device, we can say that it has no IP address.
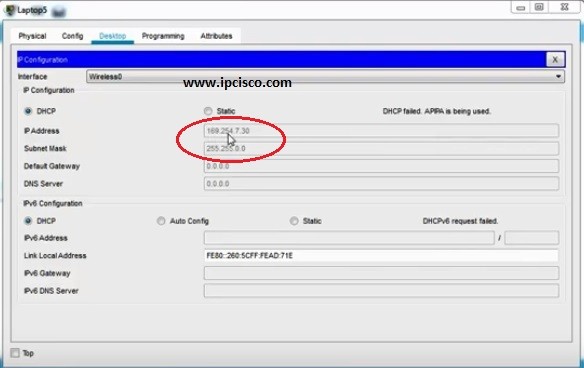
APIPA Address on Host
In this step, we will configure our DHCP Server in the WLAN. This server will give IP addresses to our devices who are connected to the Access Point.
In the Services tab of Server, we will go through the DHCP at the left hand. In here, we will define our IP Pool. For this configuration example our DHCP Pool’s name is “IPCisco Pool”. Beside, we will configure the Default Gateway, DNS Server IP addresses. After that we will configure the starting IP and Subnet Mask. DHCP server will start IP asssignition with this IP. And for this example, we have created 254 IP for our IP Pool. We also assign this value on this screen.
After this configuration, we should not forget to “on” our DHCP Service at the top and then, we add our DHCP Pool to the configuration with “add” button.
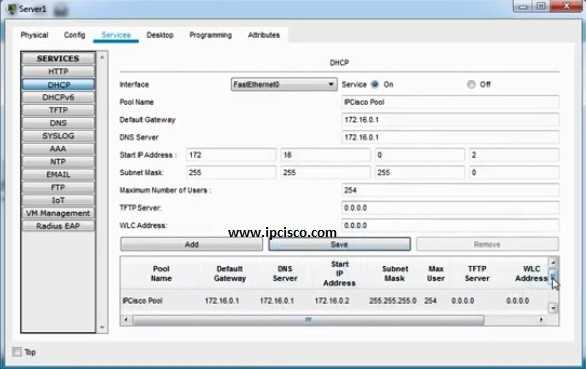
DHCP Server Configuration – Services Tab
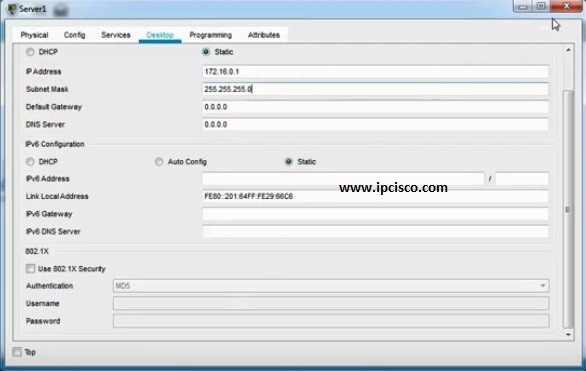
After DHCP Services configuration on DHCP Server, we will configure one more thing on this DHCP Server. This is the IP address and subnet mask of the Server. Here, our Servr IP address will be 172.16.0.1 and the mask will be 255.255.255.0.
Laptop IP Address Assigned by DHCP – Desktop Tab
After configuring the DHCP Server, let’s check the IP configuration of our wireless devices again. This time, the devices should receive IP addresses from the DHCP Pool that we have configured.
Let’s check the IP configuration of one of our laptops.
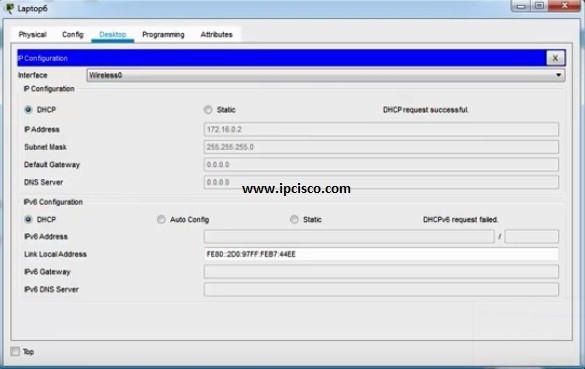
Laptop IP Address Assigned by DHCP – Desktop Tab
At first, you may still see the previously assigned APIPA address. In Packet Tracer, you can select Static and then select DHCP again to request a new IP configuration from the DHCP Server.
After this process, the laptop should receive an IP address from our configured DHCP Pool instead of an APIPA address.
We can repeat the same process on the other wireless devices and verify that they also receive their IP configurations from the DHCP Server.
Lastly, let’s verify the communication between our WLAN devices. We can use the ping command from one wireless device to another device in the same network.
For example, we can ping another wireless client from one of our laptops.
PC> ping <destination-ip-address>
If the ping is successful, it shows that our wireless devices can communicate over the WLAN.
In this WLAN Configuration example, we have installed wireless network interface cards on our laptops, used the default Access Point settings, configured DHCP services, assigned IP addresses to our wireless clients and verified WLAN connectivity. With these basic configuration steps, we have created a simple wireless network in Cisco Packet Tracer.
WLAN and Wi-Fi are closely related, but they are not exactly the same. WLAN (Wireless Local Area Network) describes a local network that uses wireless communication, while Wi-Fi refers to a family of wireless networking technologies based on IEEE 802.11 standards. In most home and enterprise networks, Wi-Fi is the technology used to create a WLAN.
To configure a wireless LAN in Cisco Packet Tracer, add an Access Point and wireless clients, install wireless network interfaces if required, connect the clients to the WLAN and configure IP addressing. You can use a DHCP server to automatically assign IP addresses and then verify connectivity using the ping command.
A wireless Local Area Network can be created by using a wireless Access Point to connect Wi-Fi-enabled devices to the local network. We can assign ip addresses to hosts manually or we can use DHCP Server to assign ip addresses automatically.
Yes. In this Cisco Packet Tracer WLAN lab, we will use GUI (Graphical User Interface). We will install wireless interfaces, connect laptops to the wireless network, configure IP settings and set up DHCP services through the device configuration windows.

Gokhan Kosem is a Network Engineer, Instructor and the Founder of IPCisco.com with 15+ years of experience in Cisco, Nokia, Huawei, Juniper, Linux, Service Provider Networks, Routing and Switching technologies.
He has worked on the backbone networks of major service providers and network vendors including Nortel, Alcatel-Lucent (Nokia) and has extensive hands-on experience with Cisco, Huawei, Juniper and Nokia networking technologies.
He has trained thousands of networking students worldwide through IPCisco.com, Udemy, books, labs, quizzes, and educational content across multiple social media platforms.
IPCisco.com | Best Route to Your Dreams





Leave a Reply